| Bookmark Name | Actions |
|---|
Manage Users
Use the feature to create and manage internal users (administrator). This feature is applicable only to the Super Administrator. Employees need a user account on Spotlight to login and use the application as required.
Menu path: Employee Management > Users
The app displays the list of active and suspended users who have access to the application. You can do the following:
- View the list of active and suspended users
- Add a new user- assign role and permissions
- View details of a user profile
- Edit user details
- Search for a user
- Change the user status (activate, suspend, or disable)
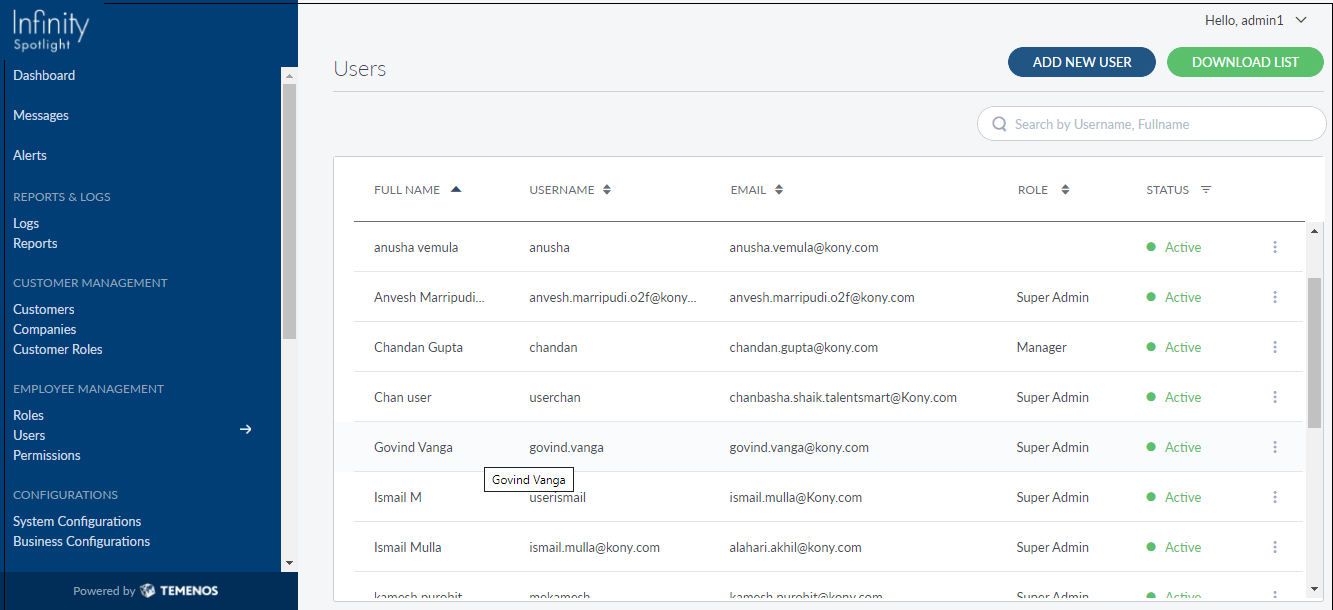
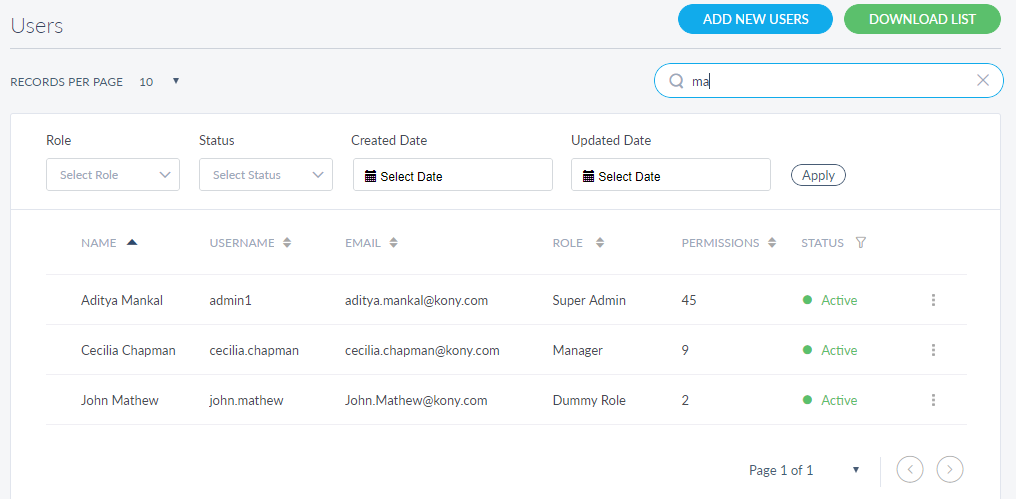
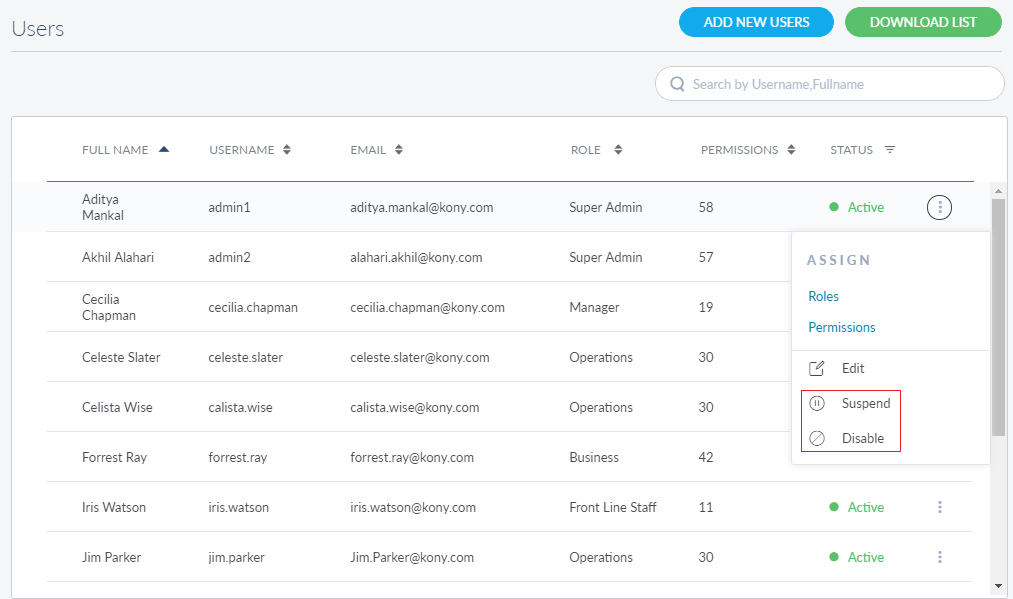
View User List
The app displays the list of active and suspended users (administrators) who have access to the application. Disabled users are not listed by default but appear in the search results if they match the search criteria.
Menu path: Employee Management > Users
The user list is represented as rows with the following details: name, username, email address, role, permissions, and status
The list is sorted by Name by default, but you can sort the list based on any of the columns by using the sort  icon (
 denotes sorted by that column).
Pagination is available and you can navigate to any required page by choosing from the list. You can also choose the number of records that should be displayed on a page (for example, 10, 50, or 100).
You can do the following:
- Click Add New Users to add a user.
- Click a user record to view the user profile details.
- Click Download List to download the complete list of existing users as an excel file.
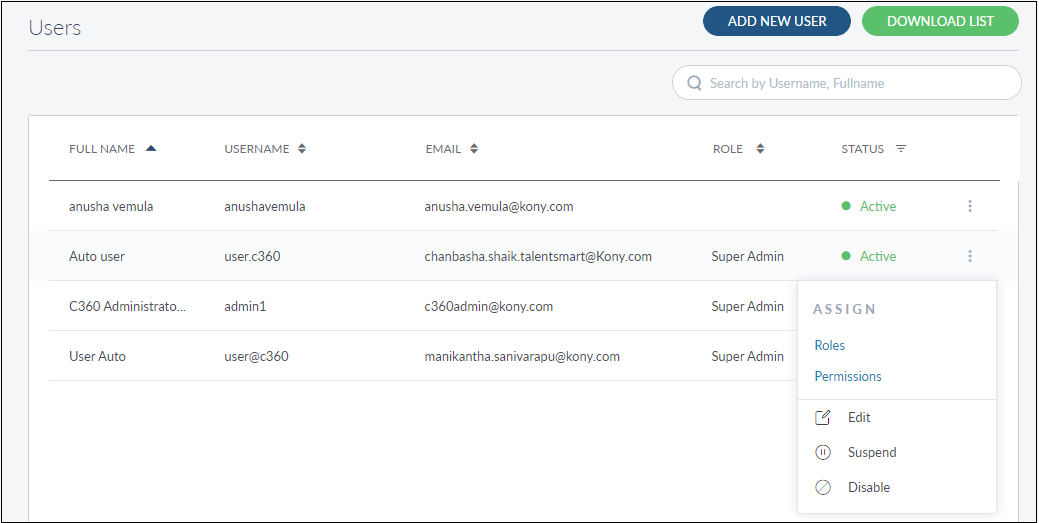
- Click the contextual menuavailable on each row to open and do the following. Click again to close the menu:
- Assign a role and assign permissions to an active user.
- Edit the details of a user record.
- Update the user status based on the current status.
- Search for a user using the search option and search criteria.
Add a User
Use the feature to add an internal user (administrator) and assign a role and associated permissions.
Menu path: Employee Management > Users > Add New Users
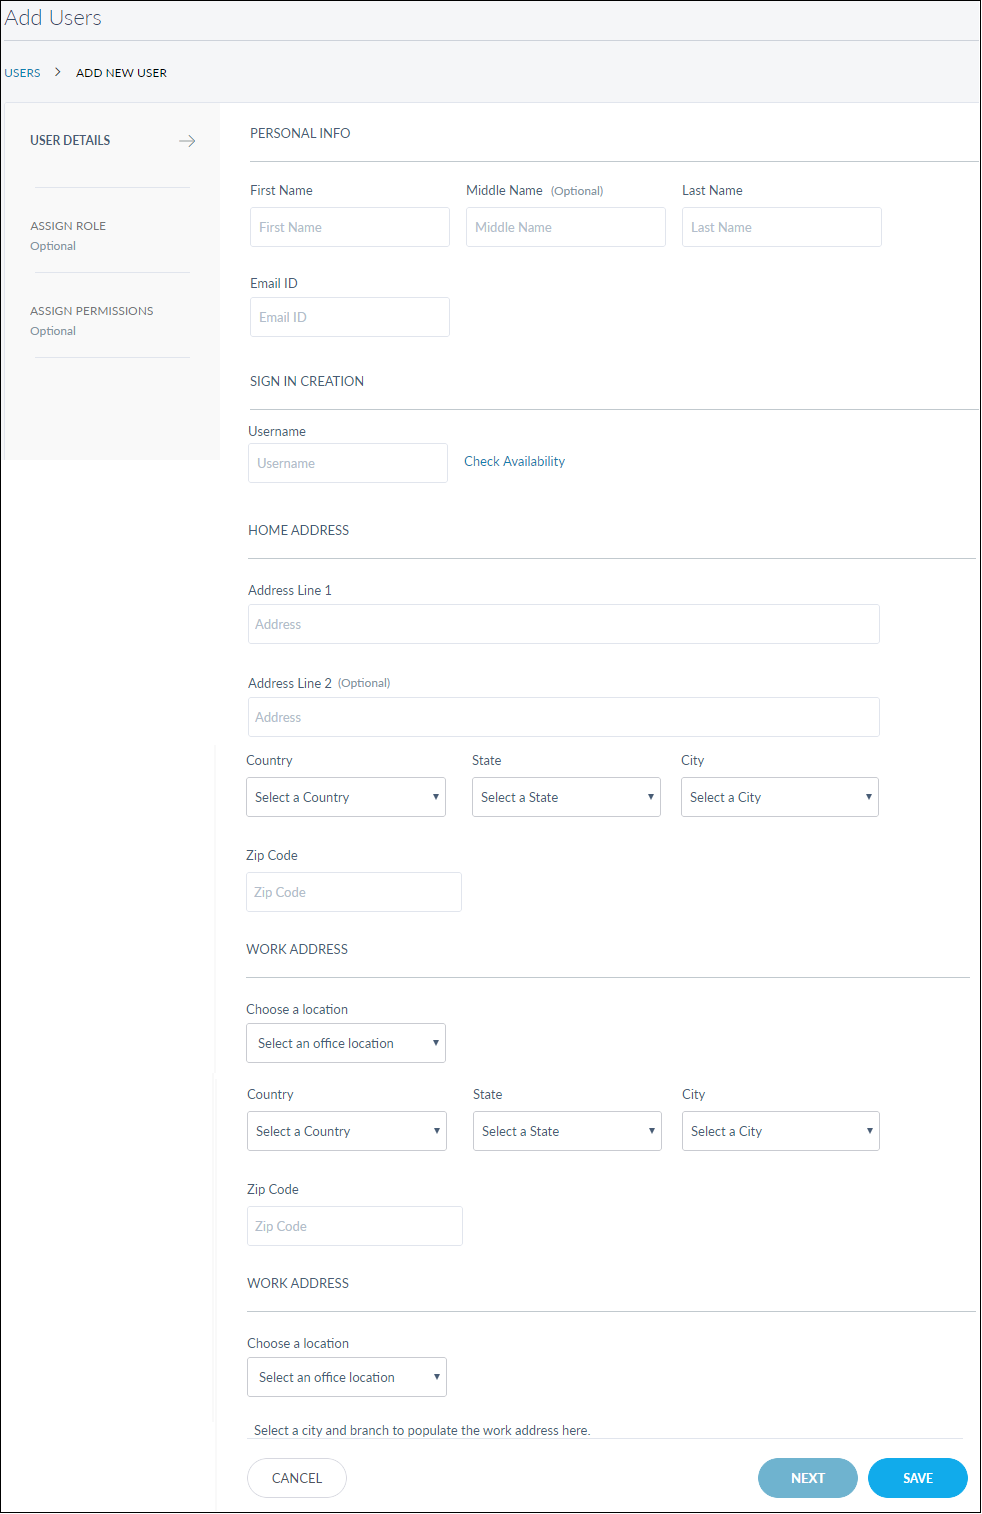
The Add New User screen comprises three steps to capture the required information - User Details, Assign Role, and Assign Permissions.
Step-1: User Details
Add the following details:
- Personal Info: Full Name comprising First Name, Middle Name, Last Name, and Email ID. It is mandatory.
- Login Creation: Username to sign in to the application and check if the username is not already used by another user. If the name is already taken, use a different username. It is mandatory.
- Home Address: Address lines, Zip Code, and select the country, State, and City from the respective lists. It is mandatory.
- Work Address: Select the office location and the corresponding branch location from the respective lists. The app displays the branch address automatically. It is mandatory.
- You can proceed to assign a role to the user by using the Next button or the Assign Role tab (this step is optional), or save the user details directly. The user record is added to the list of users with the status as active. An email notification is sent to the user about the user account with the instruction to set the password. The user will not be able to do any activity post-login until a role is assigned.
NOTE: You can cancel the process at any time. The changes are not saved.
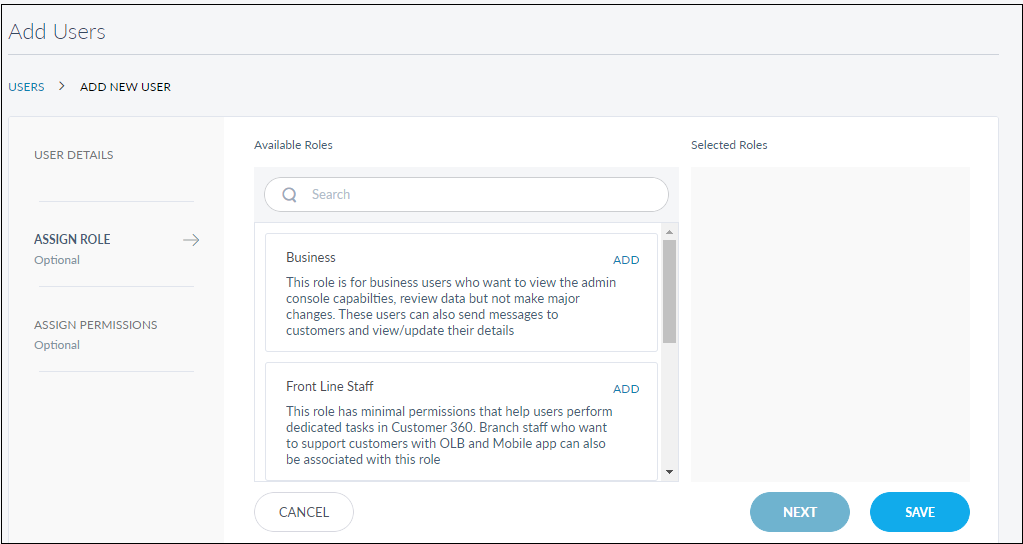
Step-2: Assign Role
This step is optional. The app displays the list of available roles that were created using the Add New Roles feature and the selected roles. In this current version, you can assign only one role to a user.
- From the list of available roles, select the required role. Use the search option to search for a particular role.
- The role is added to the selected roles list. Note that the provision to assign a role is disabled after you selected a role.
- You can remove
 the role from the selected roles list to select another role from the available roles list. Note that the provision to assign a role is enabled after you unassigned a role.
 - In case you need to assign additional permissions to the user other than those associated with the role, proceed to assign permissions by using the Next button or the Assign Permissions tab (this step is optional). Otherwise, save the user details directly. The user record is added to the list of users with the status as active. An email notification is sent to the user about the user account with the instruction to set the password.
Step-3: Assign Permissions
This step is optional. The app displays the list of additional permissions that you can assign to the list of permissions already associated with the selected role. These permissions are additional permissions that are not already available in the user's role.
- From the list of available permissions, select the required permission. Use the search option to search for particular permission. You can also use the Add All option to select the entire permission list.
- The permission is added to the selected permissions list along with the permissions already associated with the selected role.
- You can remove the permission that you assigned from the selected permissions list to select another permission from the available permissions list. Note that you cannot remove the permissions that are already associated with the role. You can also use the Remove All option to remove all the selected permissions.
- Save the user details. The user record is added to the list of users with the status as active.
An email notification is sent to the user about the user account with the instruction to set the password.

View User Profile Details
Use the feature to view the details of the selected user (administrator) record and edit the details if required.
Menu path: Employee Management > Users > Click a user row
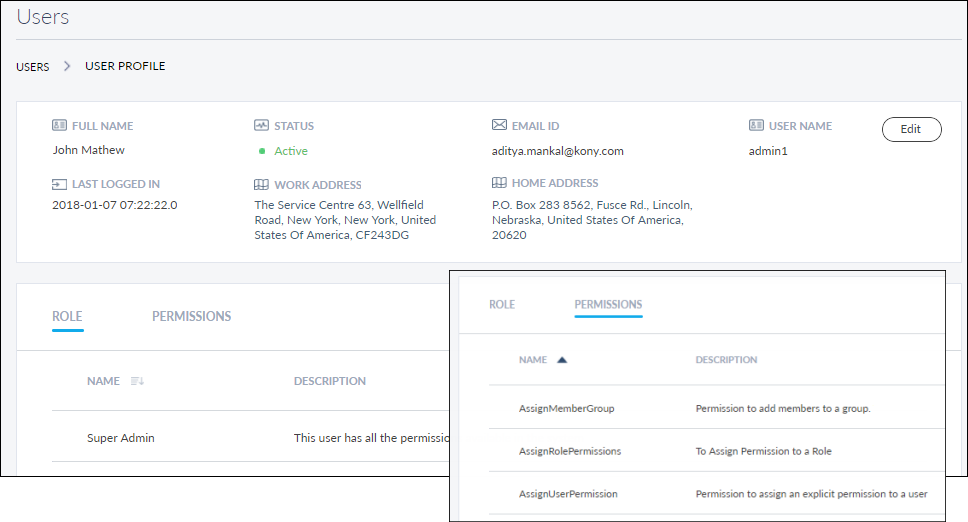
The app displays the following details on the User Profile screen:
- Full name
- Status: It can be active, inactive, or suspended
- Email ID
- User name
- Work Address
- Home Address
- Last logged date and time
- Role Tab: Role of the user (for example, Super Admin)
- Permission Tab: List of Permissions that this user has as inherited from the assigned role or additionally assigned to the user (for example, permission to add users, assign permissions to a role). Sort the name using the sort icon ( denotes sorted by that column). The list contains the Permission Name and Description.
Edit User Details
Use the feature to edit the details of the selected user (administrator) record.
Menu path: Employee Management > Users > User Profile screen > Edit
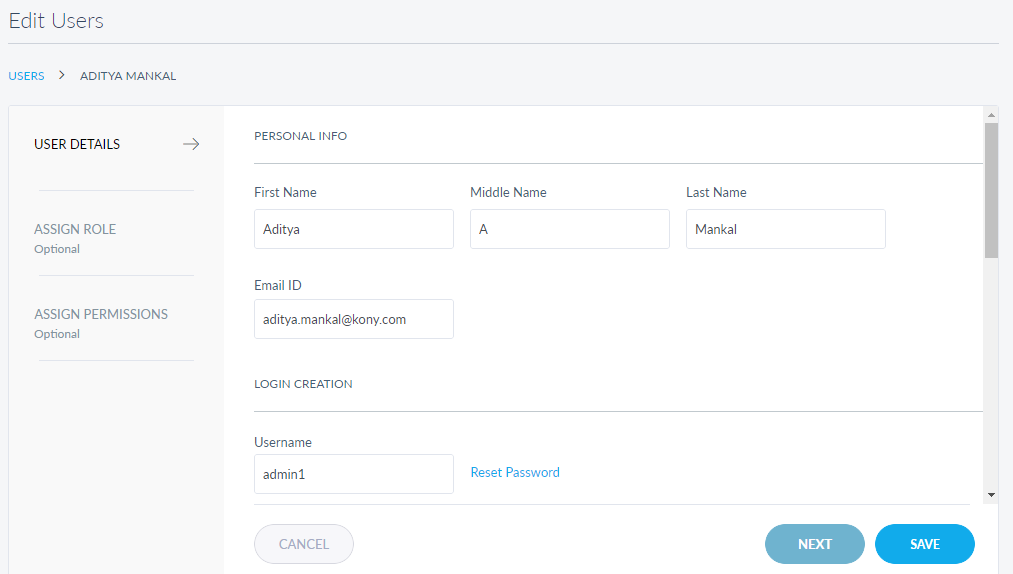
The edit screen is similar to the add a user screen with the provision to modify the details. Make the changes as required:
- Full Name
- Email ID
- Username. Make sure that the username is not already used by another user.
- Home Address
- Work Address
- Status
- Assign Role
- Assign Permissions
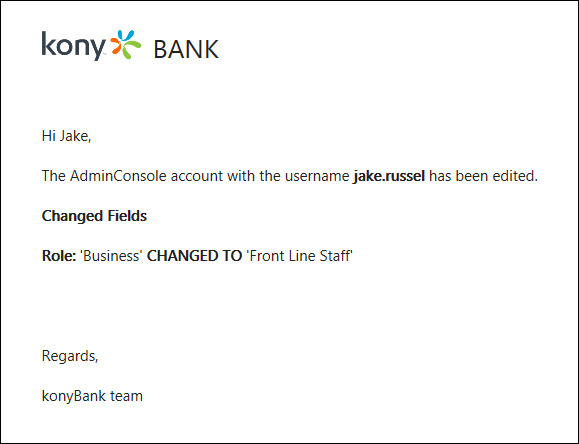
Make the required changes on the User Details, Assign Role, and Assign Permissions tabs, and save the details. An email notification is sent to the user about the changes.
Note: You can cancel the process at any time. The changes are not saved.
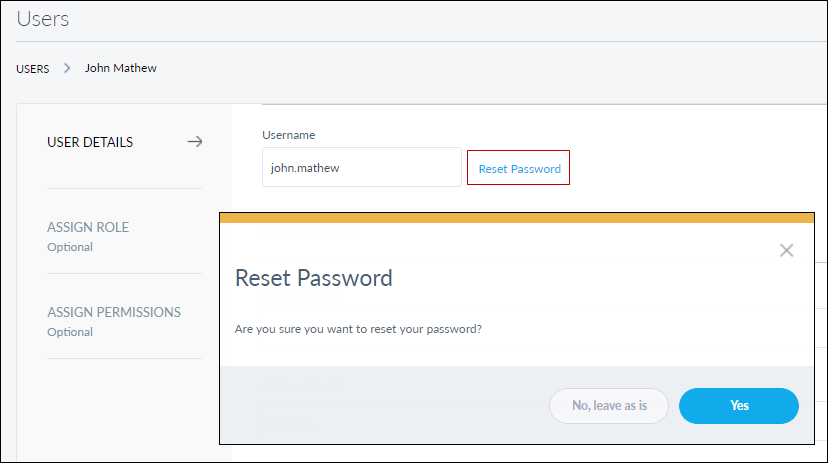
Reset Password
Reset the password if required on the User Details tab. The app sends the reset password link to the registered email ID. This option is available only in the Edit mode.
Search for a User
Use the search option to search for a particular user using search criteria and download the list of matching records as an excel file, if required.
Menu path: Employee Management > Users > Search
Enter the search keyword (username and name) in full or in part. The app displays the matching records automatically. The Search result also lists the Disabled Users which are not listed otherwise.
You can filter the list by role, status, updated date, or created date.
- Role: Pick from the list
- Status: Pick from the list (active, suspended, or inactive)
- Updated Date: Pick a specific date, select from a list of preset date sets (last 7 days, last 30 days), or select a custom date range (From and To)
- Created Date: Pick a specific date, select from a list of preset date sets (last 7 days, last 30 days), or select a custom date range (From and To)
Click Download List to download the list of users matching the search criteria as an excel file if required.
Update User Status
Use the feature to update the status of a user.
Menu path: Employee Management > Users > Contextual menu
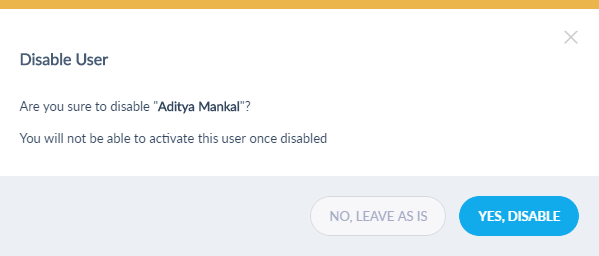
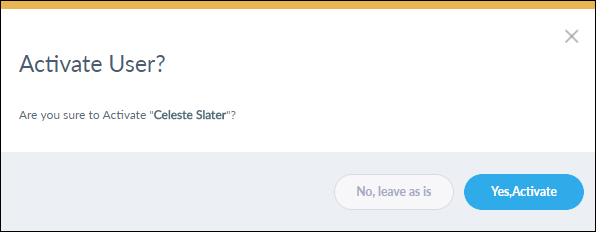
Click the contextual menu available on each row and update the status based on the current status of the user. The following statuses are available: Activate, Suspend, and Disabled. For example, if the current status of a user is Active, you can Suspend or Disable the user.
- Active: User can perform all activities as per his role and permissions
- Suspended: Temporarily preventing the user from logging in. User can either be suspended due to multiple incorrect login attempts or by a Super Admin user for any reason deemed necessary. Status can be changed to Active at any time by a user with Super Admin role.
- Disabled: The user will not be able to log in and this state cannot be reversed. Once a user is disabled, he cannot be activated again. This state is useful for employees who may have left the Bank/CU but the users details need to be maintained for audit purpose.
On the confirmation screen, confirm the action. The status of the user is updated as required.
Various status confirmation screens

Add Bookmark
save your best linksView Bookmarks
Visit your best links BACK
BACK


Are you sure you want to log-off?