| Bookmark Name | Actions |
|---|
User Management
The user management feature provides the following self-service options for business owners and other authorized users of business/company.
- View the list of enrolled business users.
- Create new business users and manage information.
- Control role permissions to access features and actions at user level at the time of user creation or editing the user permissions after the user has been created.
- Activate or suspend a business user.
- Distinguish between logged-in user and other users in the user list. The logged-in user record is marked with (Me) after the name, for example - John (Me).
- View own permissions.
The feature is available to only those users who are given explicit permission to manage business users. The business users can access the permitted business accounts in the banking application and perform the activities based on the permissions (access to features and actions) given to the business user. See Permissions for more information.
At the time of user creation, an authorized user can create a user manually or copy permissions either from an existing custom role or an existing user. The following permissions are copied from the custom role into the user’s profile on selecting the copy permissions option. if necessary, the copied permissions can be modified before confirming the creation of the new user.
- Accounts
- Roles
- Permissions (account level and user level)
- Transaction limits
Menu Path:
- Online Banking: Side Menu > User Management > All Users. The application displays the User Management screen.
- Mobile Banking: Side menu > User Management
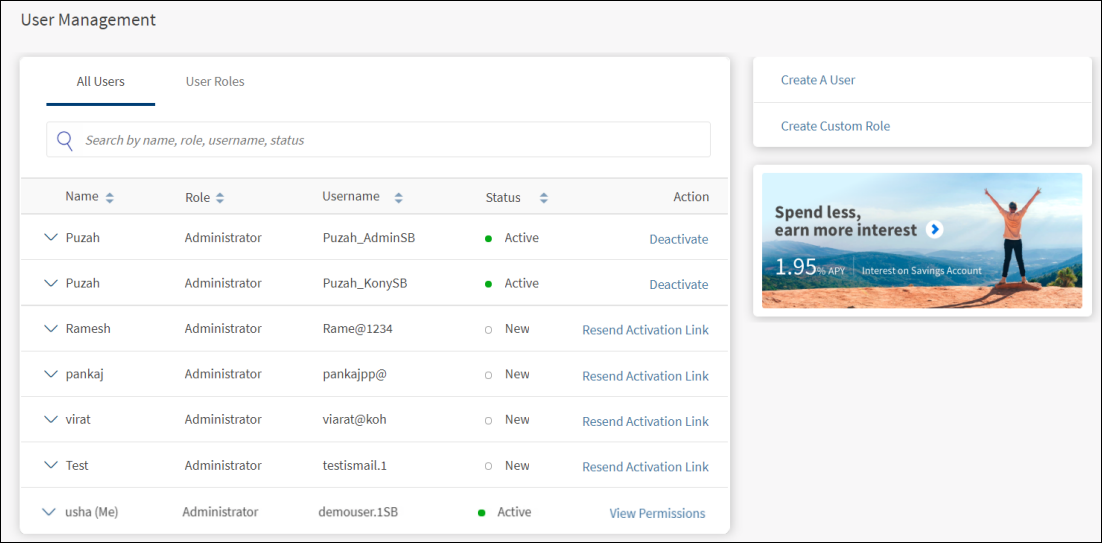
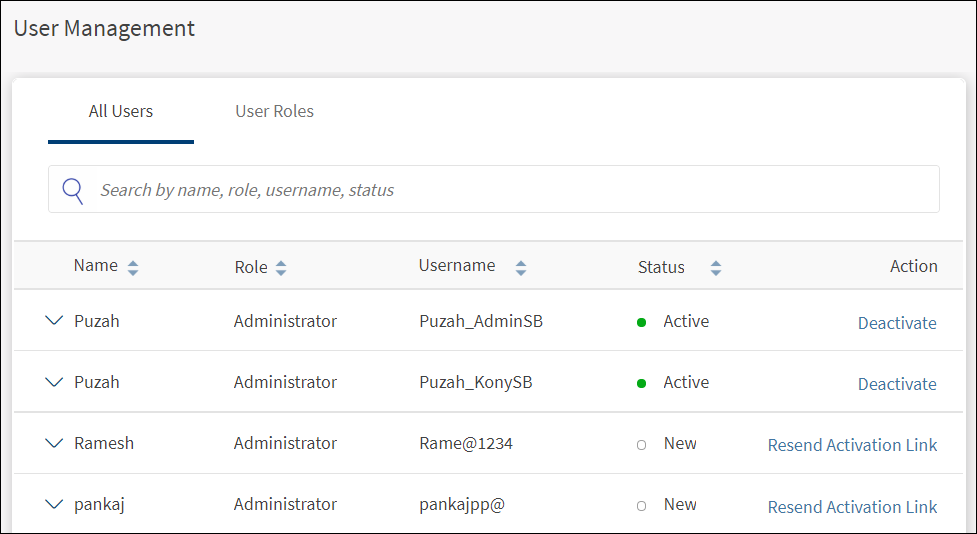
The User Management screen displays the list of business users who have access to the business accounts. This is also the landing page of the user management module. You can do the following:
- View the business users list
- View business user details
- Edit business user details (manage user)
- Create business user
- Search for a business user
- Change business user status
Feature Actions
Within the User Management feature, various feature actions are available. The following are the revised feature actions:
| Feature Action | Description |
|---|---|
| View Users | This action is associated with permission for viewing all the users and their list of permissions. |
| Activate/Suspend Users | Single action is associated with permission for activating and deactivating a user. |
| Create Users | Associated with permission for creating a new user. |
| Manage Users | Associated with permission for editing an existing user. A business user can view the list of users and their account access and all the associated permissions. |
View Business Users List
The application displays the User Management screen with a list of business users who have access to the business accounts.
Menu Path: Side Menu > User Management > All Users
The list is represented as rows with the following details of business users:
- Name of the user. The logged-in user can distinguish between self-user and other users in the user list. The logged-in user record is marked with (Me) after the name, for example - John (Me). In online banking application, maximum 15 characters of name is displayed and includes (Me) in case of the logged-in user. If the first name (which is displayed in online banking) is very long, the (Me) suffix part will be truncated.
- Role assigned to the user.
- Username used to sign into the banking application.
- Status - New, Active, or Suspended.
- Actions to activate or suspend a user, send an activation link to new users, and view permissions depending on the permissions available to the business user. The logged-in business user can only view the permissions and cannot edit own permissions even if "Manage Users" permission is enabled in User Management feature.
The list is sorted by Name by default, but you can also sort the list based on Role, Username, or Status using the sort  icon.
icon.
Do any of the following:
- Click Create a User to add a business user.
- Click
 the down arrow to view and edit (manage) the user details.
 - Search for a business user using the search option and search criteria.
- Change business user status (Active and Suspended. For New user, resend the activation link).
- Edit business user details.
- If you are a logged-in user, click View Permissions to view own account permissions. The permissions details are view-only, and the details cannot be edited even if Manage Users permission is enabled in User Management feature.
NOTE: A business user can view the list of users and their account access and all the associated permissions if "View Users" permission under User Management feature is enabled. Expanding the user details displays the, Manage User option. On clicking, the page navigates to user details page. If the business user has only view permission, the Edit button is not visible.
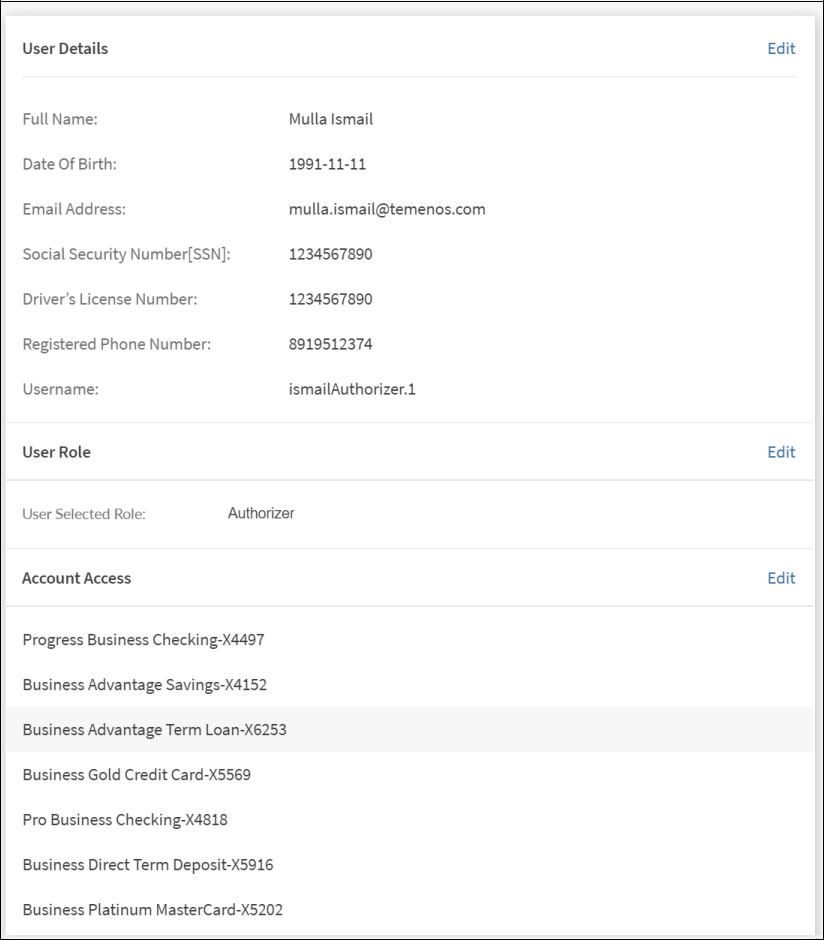
View Business User Details
Use the feature to view the details of a selected business user.
Menu Path: Side Menu > User Management > All Users > Click a user row

The application displays the following details:
- Last signed in date
- Email ID
- Phone Number
- Click Manage User if you want to view additional information and control permissions to access features and actions at user level. The application displays the Manage Users screen.
- If you are a logged-in user, click View Permissions to view own account permissions.

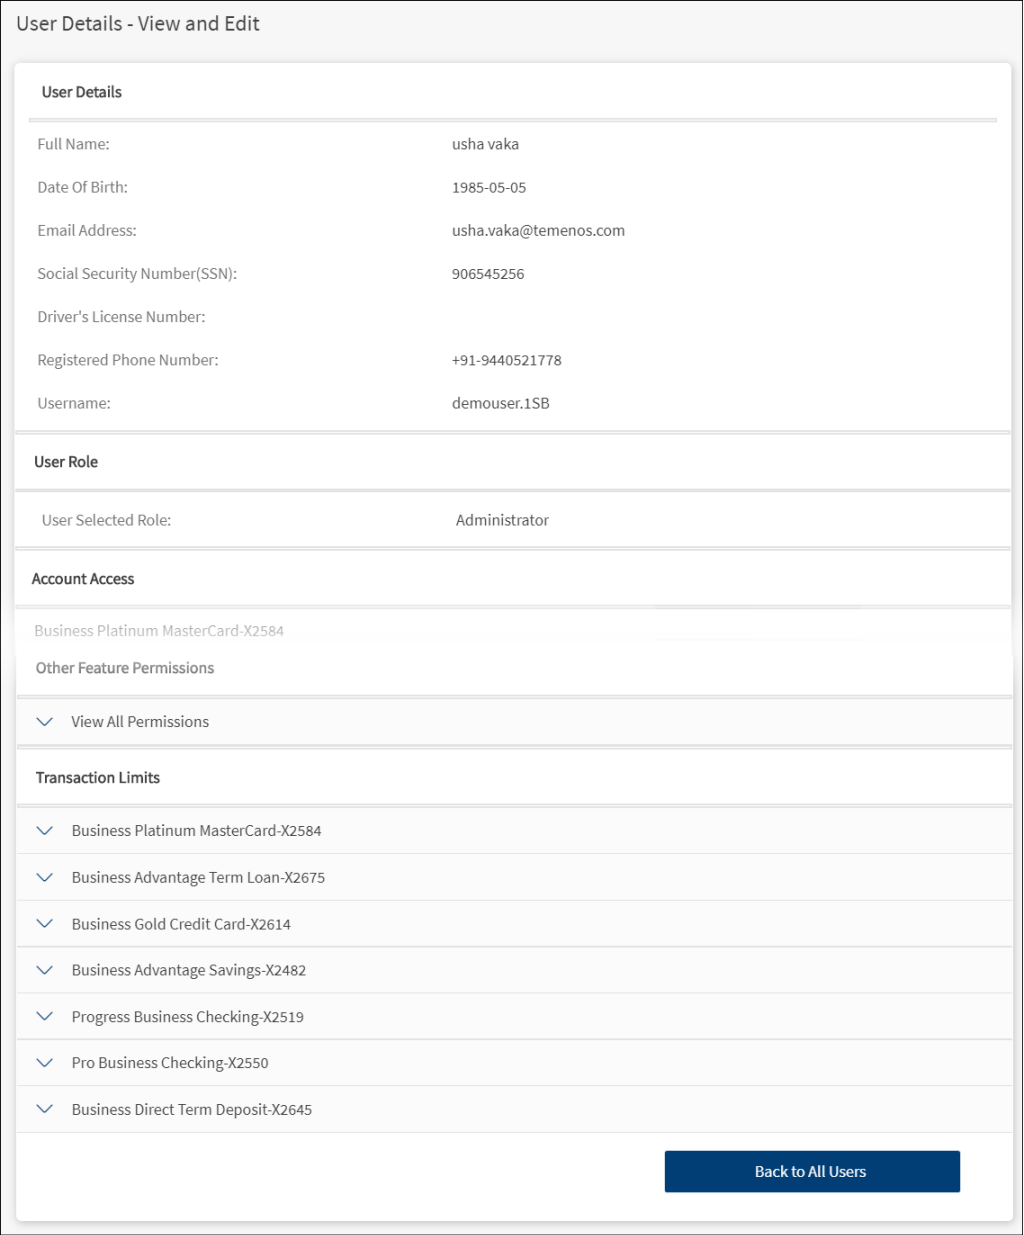
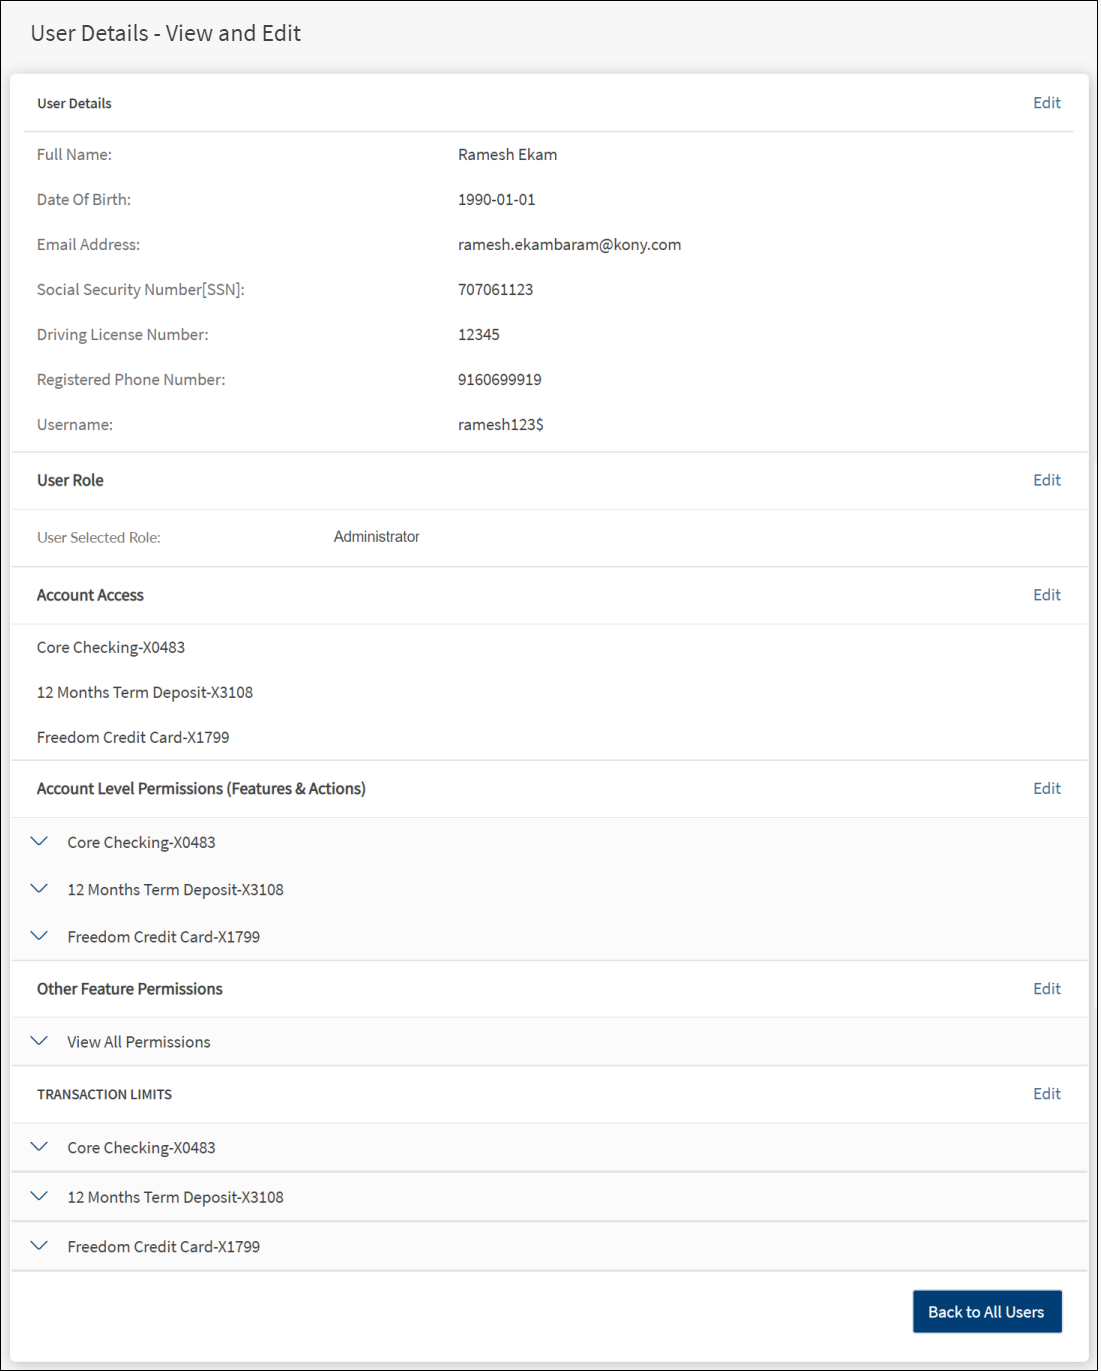
Edit Business User Details (Manage User)
Use the feature to view and edit the details of a selected user and control permissions to access features and actions at user level in edit mode. A business user can edit only if "Manage Users" permission under User Management feature is enabled. Otherwise, the user will be able to only view the details.
Menu Path: Side Menu > User Management > All Users > Click a user row > Manage User
To edit the user details and control permissions to access features and actions at user level, follow these steps:
- From the user list, click a user row.
- Click Manage User. The following screen is displayed.


- The details on the screen are divided into the following sections. Click the respective Edit link and make the changes as required. See Review Permissions section on this page for more information on editing the details.
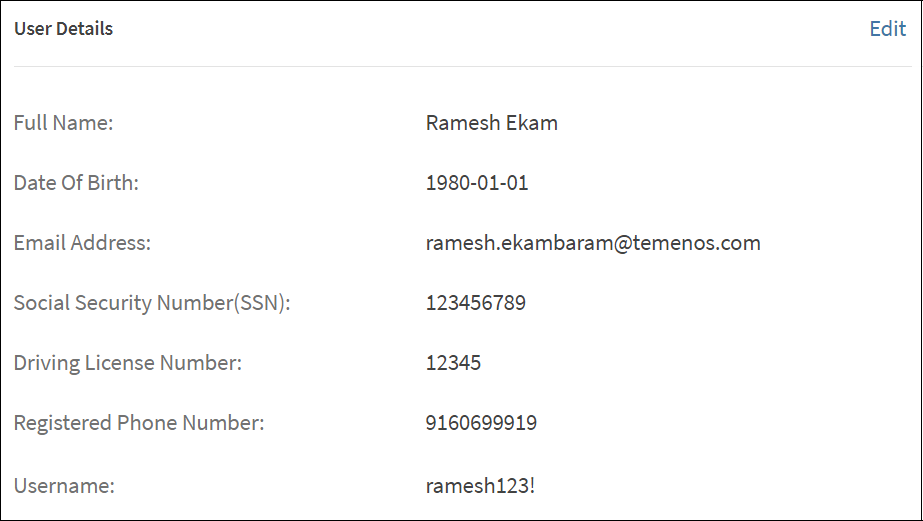
User Details
Displays the user details. Make the changes and click Save & Update. The changes are updated.
- First Name, Middle Name, and Last Name
- Date of Birth
- Email address
- Registered Phone Number
- Social Security Number (SSN). This field cannot be edited.
- Driving License Number
- Username. This field cannot be edited.
User Role
Displays the Assigned Role of the user. Assign a new role if required and click Save & Update. The change is updated. The user permissions and transaction limits changes based on the assigned role.
Account Access
Displays the list of accounts to which the user has been provided access. Make the changes by selecting or clearing the account check boxes. Click Save & Update. The changes are updated. The user will be able to view or operate only the selected accounts when the user signs in to the application.
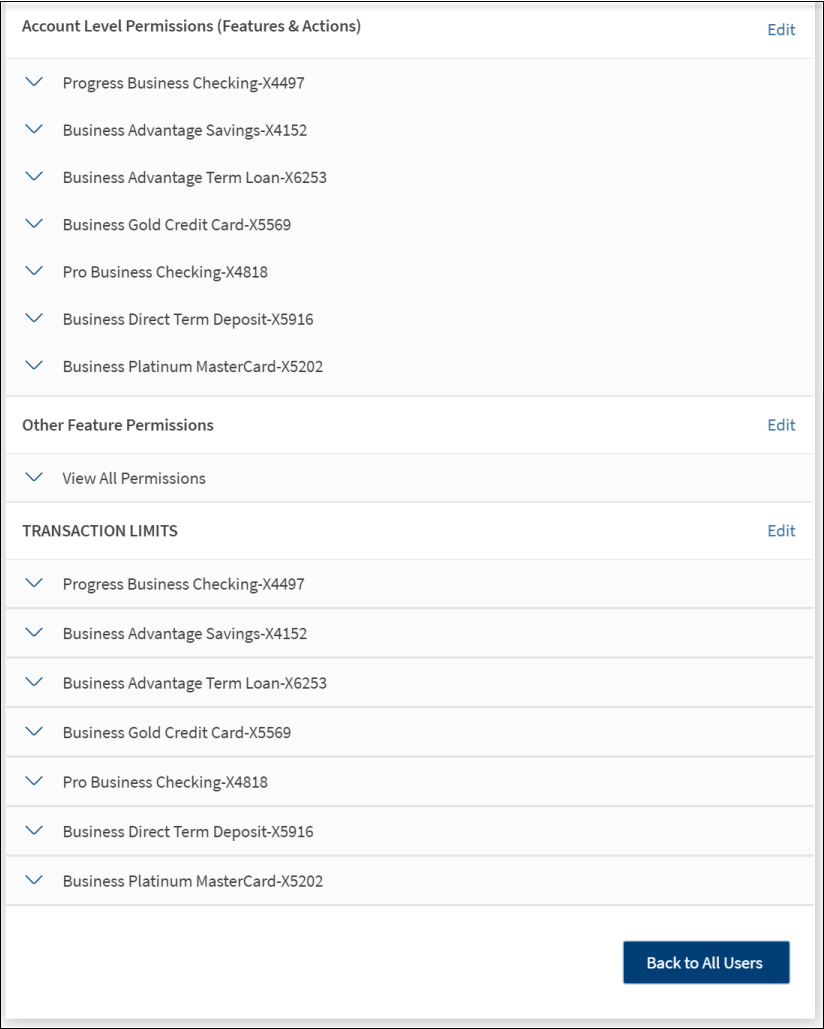
Account Level Permissions (Features & Actions)
Displays the permissions given to the user to access the features and associated actions at the account level. Make the changes by selecting or clearing the feature check boxes of respective accounts. Click Save & Update. The changes are updated. The user permissions and transaction limits changes based on the changes.
Other Feature Permissions
Displays the permissions given to the user to other non-transactional features. Make the changes by selecting or clearing the feature check boxes. Click Save & Update. The changes are updated.
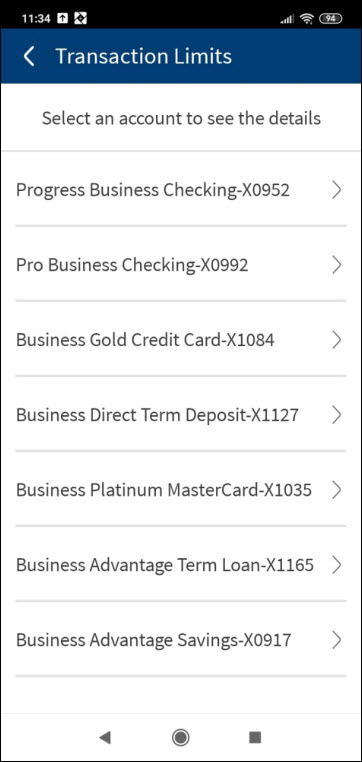
Transaction Limits
Displays the transaction limits defined for the various services of corresponding accounts. Make the changes to pre-approval and denial limits. Click Save & Update. The changes are updated. Note that the changes will affect all future transactions.
- After all the updates are done, click Back to All Users to go to the All Users screen.
Create Business User
Use the feature to create a business user and assign a role with permissions to access accounts and features. Business owners and other authorized manager of business users can control access to various features at user level at the time of user creation or editing the user permissions after the user has been created. A business user can create a user only if "Create Users" permission under User Management feature is enabled.
At the time of user creation, an authorized user can create a user manually or copy permissions either from an existing custom role or an existing user. The following permissions are copied from the custom role into the user’s profile on selecting the copy permissions option. if necessary, the copied permissions can be modified before confirming the creation of the new user.
- Accounts
- Roles
- Permissions (account level and user level)
- Transaction limits
Menu Path: Side Menu > User Management > Create a User. Alternatively, on the User Management screen, click Create a User. The application displays the Create User - User Details screen.
The user creation process is divided into the following sections:
- Enter user details
- Assign a role
- Provide account access
- Review permissions to features
- Define transaction limits
- Submit details
User Details
Capture the business user details in the Create User - User Details screen.
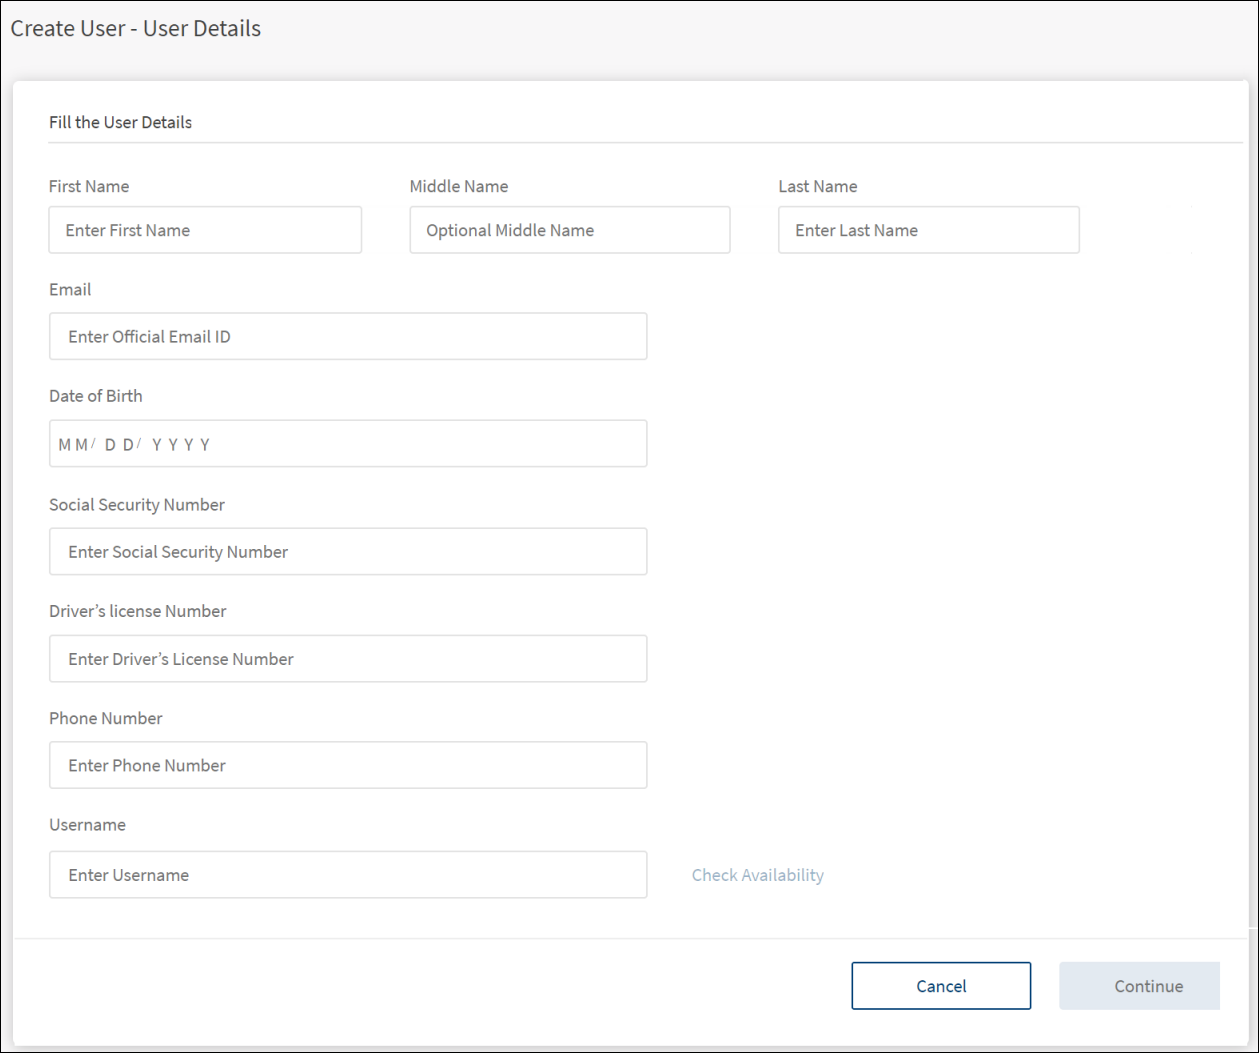
Add the following details:
- First Name. Enter the first name of the business user. It is mandatory.
- Middle Name. Enter the middle name. It is optional.
- Last name. Enter the last name. It is mandatory.
- Email ID. Enter a valid email ID. It is mandatory.
- Date of Birth. Enter the date of birth in the prescribed format (for example, MM/DD/YYYY). The date format depends on the location selection.
- Social Security Number. Enter the social security number (SSN). It is mandatory.
- Driver's License. Enter the driver license number. It is optional.
- Phone Number. Enter the phone number. It is mandatory.
- Username. Enter a unique user name for the business user. User name will be used by the business user to login to the banking application. It is mandatory. User name rules are displayed at the bottom of the screen. The text entered in the Username field must match with the defined rules. The Check Availability button is active only after the user name matches with the defined rules.
The user name rules are managed within the Spotlight (Customer 360) application. - Check Availability. Click to validate the given user name for its uniqueness. If the status of the validation is Available, then assign the user name for the new business user. Otherwise, change the user name and check the availability again.
- Click Continue. The application displays the Create User - Assign Role screen. The Continue button is enabled only if the user name is available.
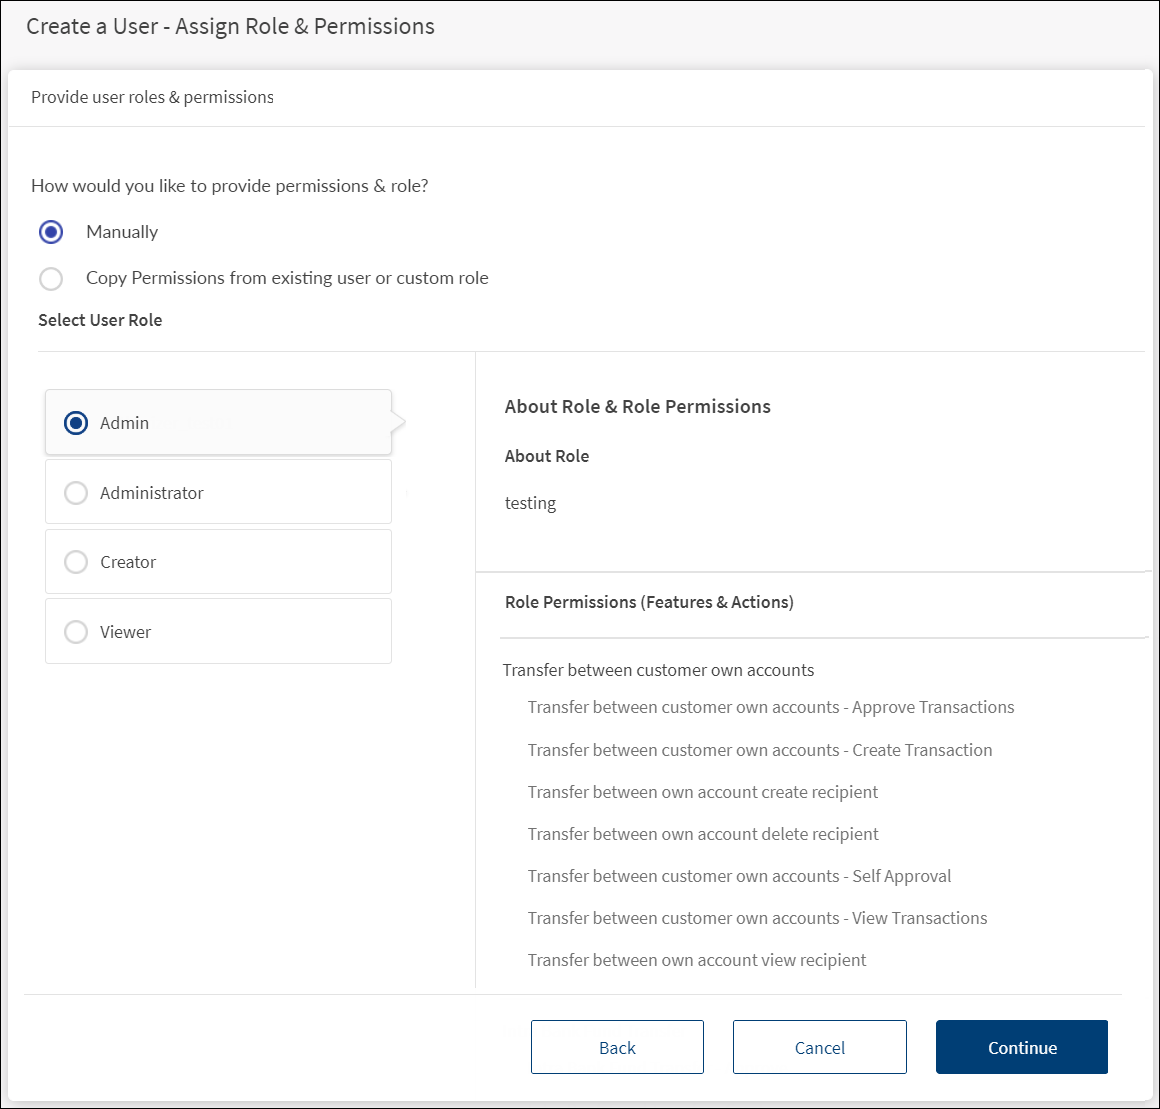
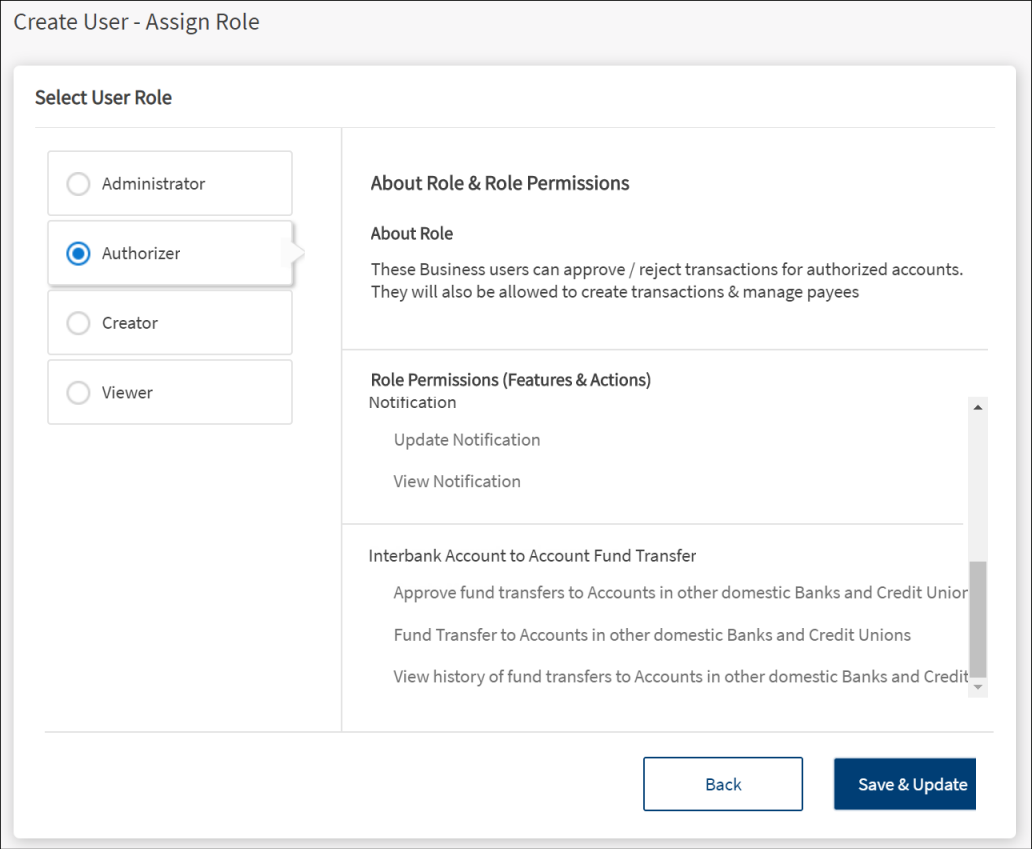
Assign Role and Permissions - Manually or Copy from Existing Custom Roles or Users
Assign a role manually or copy permissions either from an existing custom role or an existing user.
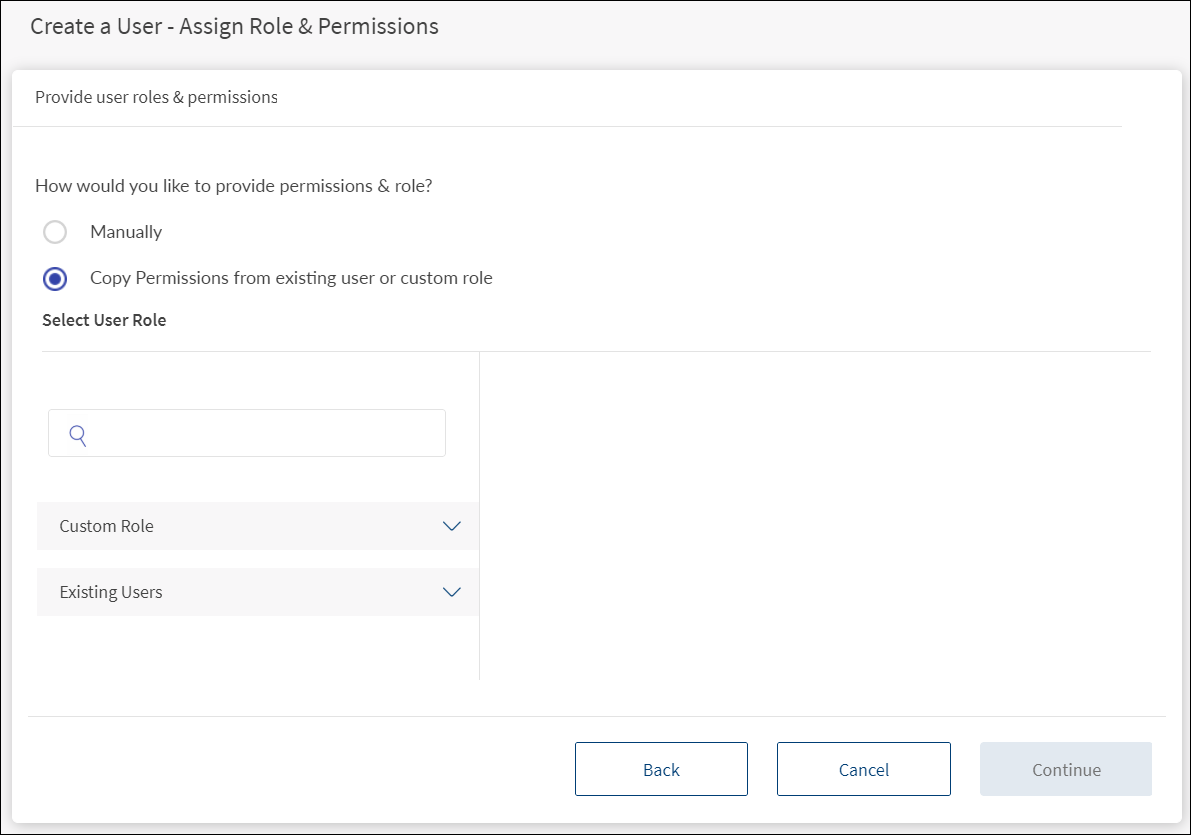
- Do any one of the following:
 Assign permissions manually from scratch
- Click the manual option to assign permissions and role.
- The screen displays the list of available user roles with a description of each role and the role permissions to features and actions aligned to each role. The roles are fetched from the Spotlight application.
- Select a user role.
- Changing a user’s role requires the permissions to be reset.
- If a new permission is added to a role, it will be added to the set of permissions for every user who has been assigned the same role.
- If a permission is removed from a role, the same will be revoked from the permission set for each user who has been assigned the role.
- The application ensures that no user has more permissions than that which is allowed by the assigned role.
NOTE: NOTE:
NOTE:- The screen displays the list of available user roles with a description of each role and the role permissions to features and actions aligned to each role. The roles are a set of permissions to multiple features and associated actions and have been configured at the financial institution (FI) level.
- A role is assigned to every business user, which controls the features and actions that the user can perform. A role defines the highest level of permission that is given to a business user and can even contain permissions to a partial set of actions for a feature, and the permissions can be restricted at the user level as well.
- A user’s features and permissions are derived from the role but would be restricted to features that have been allowed to the company or business. However, A business owner or an authorized person can take away some of the permissions that the user inherits from a role. Therefore, it is possible to have a custom set of permissions for every user.
- See Permissions for information on features and associated actions mapped to the user roles currently available in the application and set of permissions applied for micro-business and business users.
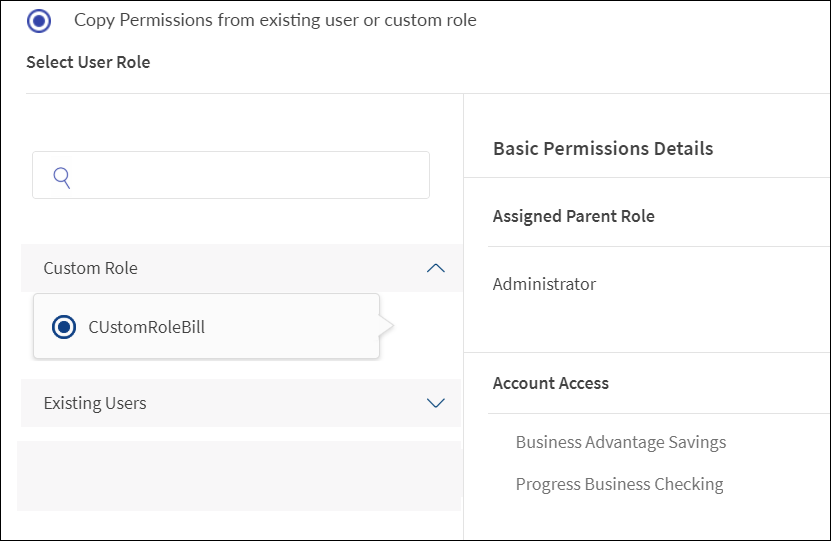
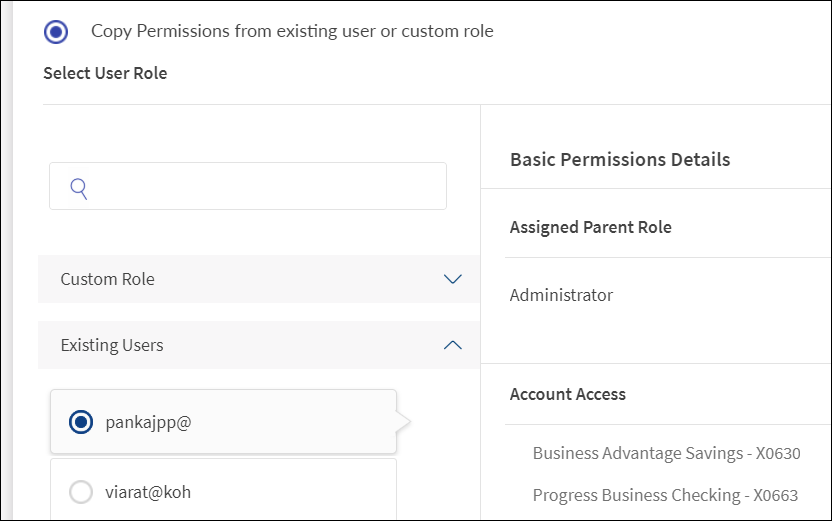
Copy permissions from existing user or custom role- Click the copy permissions from existing user or custom role option.

- The screen displays the existing Custom Role and Existing Users list. Search for a role or user by entering the keyword in the search box.
- Do any one of the following:
- Click the Custom Role list. The application displays all the custom roles that have been already created.
- Select the required custom role. The selected role is highlighted alongside the custom role list when the list is collapsed.

- The application displays the basic permission details, assigned parent role, and the list of accounts to which the selected custom role has access. The custom role that you are creating will inherit all the permissions of the selected role.
- Click the Custom Role list. The application displays all the custom roles that have been already created.
- Click the Existing Users list. The application displays all the existing users.
- Select the required user.

- The application displays the user's role and the list of permissions to features. The custom role that you are creating will inherit all the permissions of the selected user.
- Click Continue. The Continue button is enabled only if a role and associated permissions is assigned.
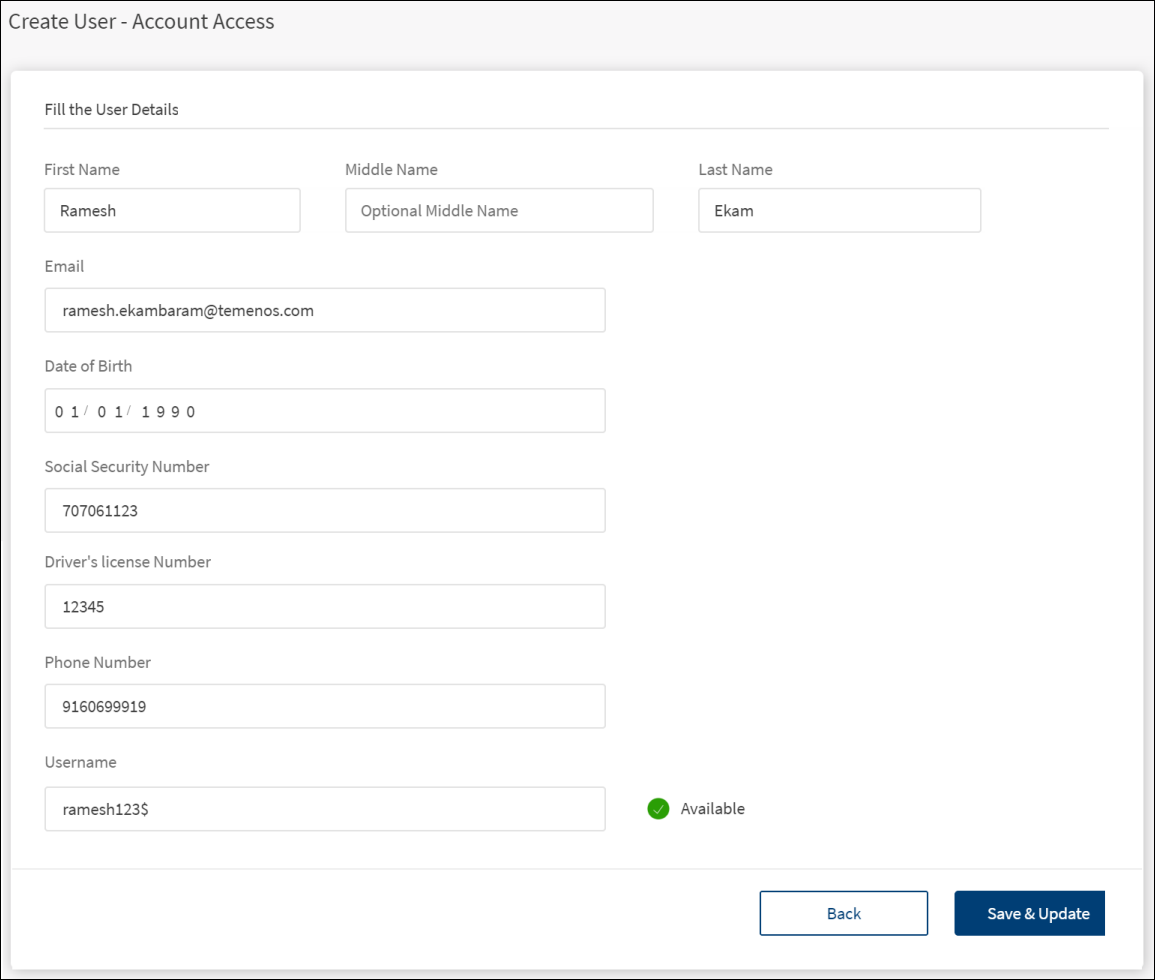
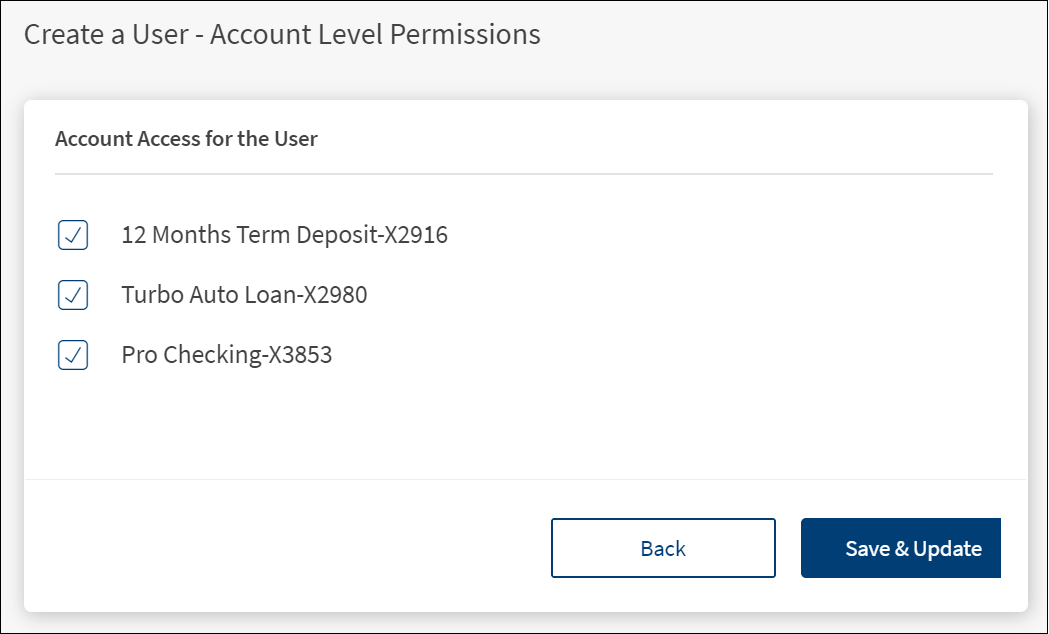
Account Access
This step is applicable only when role and permissions are assigned manually in the previous step. Select the required check boxes to provide access to all or a subset of the accounts that are tied to the business or company in the Create User - Account Access screen. The screen displays the list of the company's business accounts and the provision to select the accounts.

To provides access to accounts, follow these steps:
- Select the required accounts. The user will be able to view or operate only the selected accounts when the user signs in to the application. It is mandatory to select atleast one account.
- Click Continue. The application displays the screen to review the permissions to features.
Review Permissions to Account Level Features and Actions
Review the details that have been already entered, assign account level permissions to features to users if required, and define transaction limits. After reviewing the details, click Confirm to submit the form.
NOTE: The permissions and transaction limits are set up with default values and a user can submit the form and complete the user creation process from here later. However, it is possible for users to review and change the default values.
The application displays the following sections. Use the edit option to modify the details:
- User Details
- User Role
- Account Access
- Account Level Permissions
- Other Feature Permissions
- Transaction Limits

User Details
The already filled in user details with the provision to edit the details.
- Click Edit to modify the details.
- Modify the changes as required.
- Click Save & Update. The changes are updated.
User Role
The assigned user role with the provision to change the role as required.

- Click Edit to assign a new role.
- Assign a new role as required. The user permissions and transaction limits changes based on the assigned role.
- Click Save & Update. The change is updated.
Account Access
The list of selected accounts with the provision to add or remove accounts from the list.
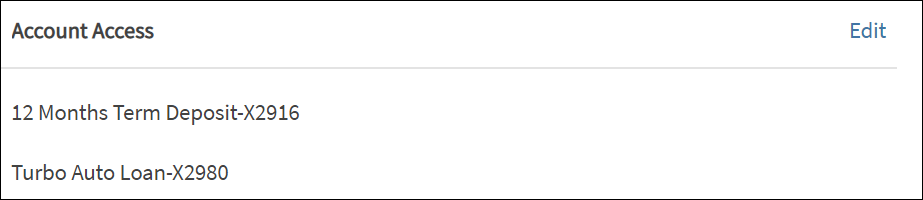
- Click Edit to add or remove accounts from the list.
- Select or clear the check boxes as required. The user will be able to view or operate only the selected accounts when the user signs in to the application.
- Click Save & Update. The changes are updated.
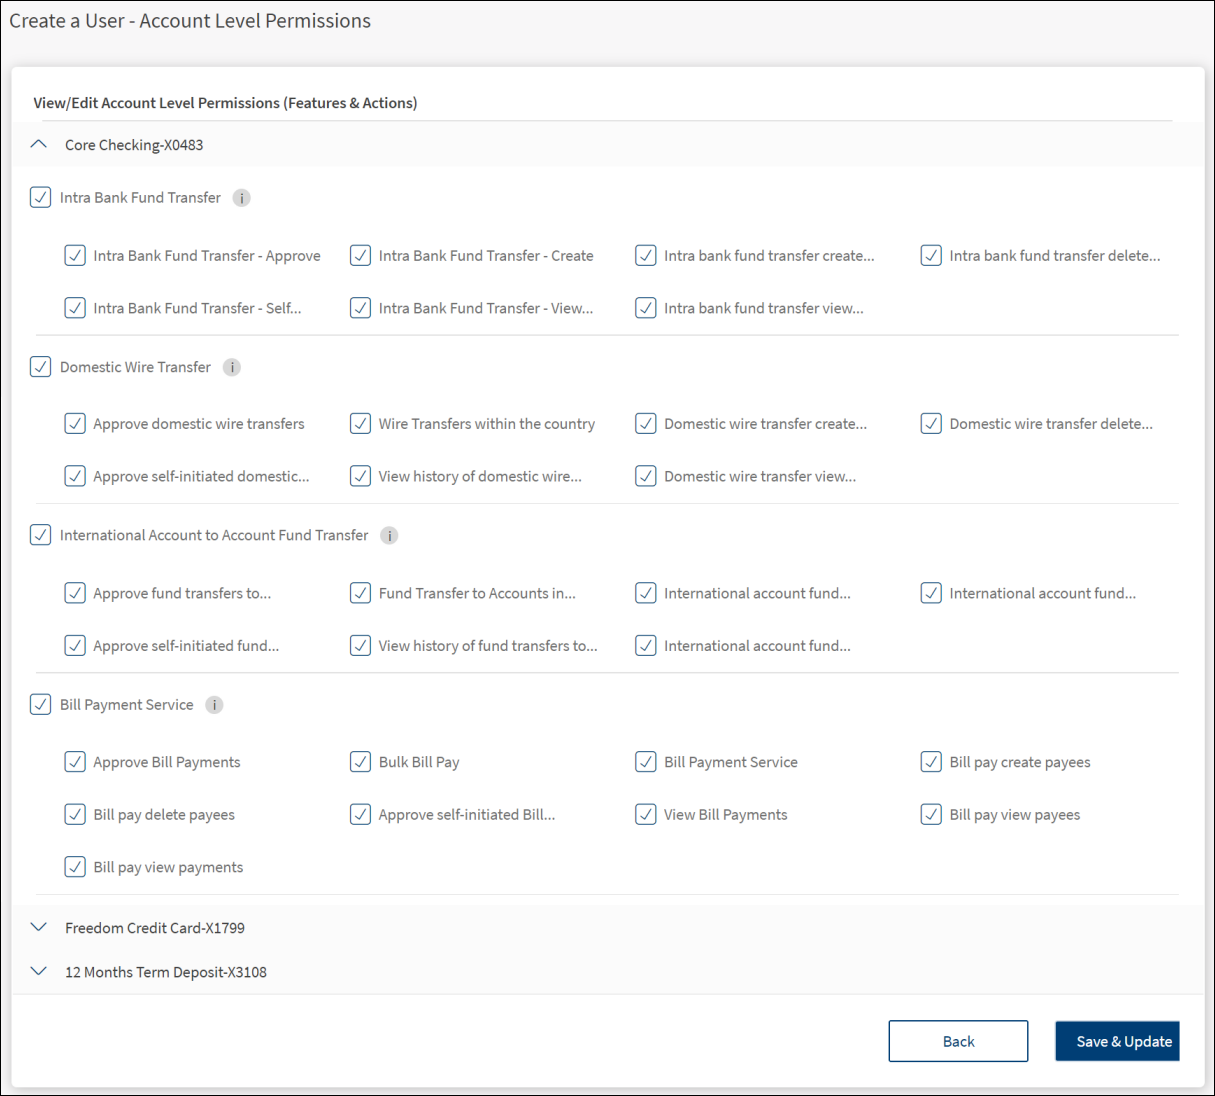
Account Level Permissions
The list of features and corresponding actions that the user can access for the selected accounts with the provision to assign or revoke access to features and actions at the user level. By default, the access to features and actions depends on the user role type.
This screen displays the features applicable to the selected accounts and the actions associated with it. A feature is a banking service which bundles a set of actions that can performed by a bank customer. For example, the funds transfer feature defines the types of fund transfer that can be done such as, domestic fund transfers, intra-bank accounts fund transfers, international funds transfers and so on.
From the list of features displayed for an account, select the required features and choose the actions associated with them.
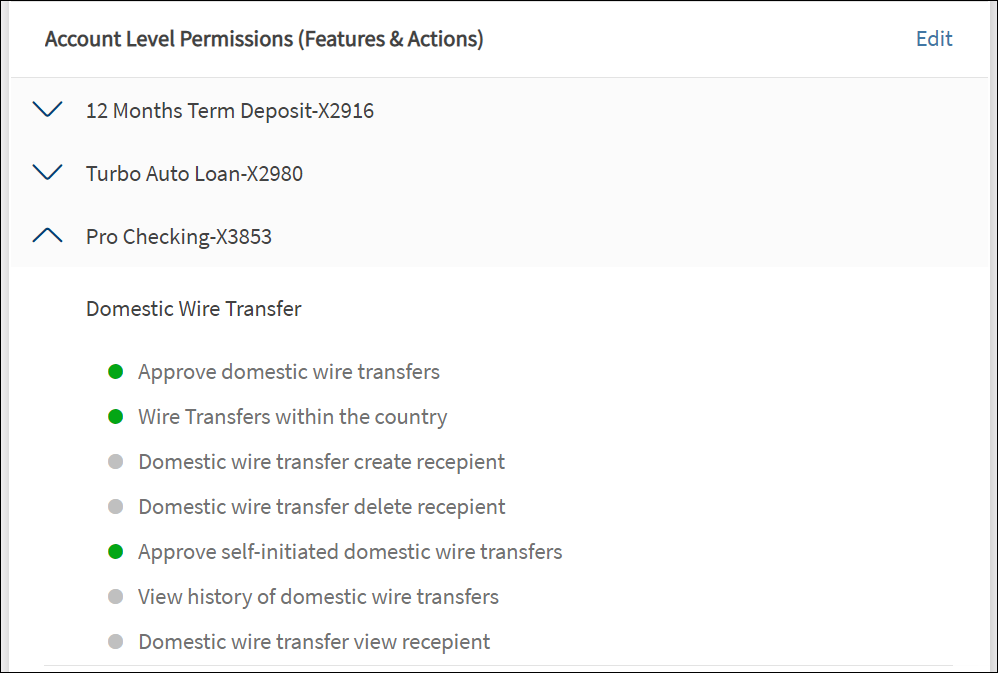
- Click the arrow to view the list of features and the corresponding actions assigned for the selected account.
- Click Edit to modify the details.
- Modify the changes as required. The user permissions and transaction limits changes based on the changes.
- Click Save & Update. The changes are updated.
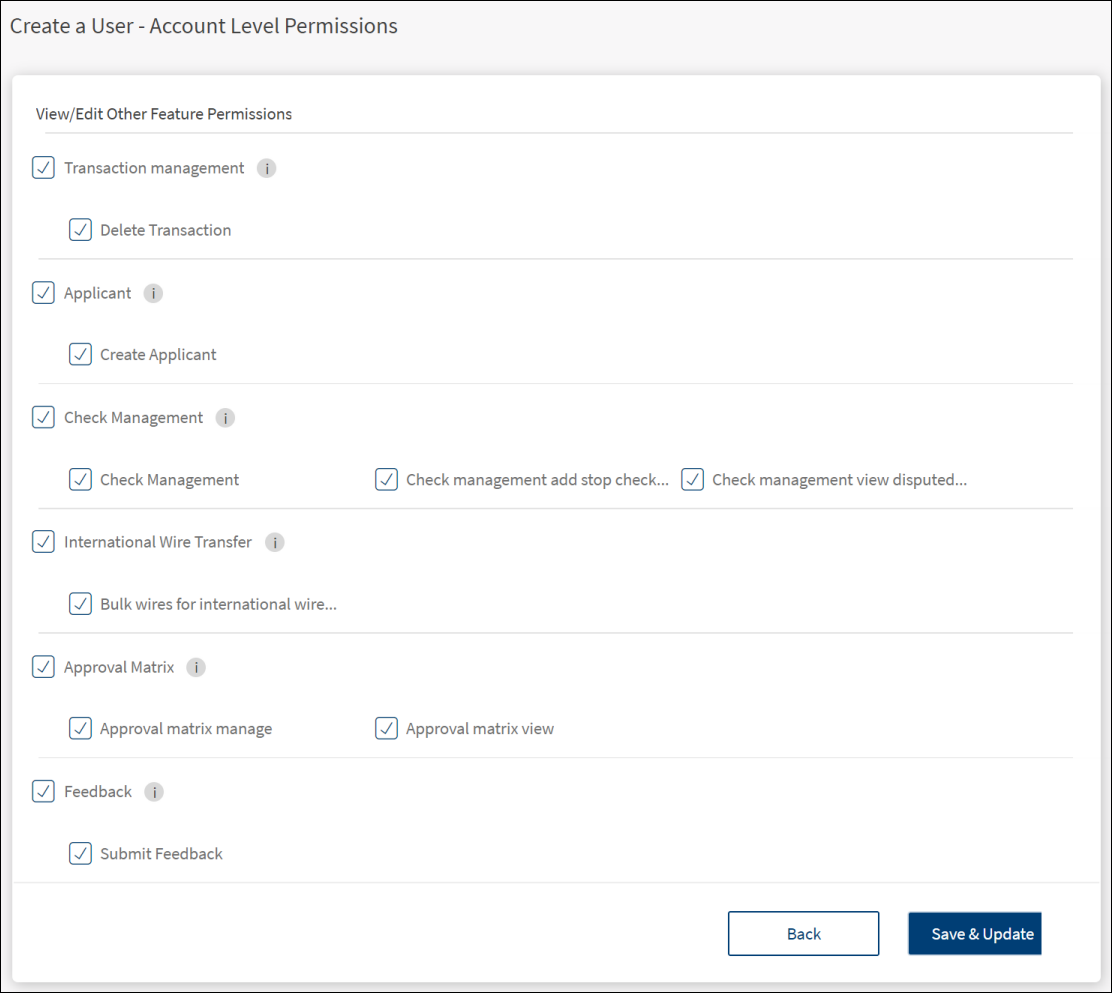
Other Feature Permissions
The list of features non-monetary in nature and not connected to the accounts that the user can access with the provision to assign or revoke access to features at the user level. By default, the access to other features depends on the user role type.
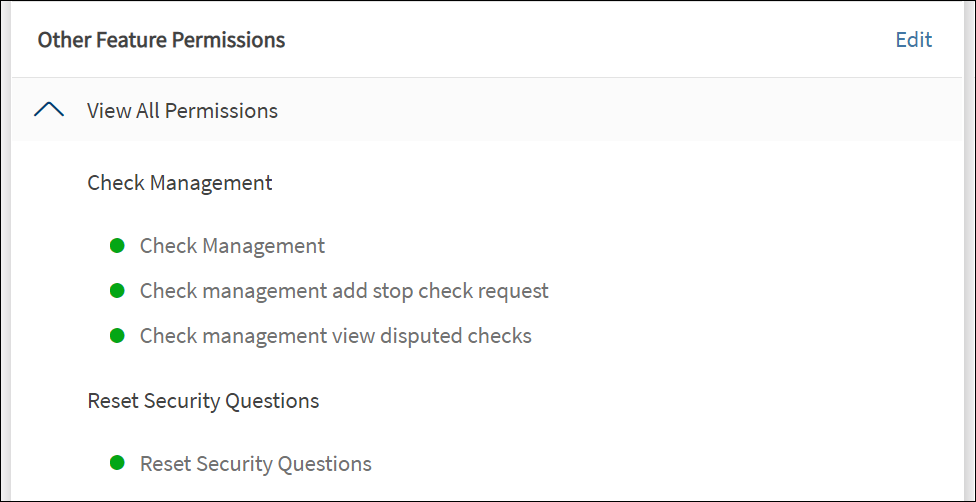
- Click the arrow to view the list of features and the corresponding actions assigned for feature.
- Click Edit to modify the details.
- Modify the changes as required.
- Click Save & Update. The changes are updated.
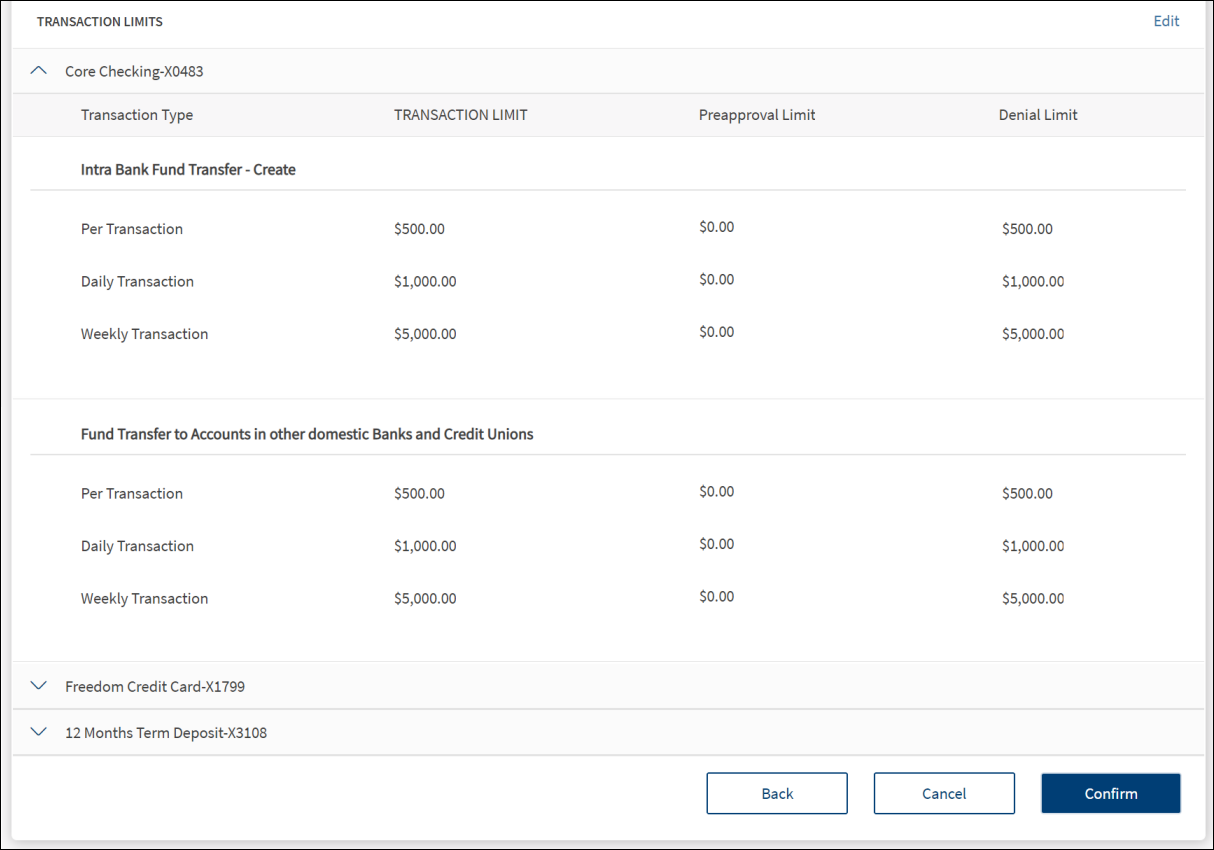
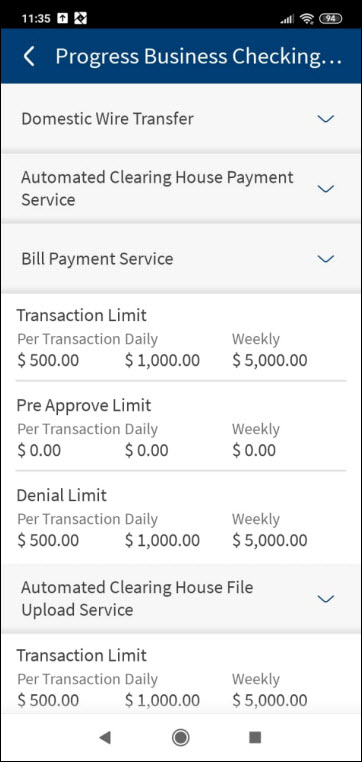
Transaction Limits - Manage transaction limits in all accounts and monetary features
As a business owner, you can set transaction limits (max transaction, daily, and weekly limits) at a user level for every monetary type of transaction. Based on these limits, a transaction can either be executed, be sent for approval or be denied.
For features involving monetary transactions, define the transaction limits per transaction type (per transaction, daily, weekly) of every permitted feature of the selected accounts. Edit the pre-approved and denial limits as required. The application validates the pre-approved and denial values as defined at the company level where pre-approved amounts does not require approval and the user cannot create a transaction beyond the auto-denied limit. See Transaction Limits for more information.
The business user can initiate a transaction of the value which is less than or equal to the maximum transaction limit. If the transaction is not pre-approved, the transaction is put into the approval queue with status as Pending Approval. If the value exceeds the maximum transaction value, the application will not execute the transaction.
The application checks the maximum transaction limit for recurring, nonrecurring, non-scheduled, and scheduled transactions.
The application checks the transactions initiated for all the services. The business user can initiate a transaction for any service of a value within the per transaction, daily, or weekly limit balance available on the transaction execution date. The transaction execution date can be a current date or a future date.
If the value exceeds the maximum daily limit, the application will not execute the transaction, or the transaction is put into the approval queue with status as Pending Approval.
The business user can initiate a transaction of the value which is less than or equal to the maximum daily limit. If the transaction is not falling within the pre-approved limit, the transaction is put into the approval queue with status as Pending Approval. If the value exceeds the maximum daily limit, the application will not execute the transaction.
See Approval and Requests and Approval Matrix for more information.
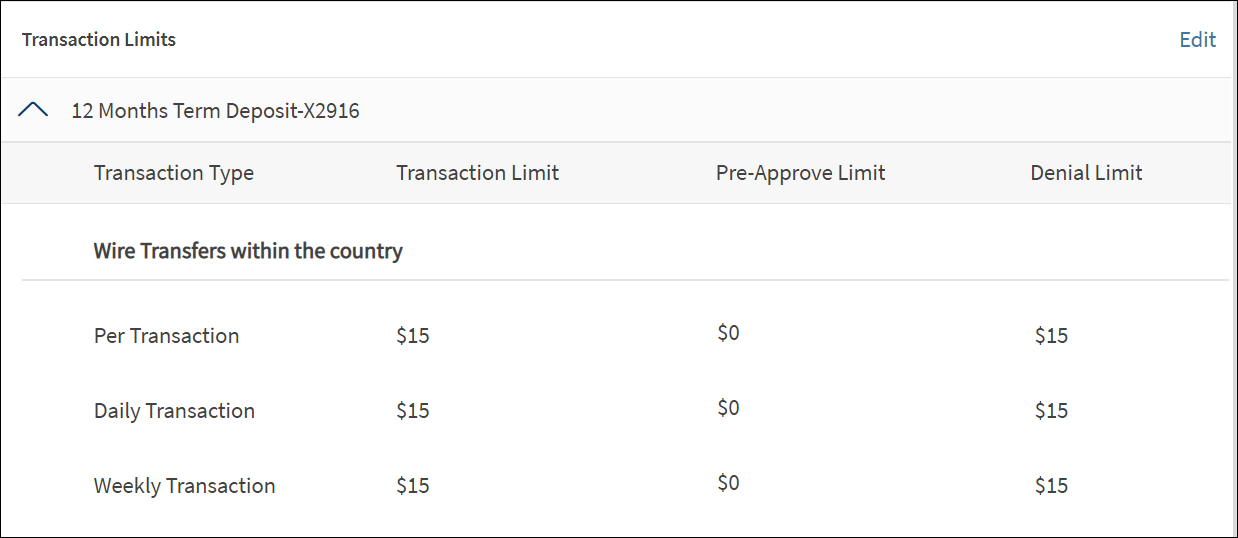
- Click the arrow to view the defined transaction limits for a service of the selected account.
- Click Edit to modify the details.
- Enter the pre-approved and denial limits as required for a service or action.
- Click Save & Update. The changes are updated.
Success page
After reviewing the user details, permissions to features, and defining the transaction limits, click Confirm.
On successful user creation, the application displays an acknowledgment screen with a unique reference number and few details of the user. The user is associated with the company and an email is triggered to the users' email address. The email contains login information using which, the user can set the password and sign in to the banking application.
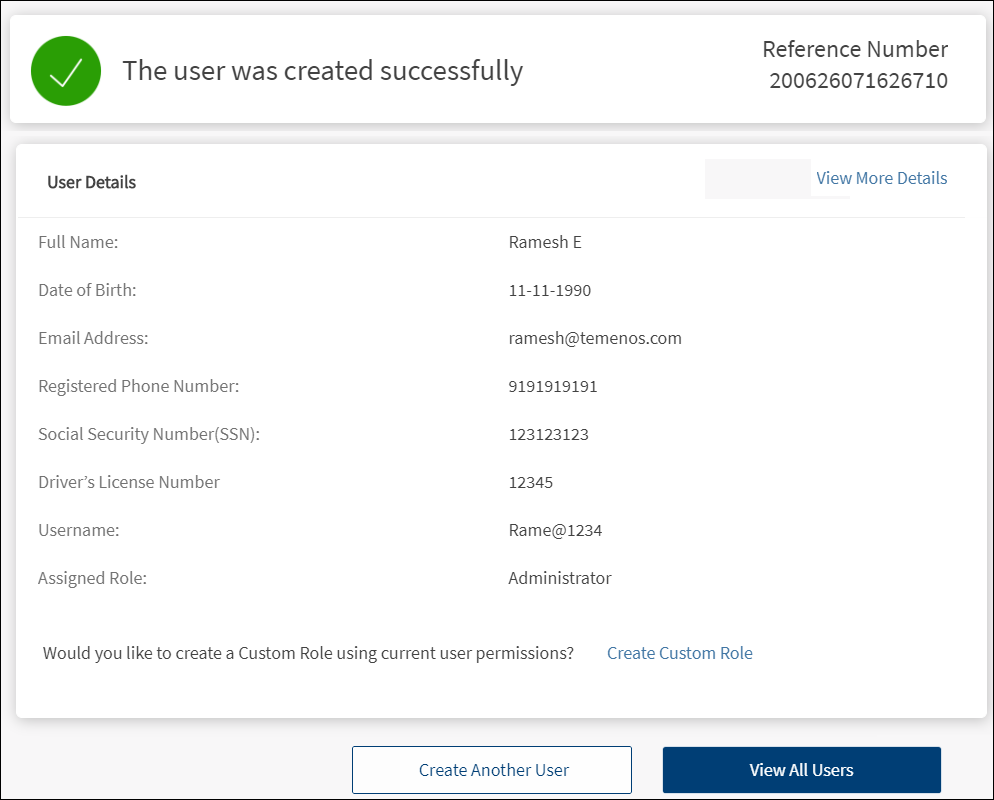
You can do any one of the following on this screen:
- Click View More Details. The application displays the screen with filled-in user details.
- Click Edit to modify the required sections and click Save & Update.
- View the details and click Back to All Users to go to the user list.

- Click Create Another User.
- Click View All Users.
- Click Create Custom Role to create a role based on the current user's permissions.
The user record is added to the list of users and the status of the user is New.

Search for a Business User
Use the search option to search for a business user using search criteria. Enter the search keyword in full or in part.
Menu Path: Side Menu > User Management > All Users > Search option
The keyword can be from any of the following fields.
- Name
- Role
- Status
- User Name
The (Me) suffix is to identify the logged-in user and in case of the search, typing "me"’ will not render the user name with suffix "me" as a result.
The application displays the matching records based on the search criteria.
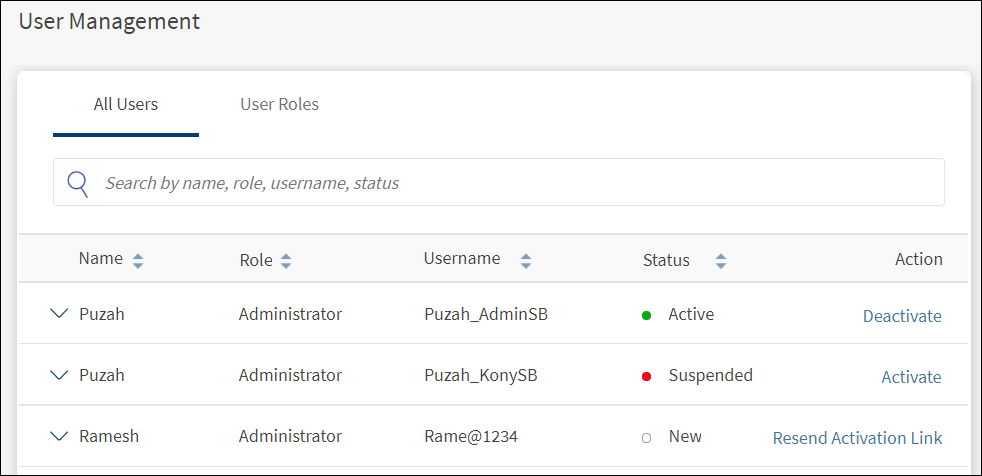
Change Business User Status
Use the feature to change the business user status. A business user can activate or suspend user only if "Activate/Suspend users" permission under User Management feature is enabled.
Menu Path: Side Menu > User Management > All Users > Click an item under Actions
The application displays the user status (Active, Suspended, or New) on the All Users list screen. To change the status, click an appropriate link under Actions.
| User Status | Action | Do this |
|---|---|---|
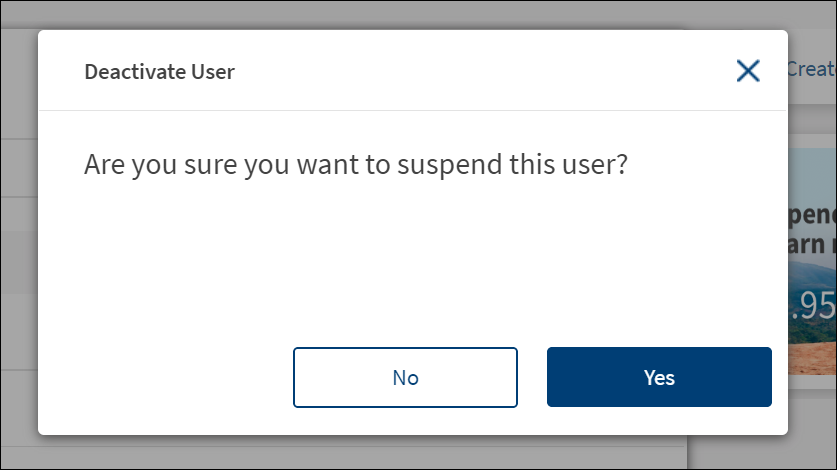
| Active | Deactivate | Click to deactivate the user by providing a reason for deactivation. The status of the user is updated as Suspended. Suspended users cannot sign in to the application. |
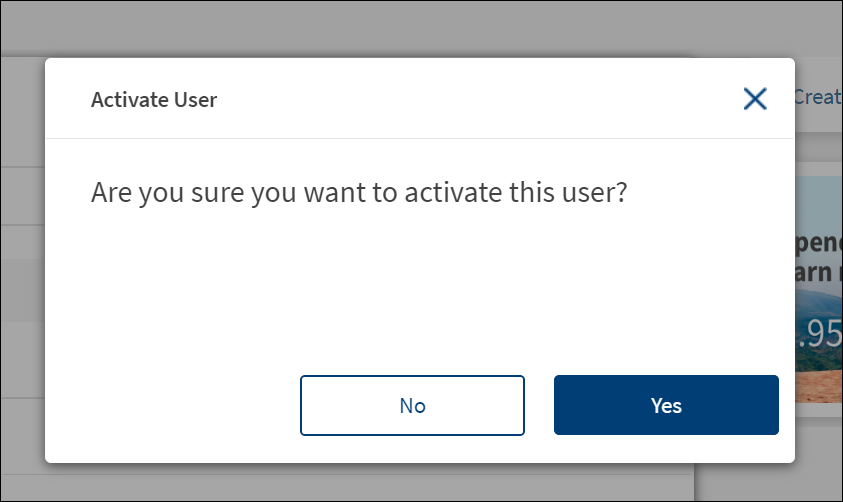
| Suspended | Activate | Click to activate the user. The status of the user is updated as Active. The user can use the same credentials that were in use prior to deactivation to sign in to the application again. |
| New | Resend Activation Link | Click to send the activation email using which, the user can activate the accounts. |
Deactivate User
Activate User
User Management - Mobile Banking
Use the feature to do the following:
- View the details of all users having access within a virtual account.
- View the permissions accessed by the users.
- Activate or deactivate a user.
Menu path: Side menu > User Management
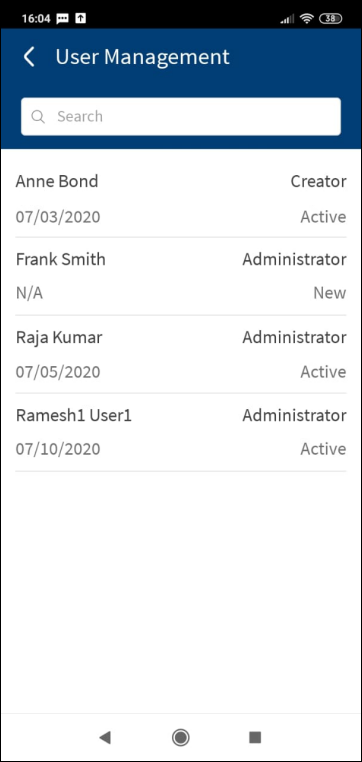
The application displays the list of users with the following details:
- First name and last name of the user.
- Role of the user.
- Status of the user - Active, Suspended, or New.
- Last sign in date. In case of a new user, the last sign in details is not applicable and N/A is displayed.
Use the search option to search for a business user using the search criteria. Enter the search keyword in full or in part. Search by name, user name, role, or status.
User Details
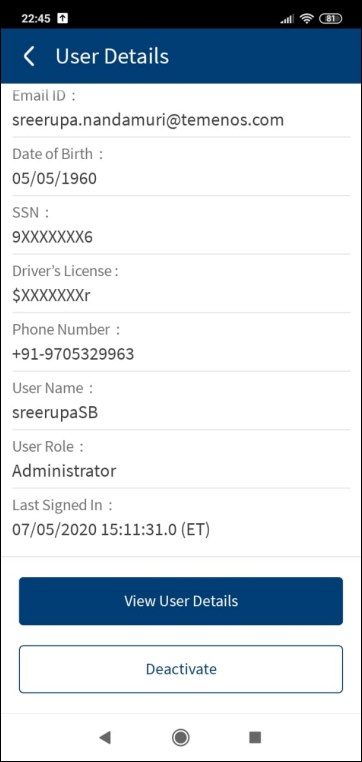
Tap any user row on the User Management dashboard to do the following:
- View the user details such as full name, email ID, date of birth, SSN, driver's license number, phone number, user name, user role, and last signed in date.
- Activate or Deactivate and Resend Activation Link: Tap Deactivate or Activate to suspend or activate the user. A business user cannot activate or deactivate self. Send activation link to new users.
- For active users Deactivate option is available. When the business user clicks an active user, "Deactivate" option is available. The activate/deactivate buttons are available only if the signed in user has the permission for activate user and suspend permission.
- For suspended users, Deactivate option is available.
- For new users, a business user has the Resend Activation Link option.
On clicking the action buttons, a confirmation message pops up, and on completion, a toast message appears on the screen.
Permission Details and Transaction Limits
For more information on the user such as the user permissions and transaction limits, tap View User Details. This is applicable only if the business user has "User Management View" and "User Management (Manage User)" permissions.
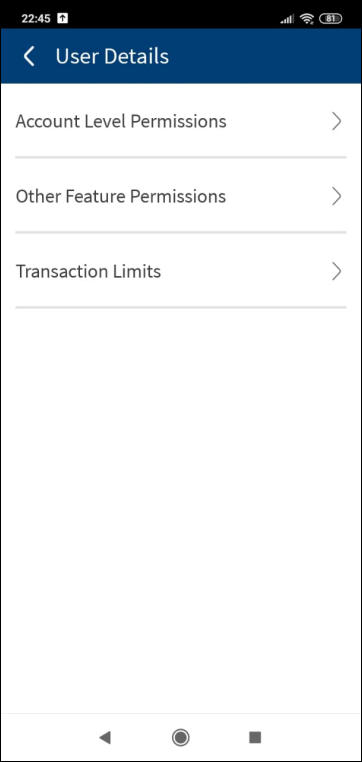
The application displays the following tabs:
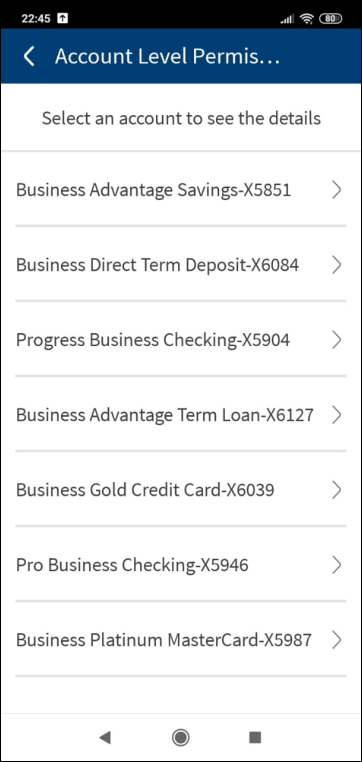
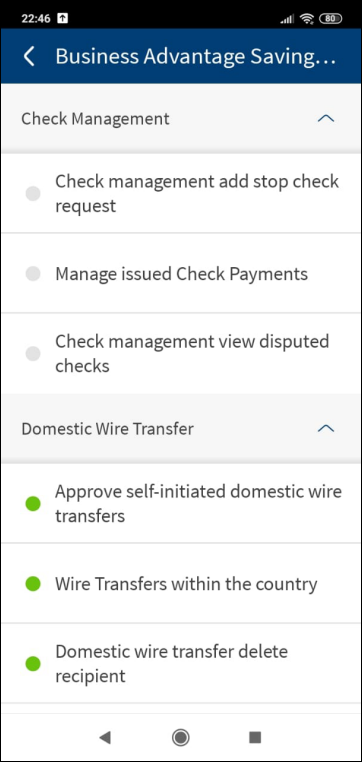
- Account Level Permissions
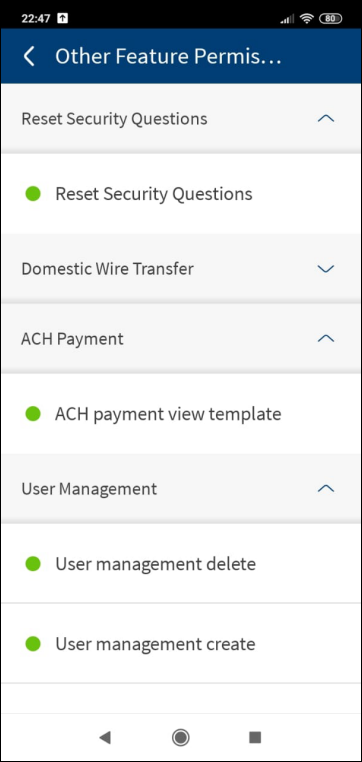
- Other Feature Permissions
- Transaction Limits
Tap any tab to view the corresponding details. You cannot edit any details. To view the details under Account Level Permissions and Transaction Limits, first select a specific account from the list of accounts. The tabs are displayed only if the business user has the necessary permissions. Use the up and down arrows to contract and expand the details.
Account Level Permissions
Other Feature Permissions
Transaction Limits
Configuration
- The visibility of each feature is controlled through the permissions defined for the user. See permissions for more information. The permissions at user levels are defined during user creation and while editing the user details after the user is created. In case the user does not have access to any of the features, that option will not be visible on the form and on the menus. The permissions at the company level and role level are defined in the Spotlight application.
- The User Management menu is available on the menu only if a business user has any one of the following permissions:
- Create Users
- View Users
- Manager users
- Activate/Suspend User
- The credential policies for updating user name are fetched from the Spotlight application.
- The user name rules are managed within the Spotlight (Customer 360) application.
- The customer roles are managed in the Spotlight application.
- Changing a user’s role requires the permissions to be reset.
- If a new permission is added to a role, it will be added to the set of permissions for every user who has been assigned the same role.
- If a permission is removed from a role, the same will be revoked from the permission set for each user who has been assigned the role.
- The Feature/Role/Company level transaction limits for recurring, nonrecurring, non-scheduled, and scheduled transactions are managed in the Spotlight application. User level limits can be managed in Spotlight and the customer-facing application.
APIs
The following APIs are shipped as part of this feature:
| API | Description |
|---|---|
| getDbxOrganizationUsers | Retrieves the details of all the corporate users registered for a DBX organization. |
| getCampaignSpecifications | Fetches a list of campaigns and their specifications (image URLs, destination URLs) for a bank customer. This is an authenticated service and invoked in post-login scenarios. |
| GetOrgEmployeeDetails | Retrieves the details of the specified business banking user in DBX. |
| getOrganizationGroupActionLimits | Fetches the organization group feature actions and action limits. |
| OFACAndCIPChecks | Initiates the OFAC and CIP verification check for a business banking user. |
| getGroups | Fetches the roles that can be assigned to the user. This API is called while creating a user. |
| getOrganizationAccounts | Retrieves the list of accounts assigned to an organization. |
| updateDBXUserStatus | Toggles the status of a user between 'Active' and 'Suspended'. |
| ResendActivationLink | Sends email activation link again to a business banking user in DBX. |
| getUserNameRulesAndPolicy | Retrieves the policies for user name in DBX. |
| verifyDbxUserName | Checks if there is a user already existing in DBX or External Bank with this identifying information. If the user does not exist, the service optionally generates an OTP with a security code. If the OTP functionality is used , then this service should not be directly invoked from the client application. It should instead be orchestrated within another service where the OTP is retrieved and sent out as an SMS/email. |
| CreateSmallOrganizationEmployee | Creates a new business user and micro-business user. |
Add Bookmark
save your best linksView Bookmarks
Visit your best links BACK
BACK


Are you sure you want to log-off?