| Bookmark Name | Actions |
|---|
Transfer
The Transfer feature can be used to transfer funds between accounts on the Send Money screen. You can initiate a new fund transfer to your own account in the same bank, recipients in the same bank, recipients in other banks that you have added, recipients in international banks, and wire transfers.
NOTE: A business user with access to both retail and business accounts can transfer funds to any of the recipients - both personal and business. Accounts are segregated by personal and business type at all relevant places in the application during transfers and other flows and icons against each account indicates the type of account.
Menu path: On the top bar > Transfers > Transfer
The application displays the Transfers screen.
Funds can be transferred to eligible accounts only. Eligibility is decided by the account type maintained by the bank and is controlled from the core banking system.
Make Transfer
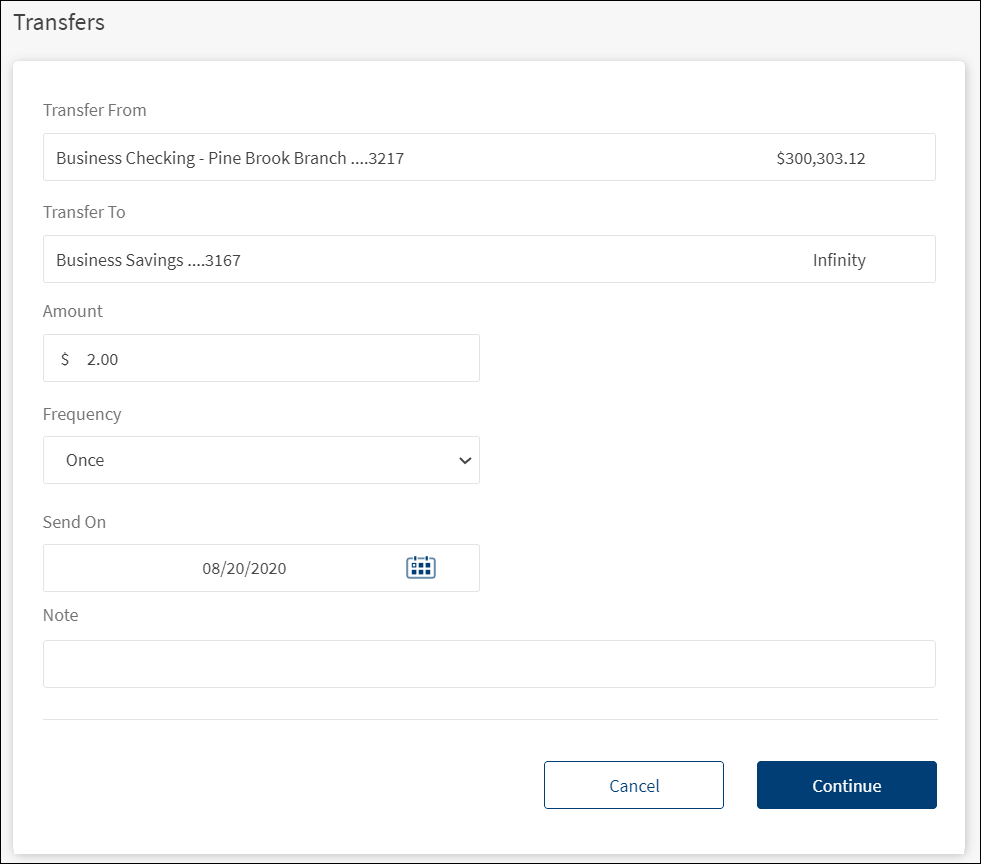
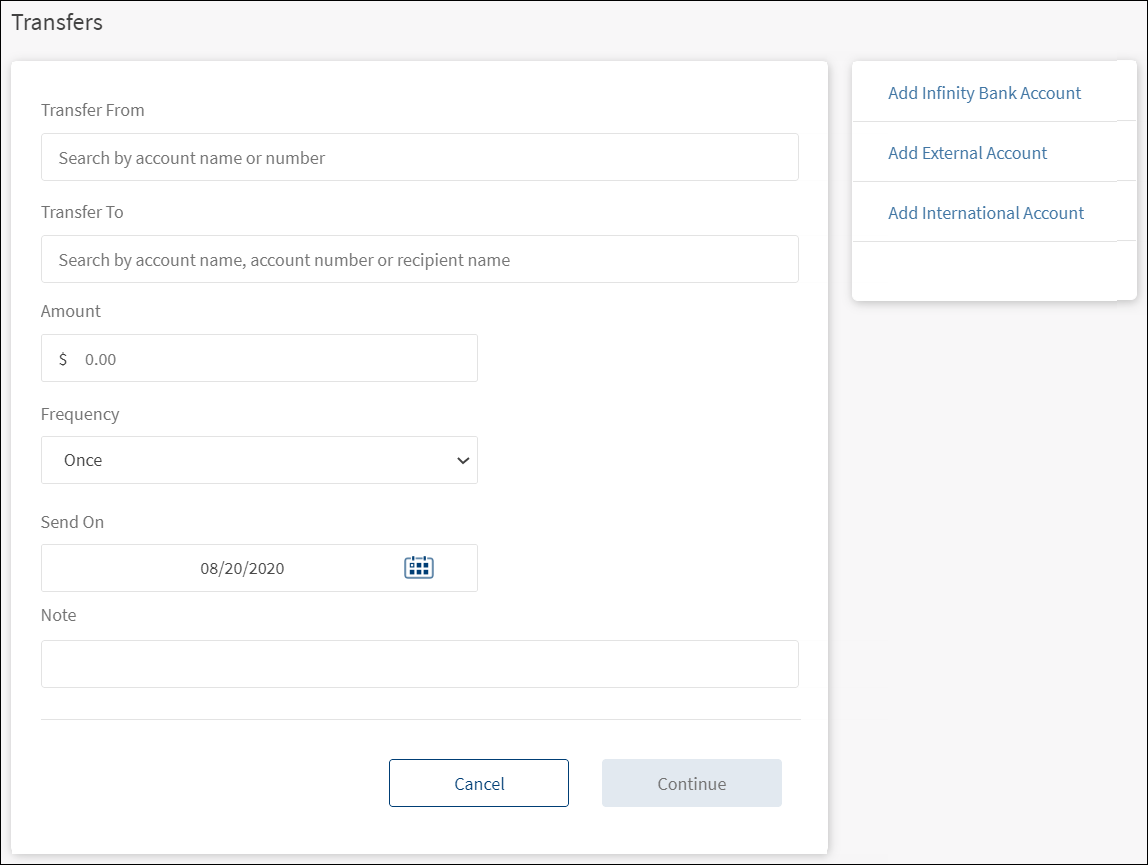
Enter the information as applicable to initiate a fund transfer:
- Transfer From account. Select the account from the list. Only the accounts based on the permission are displayed in the list. The application displays an appropriate message if the list is empty. For a business user having access to multiple companies, the accounts are displayed as different companies followed by accounts of each company. For a combined user, the application displays accounts as personal and business and within business different companies followed by accounts of each company.
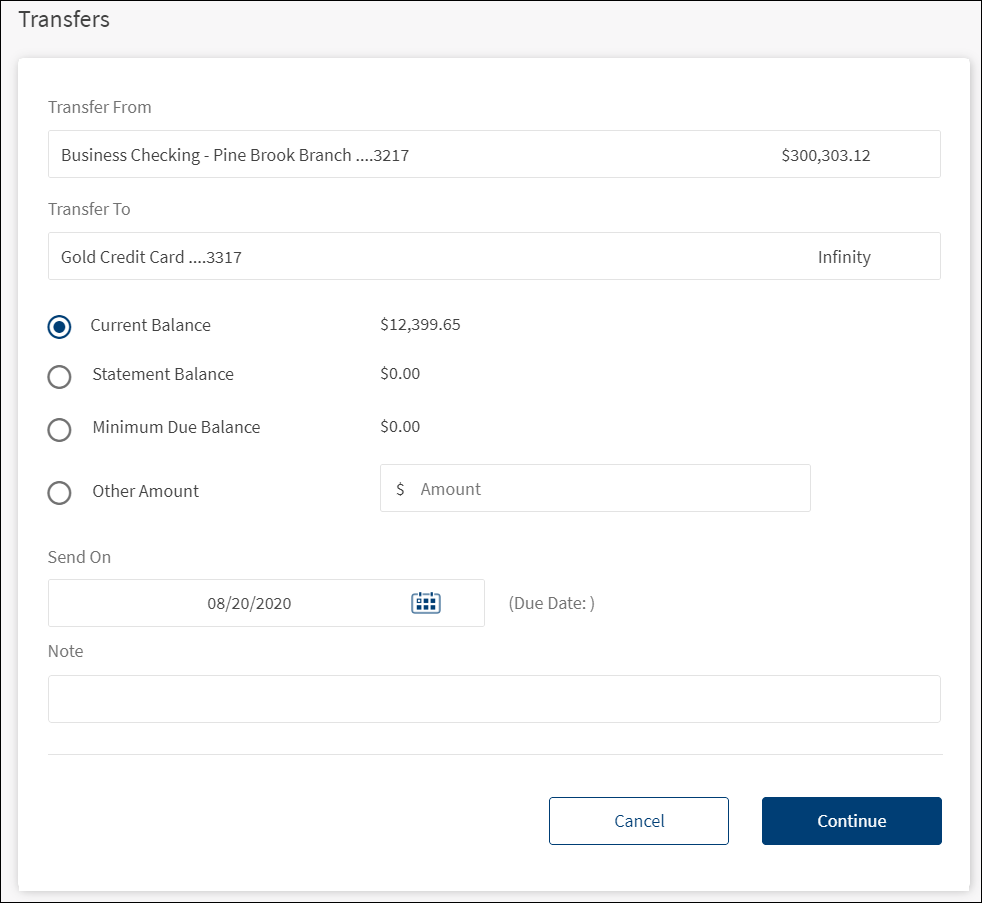
- Transfer To account. Select the account from the list. Only eligible accounts are displayed in the list. The application displays an appropriate message if the list is empty.
- Own accounts: Displays own personal as well as business accounts grouped by account type.
- Other accounts (in the same bank/credit union as mine or in other banks/credit union: Includes the list of all recipients added for all transfer types (internal, external, international, and domestic) for both personal and business users.
- Amount. Enter the amount to be transferred and click Continue.
- You cannot enter an amount greater than the available balance.
- This field is not applicable if you had selected a credit card account in the To account and after selecting the amount, you will be directed to the confirmation screen.
- For loan account, the Pay Due amount is pre-populated for the loan. You can select Pay Other Amount and enter the amount.
- Frequency. Select the frequency from the list.
- This field is not applicable if you have selected a credit card account in the To account field.
- By default, the application selects the frequency as Once.
- Change the frequency and the date if the transfer is a scheduled or a recurring transfer.
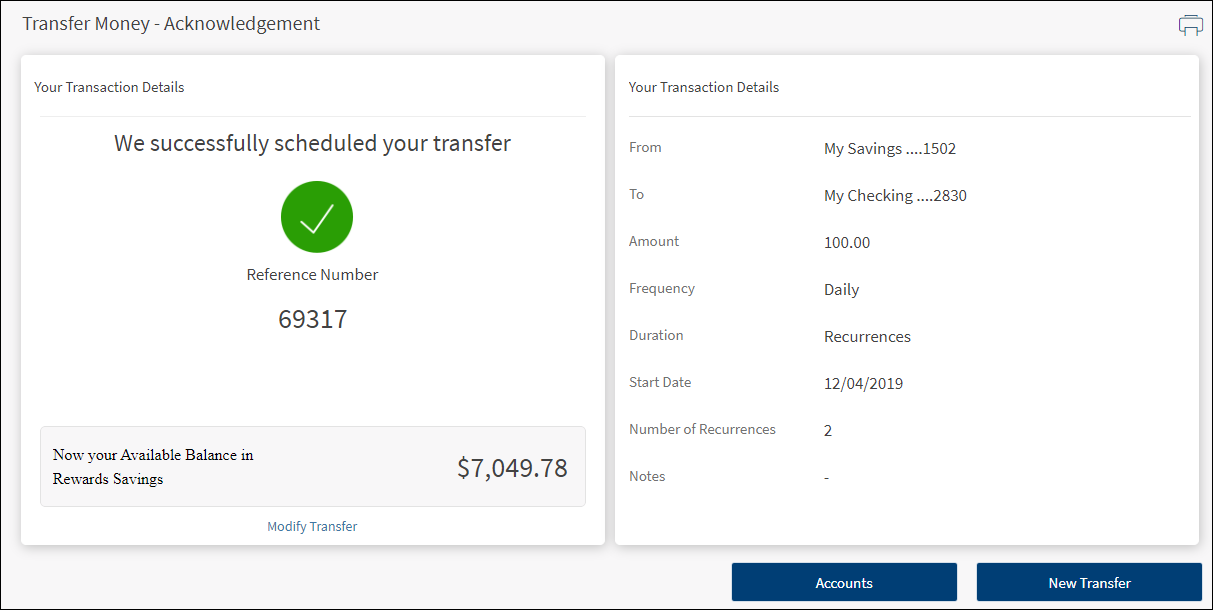
Scheduled Transfer or Recurring Transfer
You can choose to set the transfer as a recurring transfer (for example, daily, weekly, monthly). In that case, select if the recurrence has to be on a specific date and select a date from the calendar, or if it is the number of occurrences and enter the occurrence value (for example, 24 times). By default, the current date is selected as the recurring transfer start date. The other frequency options are:
- Daily
- Weekly (every 7th day from the selected start date)
- Every Two Weeks (every 14 days from the selected start date)
- Monthly (every month on the selected date, cannot select 31st of the month in this case)
- Quarterly
- Half Yearly
- Yearly
NOTE: If you select any credit card account in To account, the application displays the Current Balance, Statement Balance, Minimum Due Amount, and Other Amount as payment options. Select the required option. If you select Other Amount, then enter the amount in the field provided.
- Send On. Select the transfer date from the calendar. By default, the current date is selected as the transfer date.
- Note. Add notes if required.


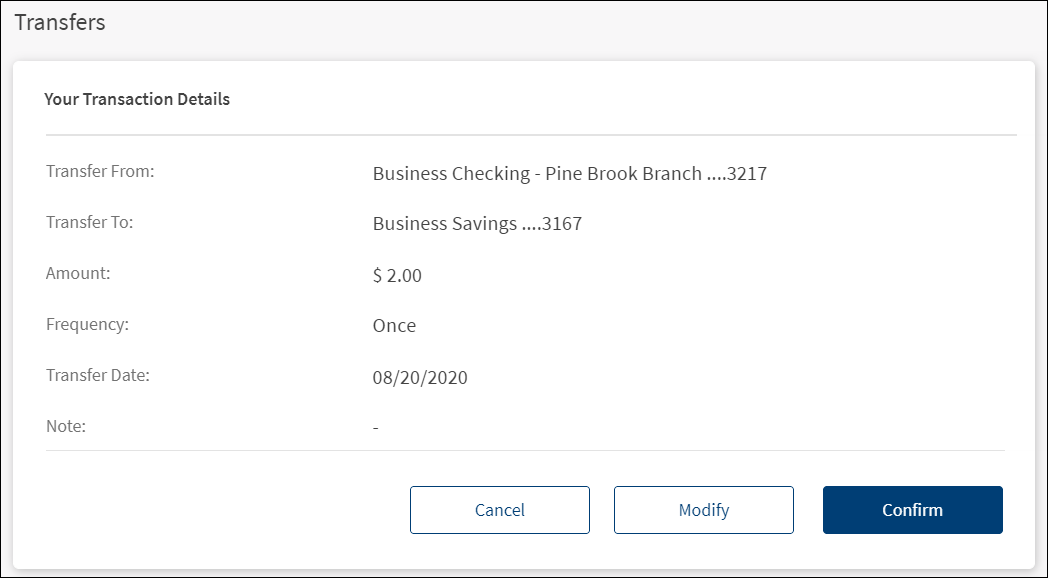
- Click Continue. If you have specified valid data in all the fields, the application displays the confirmation screen with provision to modify the details if required.

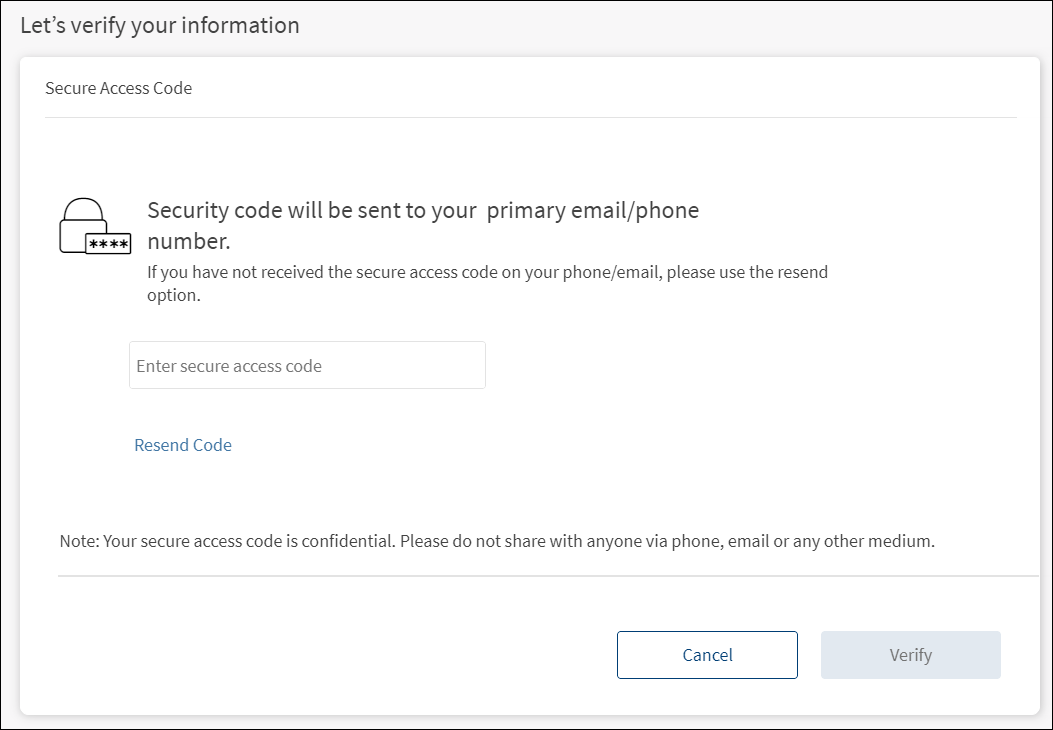
- Modify details if required. Click Confirm. The application displays an MFA screen.

- Depending on the bank configuration, you must either provide the secure access code that is sent to your registered mobile number and email ID or must answer the security questions.
- Only one OTP resend request is allowed per transaction.
- The authentication type is configured in the Spotlight application.
NOTE:
- Once the authentication details are entered, click Verify.
NOTE:
- If the transfer fails due to some reason (for example, if you have insufficient funds in the selected account), the application displays an alert along with an appropriate message.
- If the session is timed-out during a transfer and leaves the window open, you have to initiate the transfer again.
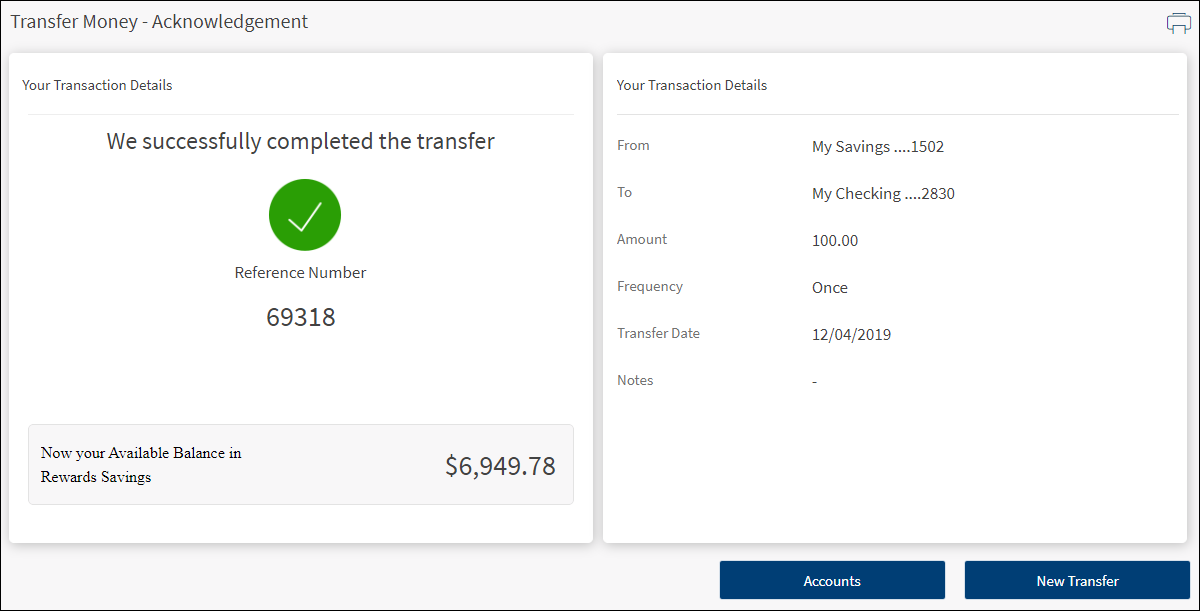
The application displays an acknowledgment screen with transaction details, unique reference number to the transaction, and provision to do the following:
- Make a new transfer
- View Accounts (Accounts Dashboard)
- Print the transfer acknowledgment
- Modify Transfer (for recurring transfers)
Acknowledgment Screens
Recurring Transfer
Error and Validations
- When the transfer to a loan is initiated, the next due amount is pre-filled in the Amount field. You cannot modify the due amount.
- The Bank/FI's can add a limit on the number of transfers or maximum amount that can be made/transferred to a loan account in a month.
- The payment may not be reflected immediately in the loan details or transaction section. It may take 2-3 business days to reflect in the loan account.
- If the From account does not have the enough balance to make the payment, the following message is displayed, "Your account balance isn't sufficient to make this payment".
- In case the due amount is zero, the following message is displayed, "Currently there are no pending dues on your account".
- In case the selected date is later than the Next Payment Date associated with the loan account, the following message is displayed, "The scheduled date is later than the due date. Making payments after the due date may incur penalty. Do you wish to continue?".
- You cannot make a payment more than the total over due amount. If you select, Pay Other Amount and enter the overdue amount, the following message is displayed, "Your account balance isn't sufficient to make this payment".
Configuration
- The authentication type is configured in the Spotlight application.
- The visibility of each feature is controlled through the permissions defined for the user. See permissions for more information. The permissions at user levels are defined during user creation and while editing the user details after the user is created. In case the user does not have access to any of the features, that option will not be visible on the form and on the menus. The permissions at the company level and role level are defined in the Spotlight application.
- The elements on the screen depends on the user account type and the permissions to access features and perform associated actions.
- The capability to revoke or restore the features is available in the Spotlight application.
- The Feature/Role/Company level transaction limits for recurring, nonrecurring, non-scheduled, and scheduled transactions are managed in the Spotlight application. User level limits can be managed in Spotlight and the customer-facing application.
Add Bookmark
save your best linksView Bookmarks
Visit your best links BACK
BACK


Are you sure you want to log-off?