

| Bookmark Name | Actions |
|---|
Automated Clearing House (ACH) Transfers
The automated clearing house (ACH) is an electronic funds-transfer system run by the National Automated Clearing House Association (NACHA). This payment system deals with payroll, direct deposit, tax refunds, consumer bills, tax payments, and many more payment services in the United States.
Using the feature, a business user with the required permissions can do the following:
- Initiate payment and collection transactions.
- Create and manage collection and payment templates.
- View transaction history.
- Upload and manage ACH files for bulk transactions.
The ACH dashboard shows all the ACH transactions and templates related information and shows the various actions a user can perform.
Menu path:
- Online Banking: Side menu > ACH > Make Transaction with Template
- Mobile Banking: Side menu > ACH
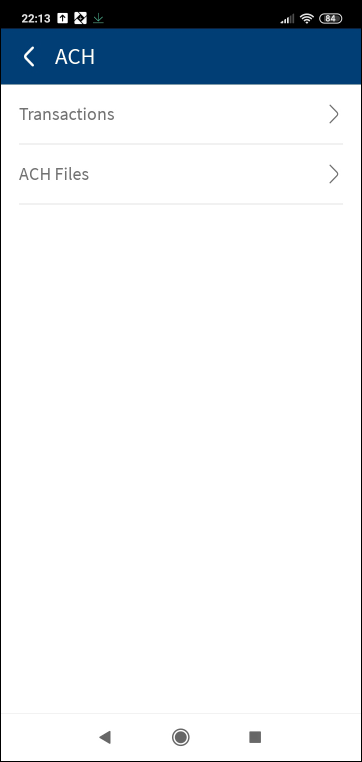
The application displays the ACH dashboard with the following information as tabs. The ACH Templates tab is selected as default.
- ACH Templates
- Transactions
- ACH Files
You can perform the following activities on the dashboard:
- Create an ACH template
- Create an ACH transaction using a template
- Create an one-time ACH transaction (without template)
- Manage transactions
- Manage ACH files
- Upload an ACH File
NOTE:
- Accounts are segregated by personal and business type at all relevant places in the application during transfers and other flows and icons against each account indicates the type of account.
- Only those users with permission to create ACH Payments / ACH Collections can create the respective templates and transactions.
- Only the users with permission to approve ACH transactions can approve or reject transactions.
- Authorized approver will see the payments and collections transactions only if the approver has Approval permission for ACH Payments and ACH Collections respectively.
- Authorized approver will see the transactions created by self only if the approver has Self-Approval permission.
- Pagination is available if there are more than 10 rows in a list. Pagination control is shown at the bottom of the list, which specifies the record numbers, for example, 11-20 and shows the left and right arrows for navigating to previous or next set.
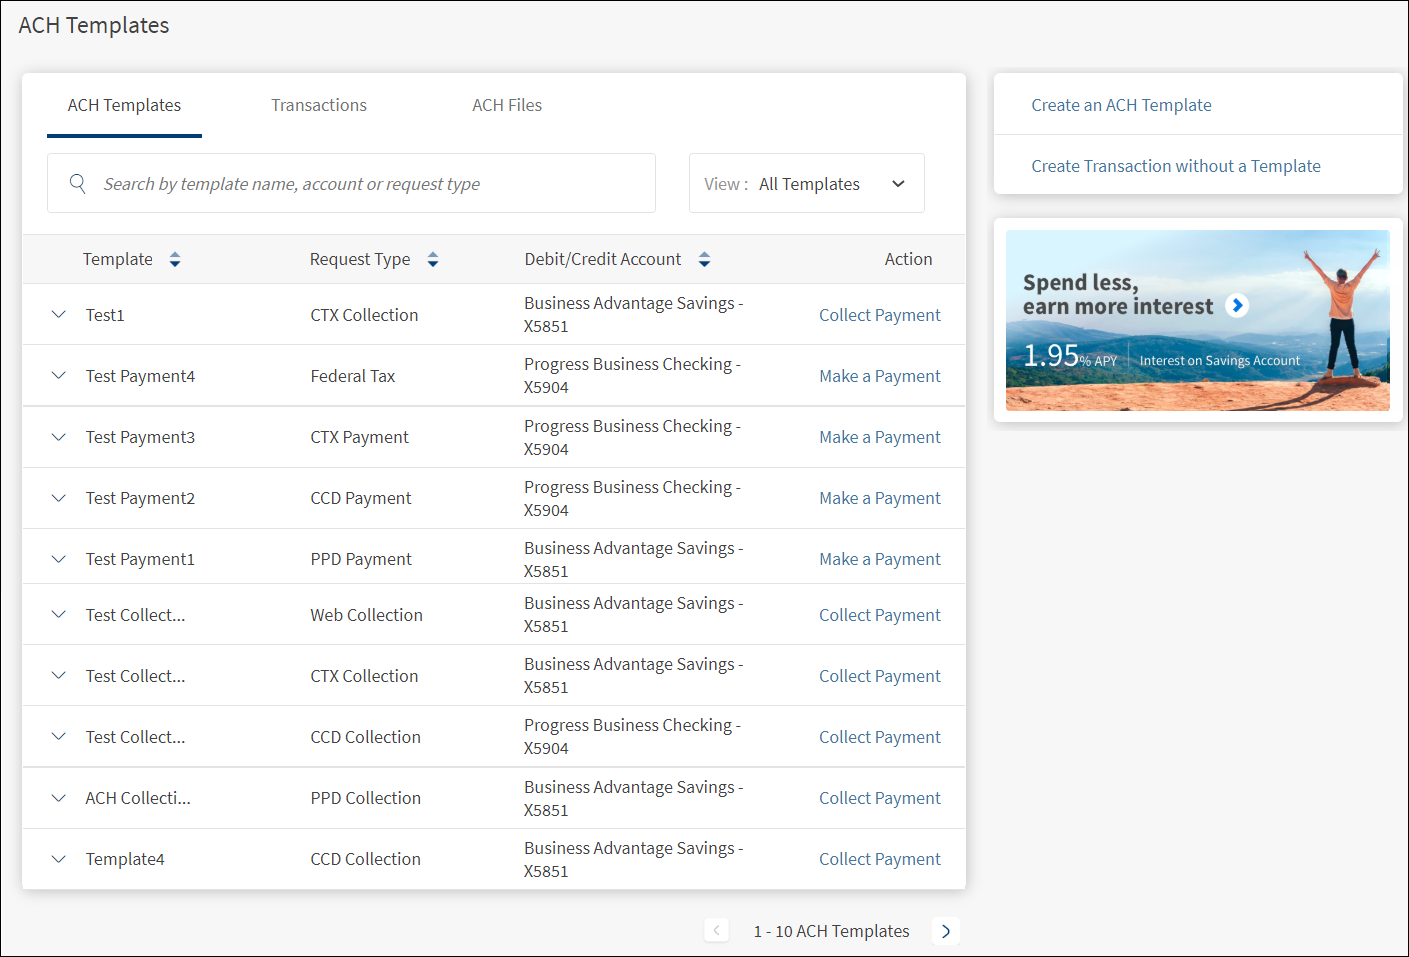
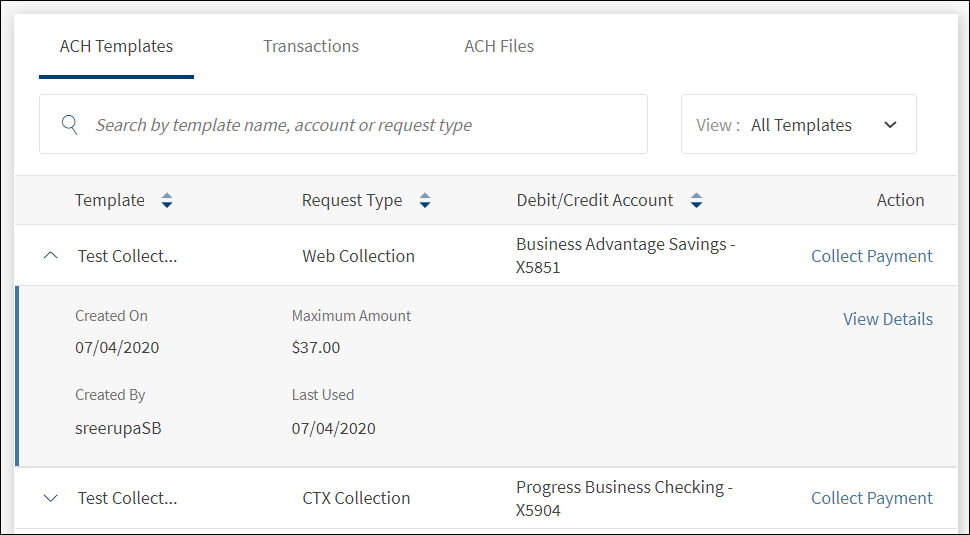
ACH Templates Tab
The ACH Templates tab displays the list of saved payment and collection templates, which can be used to make a payment or collect payments at a later date.
Menu path: Side menu > ACH > Make Transaction with Template
The ACH Templates tab displays the following information:
- Template: The name of the template.
- Request Type: The type of the request made using any type (collection or payment) of template. Supported request types are:
- PPD (Prearranged Payments and Deposits) payment or collection
- CCD (Cash Concentration and Disbursement) payment or collection
- CTX (Corporate Trade Exchange) payment or collection
- Federal Tax
- Web Collection
- Debit/Credit Account: The account from which the payment has to happen or to deposit the collection amount.
- Actions. Instantly make a payment or collection.
- Click the down arrow to view the template details - Created on, created by, maximum amount, and the last used date. Further actions can be performed such as view the additional details of the template, edit or delete the template, and initiate payment or collection transaction. See View Template Details for more information.
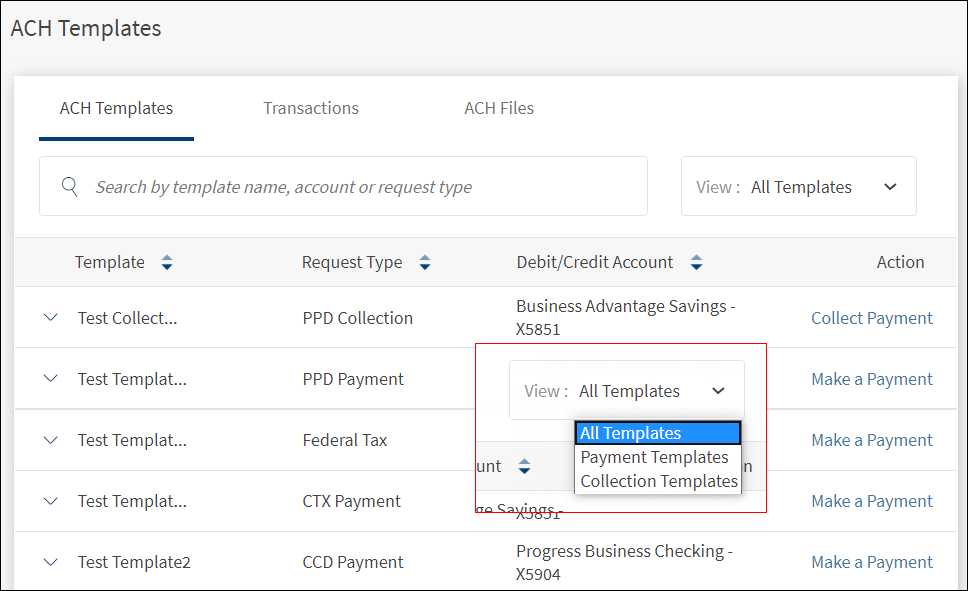
Filter: Filter the list based on the type of template to view. The options are All Templates (default selection), Payment Templates and Collection Templates. Select the required template type from the View list.
Sort: By default, the list is sorted by Template Name, but can also be sorted by Request Type or Debit/Credit Account using the sort  icon.
icon.
Search: Search the list of templates to find a certain template to initiate a transaction. To search any template, enter the name of the template, request type, or the debit or credit amount.
View and Manage Templates
Use the feature to view and manage the template details.
Menu path: Side menu > ACH > Make Transaction with Template > Click any row
On the ACH templates tab, click any template row, and then click View Details. The application displays the additional details on the selected template.
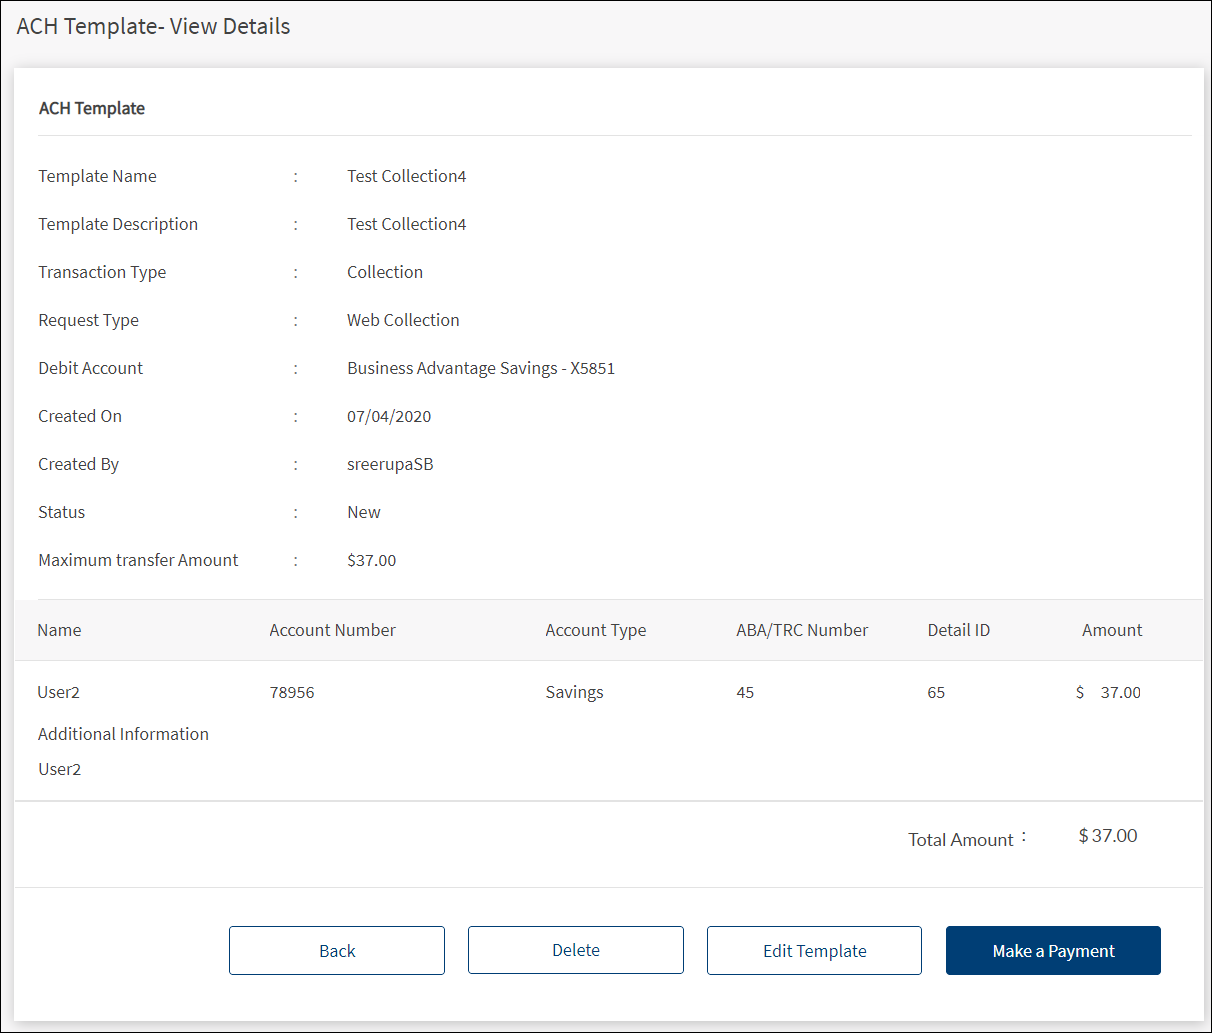
The application displays the following information:
- Template Name
- Template Description
- Transaction Type
- Request Type
- Debit Account
- Created On
- Created By
- Status
- Maximum Transfer Amount
- Provision to delete the template, edit the template, make a transaction, or go back to the templates list.
- The account details of the recipients who will receive or pay the amount when a transaction is performed. The details vary depending on the "Request Type" of the transaction. See table for details.
| Request Type | Account Details |
|---|---|
| PPD |
|
| CCD |
|
| CTX |
|
| Web Collection |
|
| Federal Tax |
|
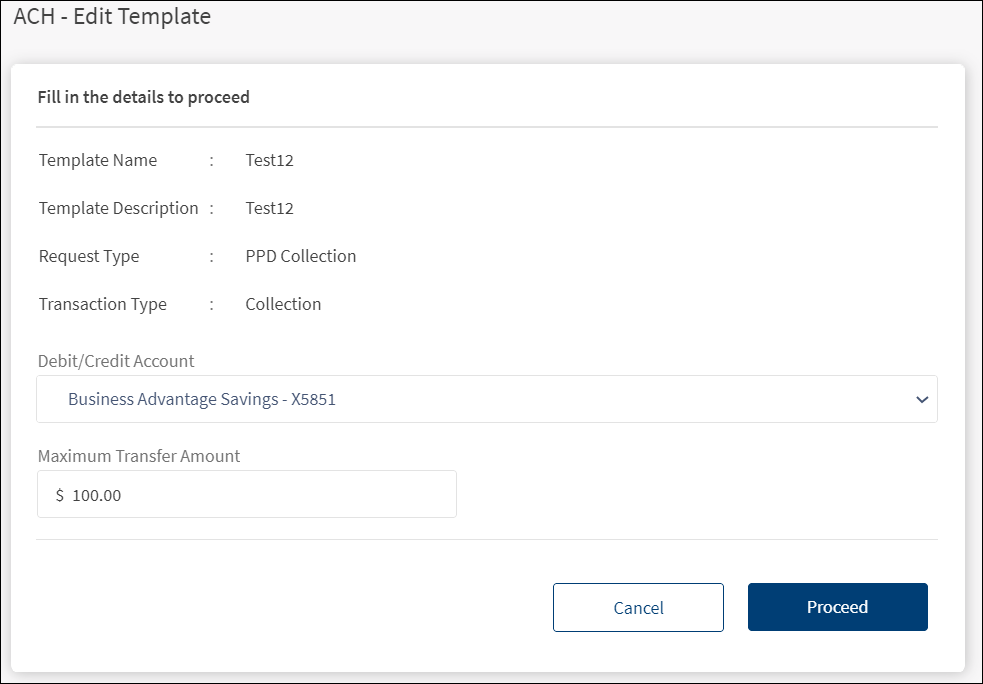
Edit Template
A business user with the required permissions ("Create / Edit Payment Templates" permission for ACH Payments / ACH Collections) can edit a payment or collection template respectively and the feature is visible only to these users.
- On the template view details screen, click Edit Template.

- Make the changes as required - Debit Account/Credit account and Maximum Transfer Amount. Click Proceed.
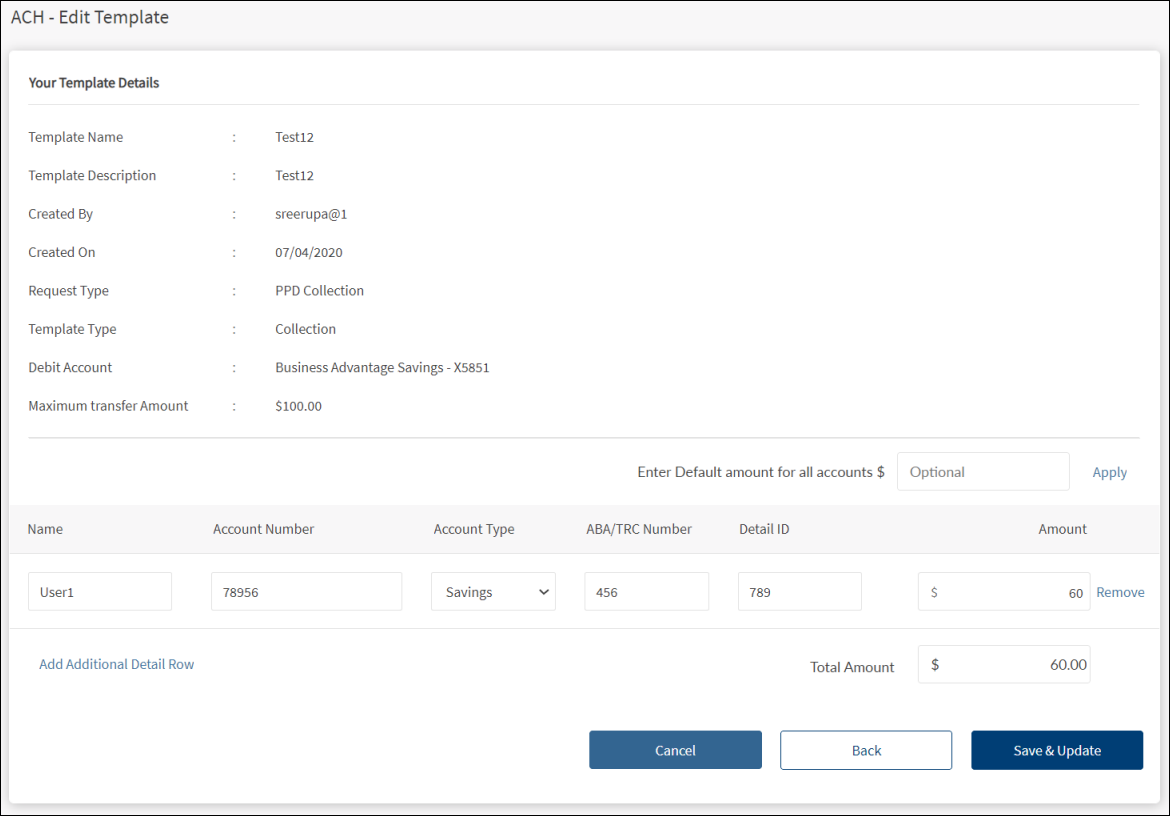
- Make the required changes to the entries in the account details section based on the selected Request Type. Click Save & Update.
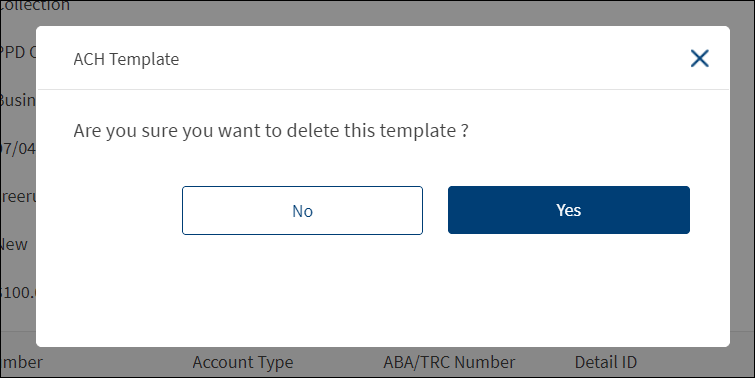
Delete Template
A business user with the required permissions ("Delete Templates" permission for ACH Payments / ACH Collections) can delete a payment or collection template respectively and the feature is visible only to these users. On deleting the template, the user is asked for a confirmation. After confirmation, the template is removed from the list and will not be available to any users.
- On the template view details screen, click Delete.

- Click Yes to delete the template.
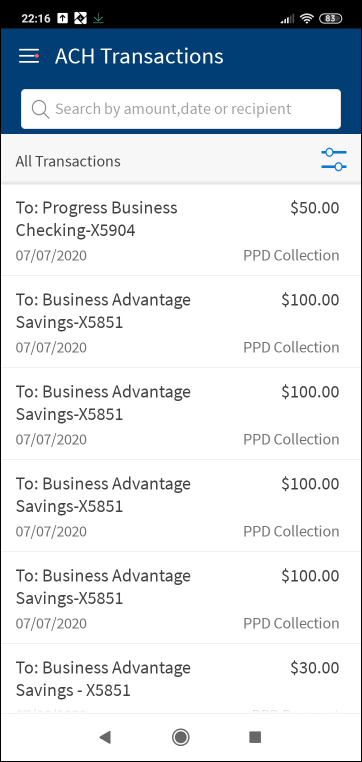
Transactions Tab
The Transactions tab displays the list of all payment and collection ACH transactions. A user with access to the ACH feature, can do the following:
- View details of all the completed and pending approval transactions.
- Approve or reject the transactions that are pending approval if the user is one of the approvers.
- Withdraw a transaction that is pending approval if the user is the one who has initiated the transaction.
Menu path: Side menu > ACH > ACH History
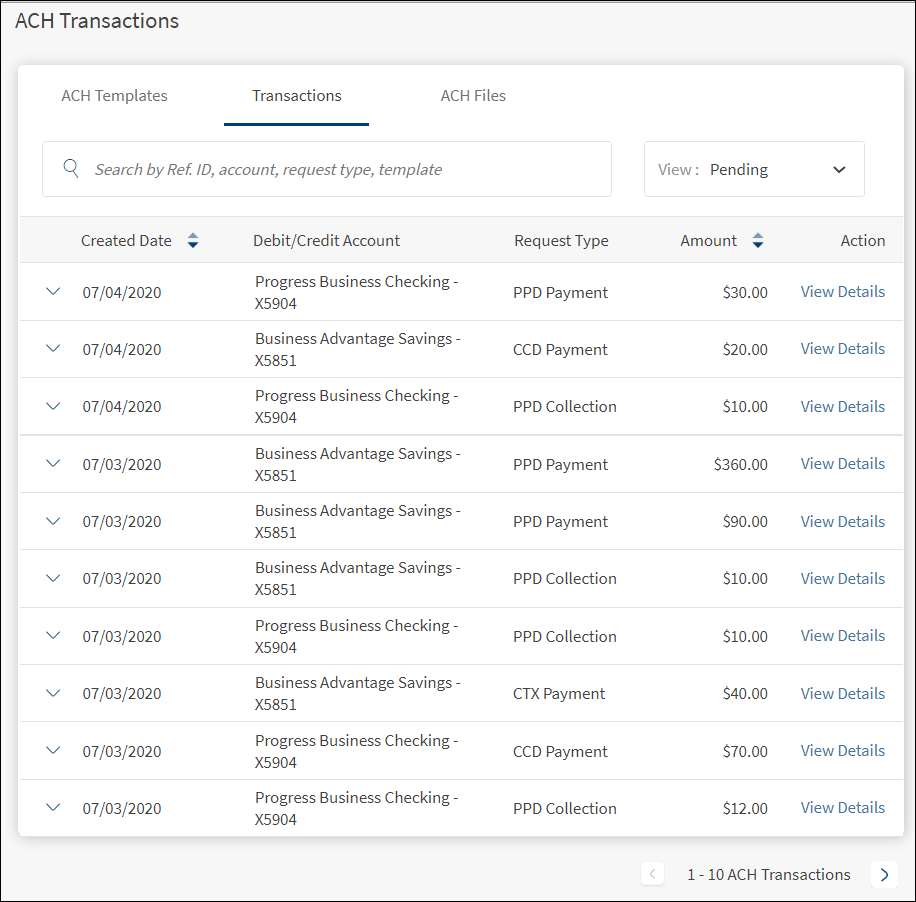
The ACH Transactions tab displays the following information:
- Created Date: The transaction created date.
- Debit/Credit Account: The account from which the payment has to happen or to deposit the collection amount.
- Request Type: The type of the request made using any type (collection or payment) of template. Supported request types are:
- PPD (Prearranged Payments and Deposits) payment or collection
- CCD (Cash Concentration and Disbursement) payment or collection
- CTX (Corporate Trade Exchange) payment or collection
- Federal Tax
- Web Collection
- Amount: The transaction amount.
- Actions. View details of the transactions and take further appropriate action depending on the status of the transaction.
Actions
- For submitted transactions. View Details link. Click to view details of the transaction.
- For transactions pending approval:
- Back to all transactions.
- Approve: Applicable only if the user is one of the approvers for the transaction. Click to approve the transaction.
- Reject: Applicable only if the user is one of the approvers for the transaction. Click to reject the transaction.
- Withdraw: Applicable only if the user is the initiator for the transaction. Click to withdraw the transaction.
Down arrow - View Details
Click the down arrow to view the transaction details - Created on, created by, template name, approvals received versus required, effective date of transaction, status, and transaction reference ID. Further actions can be performed such as view the additional details of the transaction by default and approve or reject the transaction if you are one of the approvers. See Manage Transactions for more information.
- For submitted transactions. View details of the transactions and a single action on the page for going back to transactions.
- For transactions pending approval
- Withdraw: Withdraw the transaction before it is approved.
- Approve: Applicable only if the user is one of the approvers for the transaction. Click to approve the transaction.
- Reject: Applicable only if the user is one of the approvers for the transaction. Click to reject the transaction.
- Withdraw: Applicable only if the user is the initiator for the transaction. Click to withdraw the transaction.
Filter: Filter the list based on the type of transactions to view. The options are:
- All Transactions: All ACH collection and payment transactions that are submitted for execution, rejected by the clearing house, and pending approval. This is the default selection.
- All Collections: ACH collection transactions that are submitted for execution, rejected by the clearing house, and pending approval.
- All Payments: ACH payment transactions that are submitted for execution, rejected by the clearing house, and pending approval.
- All Pending Approval: All ACH collection and payment transactions that are pending approval of the logged in user.
- Collections Pending: ACH Collection transactions that are pending approval of the logged in user.
- Payments Pending: ACH payment transactions that are pending approval of the logged in user.
Sort: By default, the list is sorted by Created Date, but can also be sorted by Amount using the sort icon.
Search: Search the list of transactions to find a certain transaction. To search any transaction, enter the reference ID, account name, request type, or the template name.
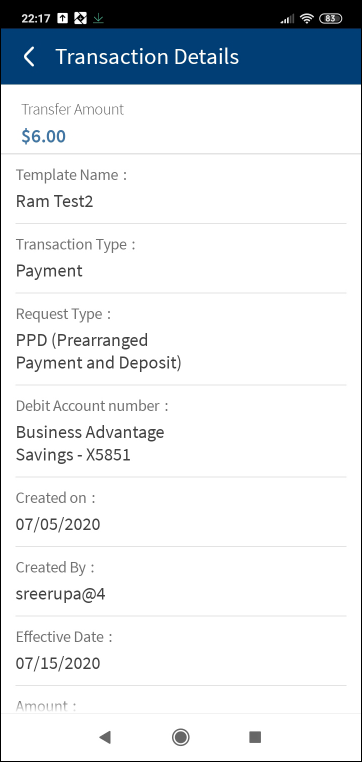
Manage Transactions
Use the feature to view and manage the transaction details.
Menu path: Side menu > ACH > ACH History (Transactions tab) > Click View Details link of a transaction
On the Transactions tab, from the list of transactions, click the View Details link of the transaction. The application displays the additional details on the selected transaction.
NOTE: The following screens are of pending transaction to demonstrate the actions available.
![]()
![]()
The application displays the following information:
- ACH Transaction
- Template Name
- Transaction Type
- Request Type
- Debit Account
- Created On
- Created By
- Created By
- Effective Date
- Maximum Transfer Amount
- Status
- Reference ID
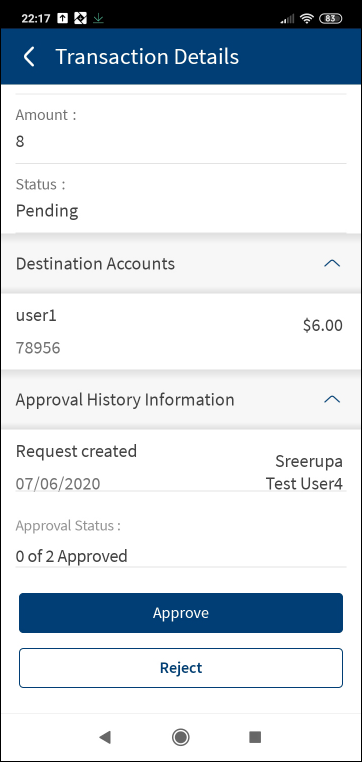
- Approval History Information
- Approval Status. The number of approvals required for the transaction to execute and the number of approvals received.
- Date and Time
- User name of the approver
- Action
- The account details of the recipients who will receive or pay the amount when a transaction is performed. The details vary depending on the "Request Type" of the transaction. See table for details.
| Request Type | Account Details |
|---|---|
| PPD |
|
| CCD |
|
| CTX |
|
| Web Collection |
|
| Federal Tax |
|
An authorized user with the required permissions can do the following:
- Click View Details to view the transaction details.
- Withdraw the payment or collection transaction before the transaction is approved.
- Approve or reject the transaction if the user is one of the assigned approvers.
Approve or Reject Transactions
Use the feature to approve or reject the pending approval transactions. This feature is applicable only to those users who have the required permissions to approve or reject transactions and the user is one of the approvers for the selected accounts as defined in the approval matrix.
Menu path:
- Side menu > ACH > ACH History (Transactions tab) > Click down arrow of a pending transaction > Approve or Reject
- Side menu > ACH > ACH History (Transactions tab) > Click View Details link of a pending transaction > Approve or Reject
On the Transactions tab, from the list of transactions, click the down arrow of the required pending transaction. Alternatively, click the View Details link of the required pending transaction. The application displays the details on the selected pending transaction.
![]()
![]()
Approve Transaction
- Click Approve to approve the transaction.
- The application displays an acknowledgment screen with a message that the transaction is approved along with a reference number.

- Click Back to Transactions to go to the transactions list.
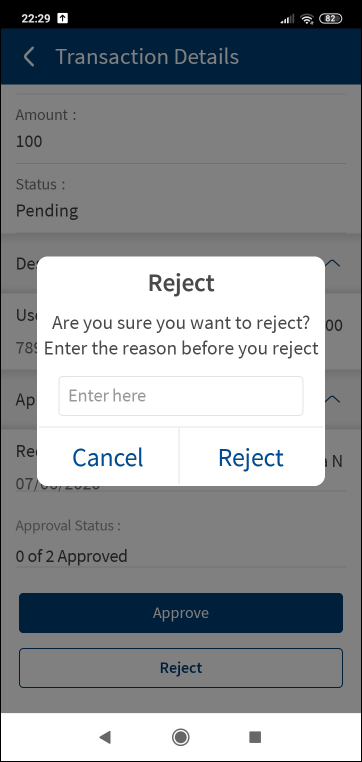
Reject Transaction
- Click Reject to reject the transaction.
- The application displays a dialog if the transaction is to be rejected.

- Enter a reason in the comments box and click Yes. It is mandatory to enter a reason.

- The application displays an acknowledgment screen with a message that the transaction is rejected along with a reference number.
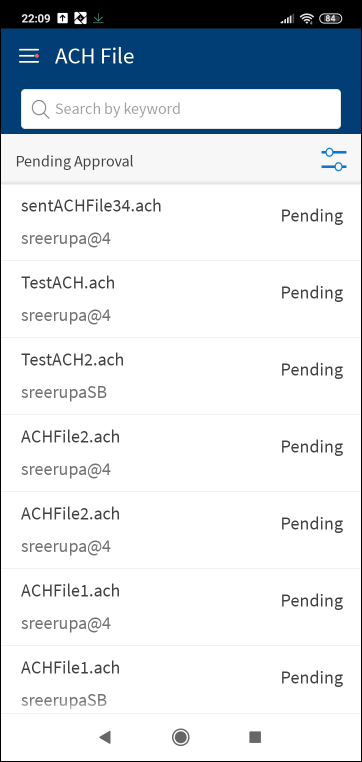
ACH Files Tab
The ACH Files tab displays the list of files (NACHA files with .ach format) that are submitted for bulk processing payments and collections through the application. A user with access to create a ACH transaction can upload an ACH file for processing the transaction. Only NACHA file format is accepted as a valid file format for processing.
Menu path: Side menu > ACH > ACH Files
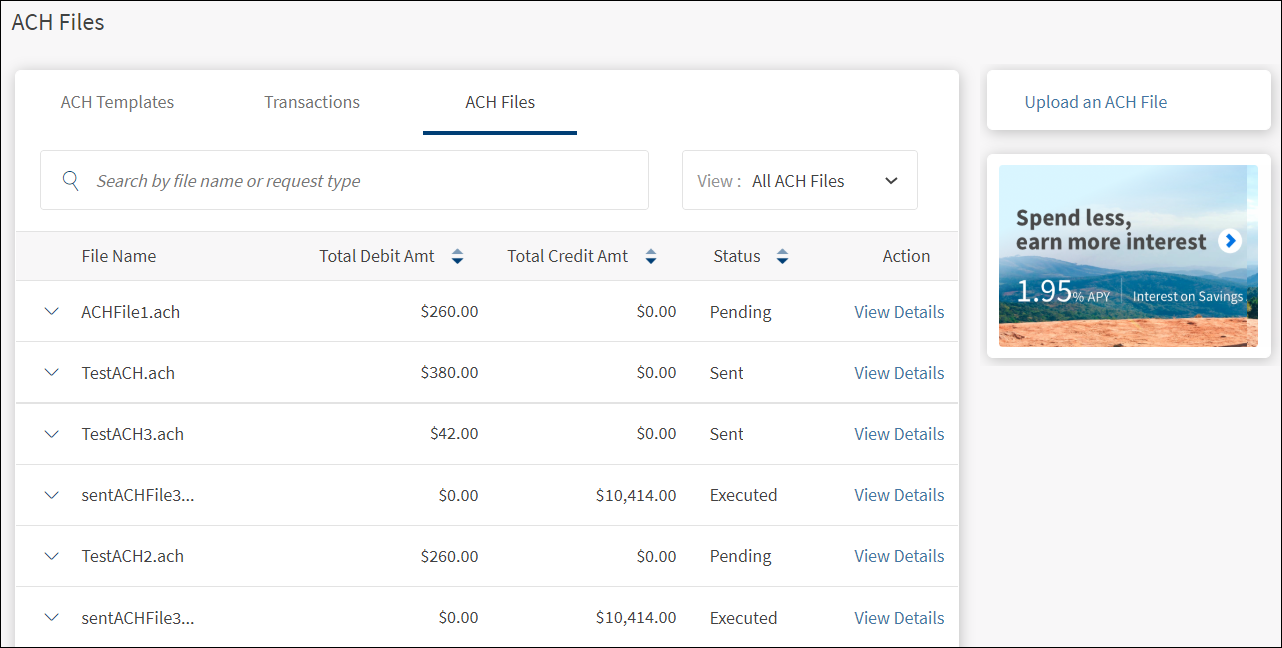
The ACH Files tab displays the following information:
- File name: The NACHA file name in .ach format.
- Total Debit Amount: The total payment amount.
- Total Credit Amount: The total collection amount.
- Status: The status of the file - Pending, Executed, and Sent.
- Actions. View file details and take further appropriate action depending on the status of the file.
Actions
- For executed and sent files. View Details link. Click to view details of the file.
- For transactions pending approval:
- Back to the files list.
- Approve: Applicable only if the user is one of the approvers for the transaction. Click to approve the file.
- Reject: Applicable only if the user is one of the approvers for the transaction. Click to reject the file.
- Withdraw: Applicable only if the user has initiated the transaction. Click to withdraw the file.
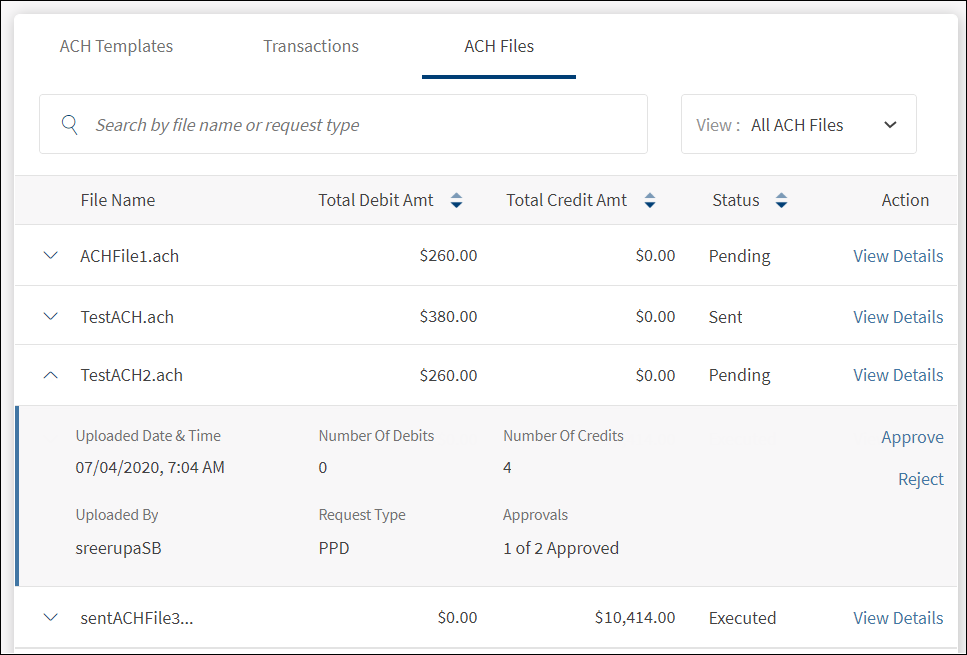
Down arrow - View Details
Click the down arrow to view the file details - Uploaded date & time, uploaded by, number of debits, number of credits, request type, and approvals received versus required. Further actions can be performed such as view the additional details of the file by default and approve or reject the file if you are one of the approvers. See Manage ACH Files for more information.
- For executed and sent files. View details of the file and a single action on the page for going back to the file list.
- For transactions pending approval
- Withdraw: Withdraw the file before it is approved.
- Approve: Applicable only if the user is one of the approvers. Click to approve the file.
- Reject: Applicable only if the user is one of the approvers. Click to reject the file.
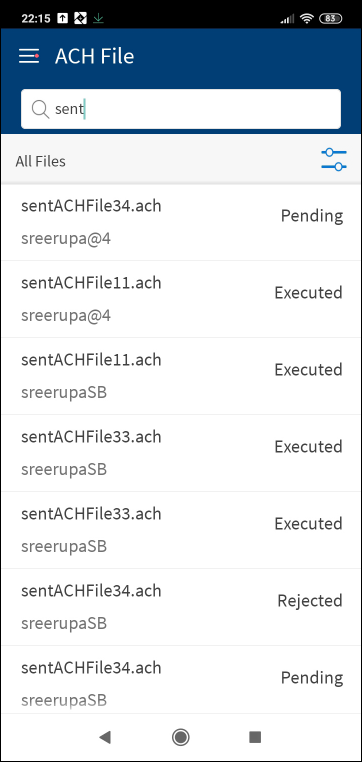
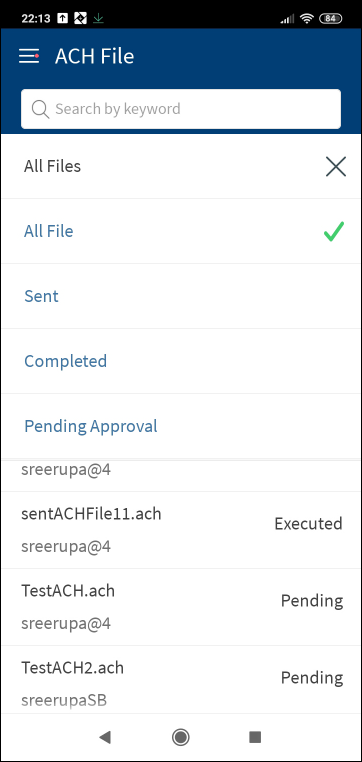
Filter: Filter the list based on the status of the files to view. The options are:
- All ACH Files: All files that are executed, sent, and pending approval. This is the default selection.
- All Sent Files: The list of uploaded files.
- All Completed Files: The list of files with the status as Executed.
- All Pending Files: All ACH transactions that are pending approval of the logged in user.
Sort: Sort the list by Total Credit Amount, Total Debit Amount, or Status using the sort icon.
Search: Search the list of files to find a certain file to action further. To search any file, enter the file name or the request type.
Manage ACH Files
Use the feature to view and manage the ACH files
Menu path: Side menu > ACH > ACH Files > Click View Details link
On the ACH Files tab, from the list of files, click the View Details link of the file. The application displays the additional details on the selected file.
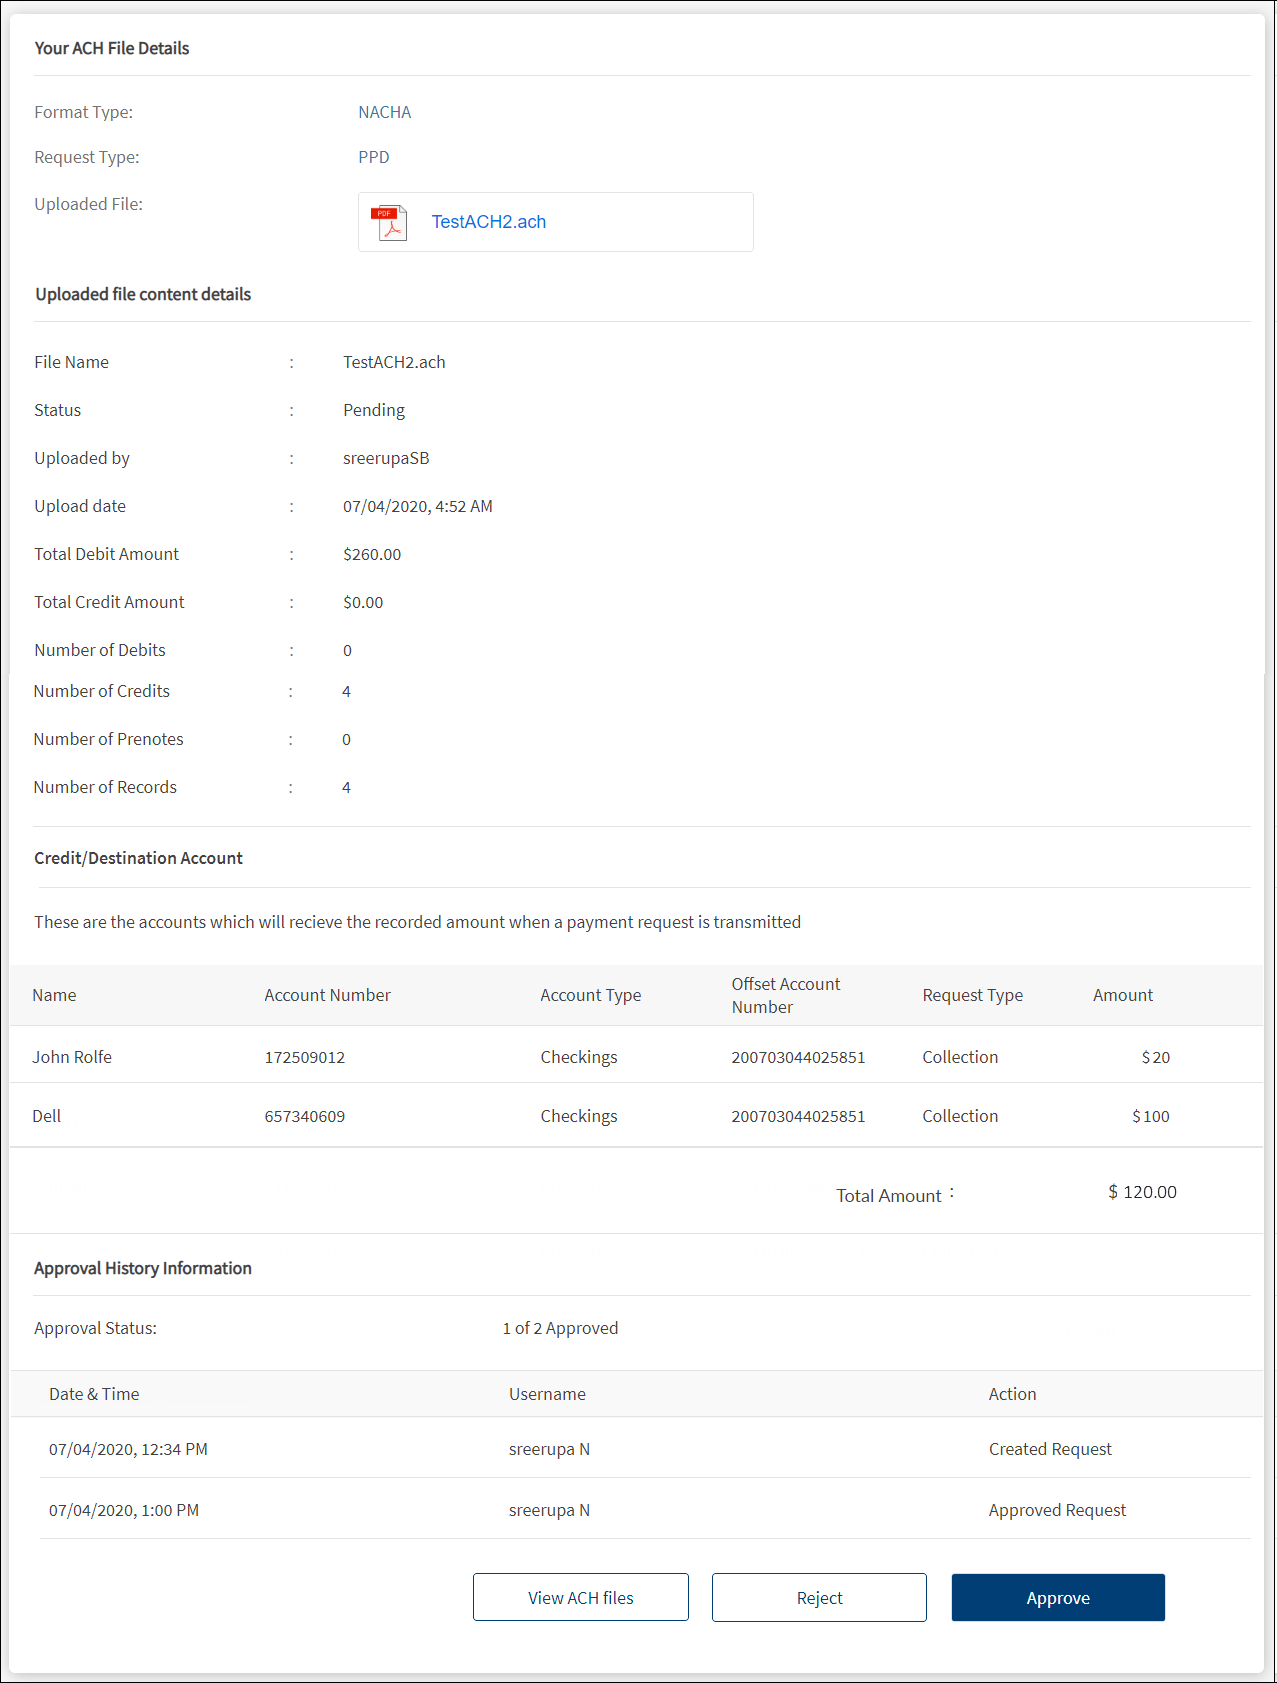
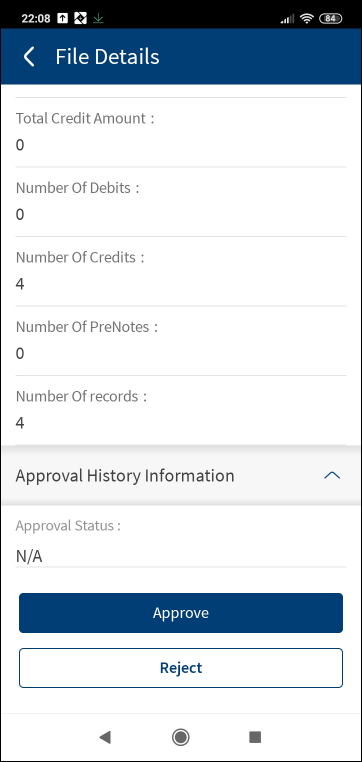
The application displays the following information:
- ACH FIle Details
- Format Type - NACHA
- Request Type
- Uploaded File in PDF format. Click to view the file.
- Uploaded file content details
- File Name
- Status
- Uploaded By
- Uploaded Date
- Total Debit Account - payment amount
- Total Credit Amount - collection amount
- Number of Debits - payments
- Number of Credits - collections
- Number of Prenotes
- Number of Records
- Credit/Destination Account - Accounts that will receive or pay the recorded amount when a collection or payment is transmitted. The following details are displayed - Account name, account number, account type, offset account number, request type (collection or payment), transaction amount, and total amount.
- Approval History Information
- Approval Status.
- Transactions pending approval: The number of approvals required for the transaction to execute and the number of approvals received.
- Transactions that are executed: Number of approvals received.
- Transactions that are rejected: Rejections received.
- Date and Time
- User name of the creator and approver
- Action
- Approval Status.
An authorized user with the required permissions can do the following:
- Click View Details to view the file details.
- Withdraw the file before the transaction is approved.
- Approve or reject the transaction if the user is one of the assigned approvers.
Approve or Reject ACH Files
Use the feature to approve or reject the pending ACH files. This feature is applicable only to those users who have the required permissions to approve or reject transactions and the user is one of the approvers for the selected accounts as defined in the approval matrix.
Menu path:
- Side menu > ACH > ACH Files > Click down arrow of a pending file > Approve or Reject
- Side menu > ACH > ACH Files > Click View Details link of a pending file > Approve or Reject
On the ACH Files tab, from the list of files, click the down arrow of the required pending file. Alternatively, click the View Details link of the required pending file. The application displays the details on the selected pending file.
Approve ACH File
- Click Approve to approve the file.
- The application displays an acknowledgment screen with a message that the file is approved along with a reference number.

- Click Back to Files to go to the ACH files list.
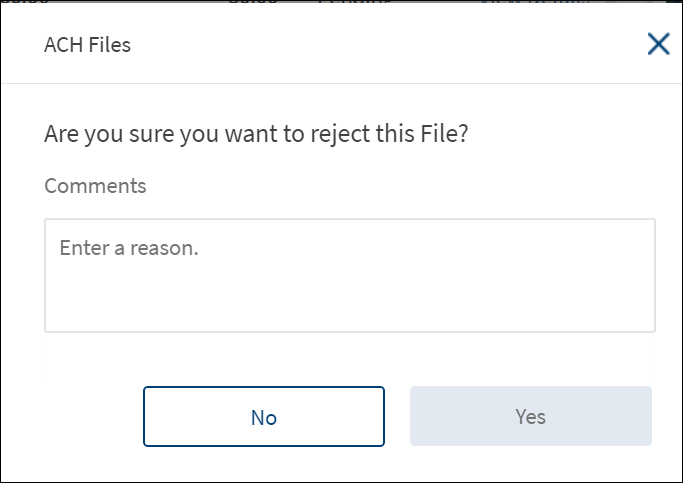
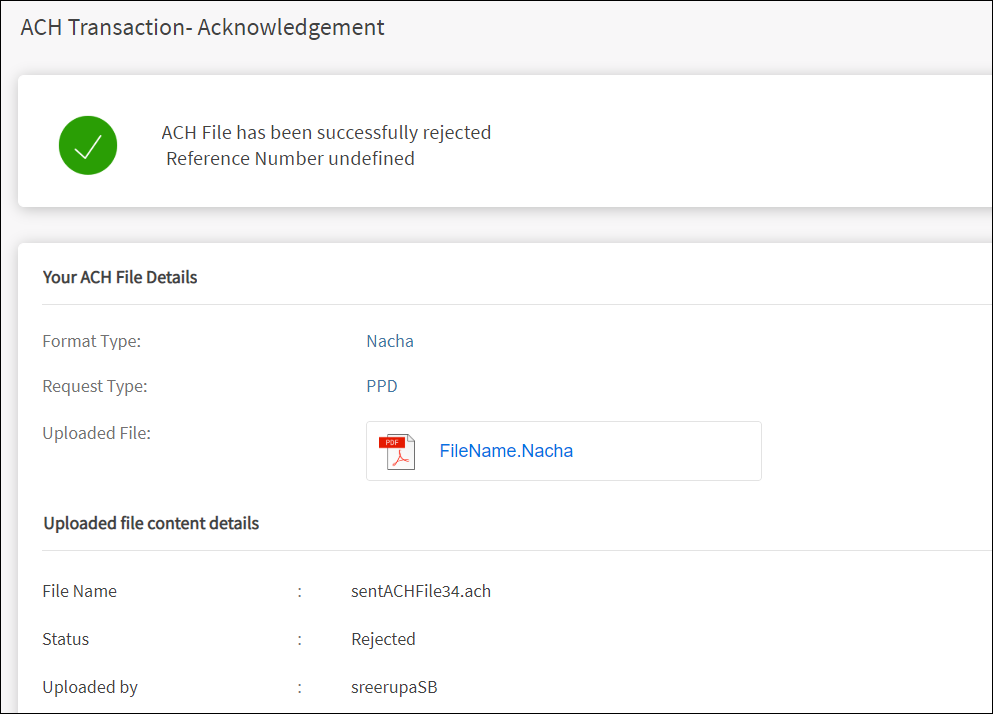
Reject ACH File
- Click Reject to reject the ACH file.
- The application displays a dialog if the file is to be rejected.

- Enter a reason in the comments box and click Yes. It is mandatory to enter a reason.

- The application displays an acknowledgment screen with a message that the file is rejected along with a reference number.
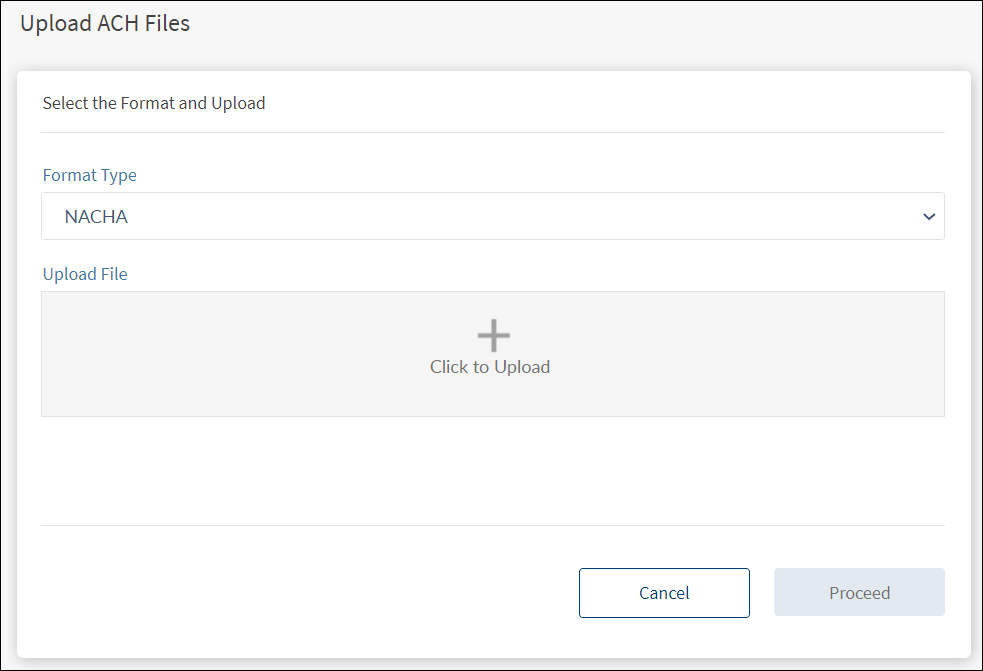
Upload an ACH file
Use the feature to upload an ACH file (NACHA files with .ach format) that is submitted for bulk processing payments and collections. A user with access to create a ACH transaction can upload an ACH file for processing the transaction. Only NACHA file format is accepted as a valid file format for processing. The file is parsed and all the payments and collections details (debit and credit amounts, request types) are gathered from the file. After an ACH file is uploaded, the file is added to the uploaded list with status as "Sent".
Menu path: Side menu > ACH > ACH Files > Upload an ACH File
The Financial Institution (FI) validates the accounts data, user permissions, MFA configuration, and transaction limits for ACH File uploads within the digital layer before the ACH file is sent for execution. The authorized users can set up approval controls for ACH file uploads. The application adheres to the approval process defined by the authorized users for the file uploads.
- If the max transaction limit for File Upload on any offset account exceeds, the application rejects the file upload.
- This includes the max transaction limit on per transaction, daily, and weekly limits for every offset account.
- For checking this limit, the application checks the limit against the sum of all the credits and debits made on each account.
- If the auto-denial limit on any of the offset accounts is exceeded, the application rejects the file upload.
- This includes user’s auto-denial limit on per transaction, daily, and weekly limits for every offset account.
- For checking this limit, the application checks the limit against the sum of all credits and debits made on each offset account.
- The pre-approval limit on all of the offset accounts must be met for the application to auto-approve the file upload.
- This includes user’s pre-approval limit on per transaction, daily, and weekly limits for every offset account.
- For checking this limit, the application checks the limit against the sum of all credits and debits made on each offset account.
- Violation of any of the pre-approval rules on any offset account requires that the file must go through an approval process. For every offset account where the violation occurs and for every rule that is violated (per transaction, daily, weekly), the application looks up the list of approvers and sends an approval request to each one of them. Note that the rules meant for handling approvals for cases where there are multiple violations, apply here as well.
NOTE: For transaction limits and approvals, the application checks for only those accounts where the sum of credits and debits are > 0.
To upload an ACH file, follow these steps:
- On the ACH Files tab screen, click Upload an ACH File. The application displays the Upload ACH Files screen.
- Select the Format Type from the list. Only NACHA format is accepted.
- Click the + icon and select the NACHA file in .ach format.
- Click Proceed to upload the file.
- The application checks for required permissions and validates the transaction limits before uploading the file.
- If the validation is successful, the application displays an acknowledgment that the upload is successful with the status as "Executed" if the sum of credit and debit is with in the pre-approval limit. Otherwise, the upload is successful, but the status will be "Pending" and must go through an approval process.
- After an ACH file is uploaded, the file is added to the ACH files list.
The following are a few error scenarios and the message displayed in the application while uploading an ACH file:
| Scenario | Message |
|---|---|
| If offset amount in ACH file is not balanced | "Offset amount present in the ACH file is not balancing the file. Please recheck your file" |
| If the auto-denial/max limit on any of the account(s) exceeds | "Transaction is denied due to auto denial max limit" |
| If user has invalid approval matrix or approval matrix not set | "Transaction cannot be executed. Please update the approval matrix of your organization and resubmit the transaction" |
| If sum of credit and debit is above pre-approval limit | "Your ACH file has been uploaded successfully and will be submitted for approval". The status of the file is Pending. |
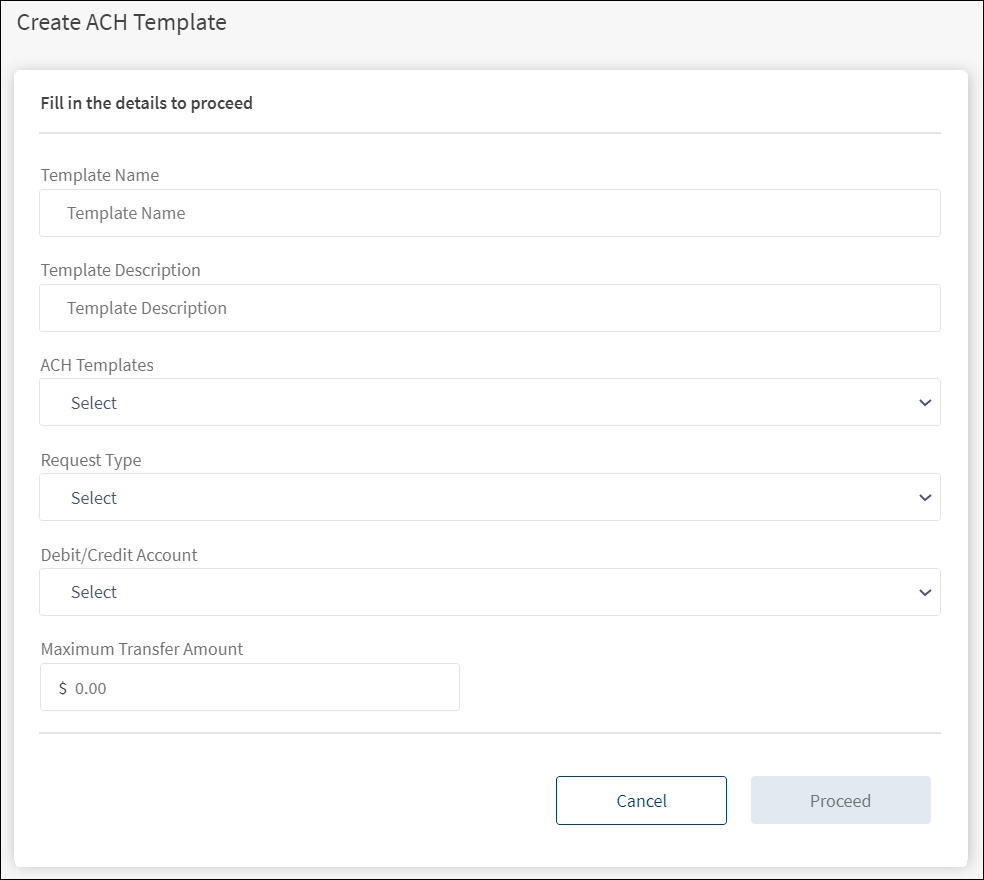
Create an ACH Template
Use the feature to create a new ACH template (base form with predefined values) that can be used for all future payment and collection related transactions.
Menu path:
- Side menu > ACH > Make Transaction with Template > Create an ACH Template
- On the ACH Templates tab, click Create an ACH Template
To create an ACH template, follow these steps. All the fields are mandatory:
- On the ACH Templates tab, click Create an ACH Template. The application displays the Create ACH Template screen.

- Template Name. Enter the name of the template.
- Template Description. Enter the description for the template.
- Template Type. Select the required template type from the list. The available template types are Payment and Collection.
- Request Type. Select the request type from the list. Supported request types are:
- PPD (Prearranged Payments and Deposits)
- CCD (Cash Concentration and Disbursement)
- CTX (Corporate Trade Exchange)
- Federal Tax - applicable only for payment template
- Web Collection - applicable only for collection template
- Debit or Credit Account. Select the required debit or credit account from the list. The application displays debit account for payment request and displays credit account for collection request. While selecting the debit account for payments, in case of combined user, the application displays only business accounts of the user and within business, different companies followed by accounts of each company. Personal accounts are not displayed in the debit account list. In case of business user, the application displays different companies followed by account of each company.
- Maximum Transfer Amount. Enter the maximum amount that you can transfer using this template.
- Click Proceed to go to the next screen.

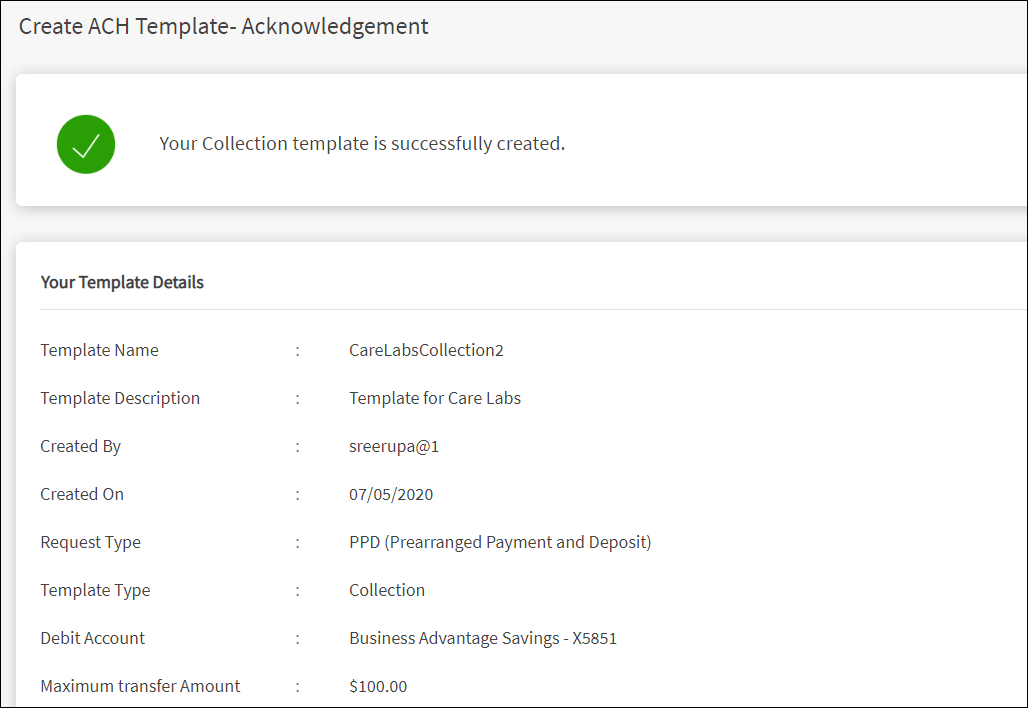
- The application displays the details entered in the previous screen and provision to add the recipients name who will receive or pay the money when a transaction is made using this template. Enter the details of the recipients based on the request type mentioned in the table. Note that the template cannot be created if the total amount across all the recipients exceeds the maximum transfer amount that is set for the template.
- If a default amount is required to all the added recipients, enter the required amount in Enter Default Amount for all Accounts field and click Apply. This field is optional.
- To add more recipients, click Add Additional Detail Row and enter the details. If there are more than one recipients and want to delete any recipient, click the Remove link on the required recipient row.
- Click Proceed.
NOTE: If multi-factor authentication is enabled for the feature, the application displays an authentication screen to select the medium to receive the secure access code - Registered primary email ID or Registered primary phone number. Complete the authentication process. Register or change the primary email ID or phone number from the Profile Settings.
- The application displays an acknowledgment screen that the template is created successfully. The template is added to the templates list on the ACH templates tab with the status as "New". The template is ready for performing transactions.

| Request Type | Account Details |
|---|---|
| PPD |
|
| CCD |
|
| CTX |
|
| Web Collection |
|
| Federal Tax |
|
Initiate an ACH Transaction Using Template
Use the feature to create or initiate an ACH transaction using the payment or collection templates that were already created and available on the ACH Templates tab.
Menu path:
- Side menu > ACH > Make Transaction with Template > Click Collect Payment or Make a Payment
- On the ACH Templates tab, from the list of templates, click the Collect Payment or Make a Payment link
![]()
To create or initiate a transaction using an ACH template, follow these steps:
- On the ACH Templates tab, from the list of templates, click the Collect Payment or Make a Payment link. The application displays the template details screen based on the selected template.

- Select the Effective Date from the date picker. It is mandatory. The transaction will be carried out on the selected date. The Effective date cannot be the current date.
- Click Next. The button is enabled only if the effective date is mentioned.

- The application displays the list of recipients who are saved in the template with respective amount. Use the option to remove the recipients or modify the existing ones before submitting the transaction. Change the amount of the transaction if required, but the total amount should not exceed the maximum transfer amount.
- Click Proceed.
If multi-factor authentication is enabled for the feature, the application sends a six-digit OTP to the selected channel. If you did not receive any OTP, use the resend cope option. Complete the authentication process and click Next.
- The application displays an acknowledgment screen with a message that the transaction request is sent for approval along with a reference number. The transaction is added to the list of transactions on the Transactions tab.

- Do any one of the following on the acknowledgment screen:
- Click Make Another Transfer to create another transaction using the same template.
- Go back to the templates list on the ACH templates tab.
Initiate a One-time ACH Transaction
Use the feature to create or initiate a one-time ACH transaction (without using the available templates).
Menu path:
- Side menu > ACH > Make One-time Transaction
- On the ACH Templates tab, click Create Transaction without a Template
To create a transaction without using an existing ACH template, follow these steps. All fields are mandatory:
- On the side menu, click ACH > Make One-time Transaction. Alternatively, on the ACH Templates tab, click Create Transaction without a Template. The application displays the screen to fill the transaction details.

- Transfer Type. Select the type of transfer. The available types are Payment and Collection.
- Request Type. Select the request type from the list. Supported request types are:
- PPD (Prearranged Payments and Deposits)
- CCD (Cash Concentration and Disbursement)
- CTX (Corporate Trade Exchange)
- Federal Tax - applicable only for payment transaction
- Web Collection - applicable only for collection transaction
- Debit or Credit Account. Select the required debit or credit account from the list. The application displays debit account for payment request and displays credit account for collection request. While selecting the debit account for payments, in case of combined user, the application displays only business accounts of the user and within business, different companies followed by accounts of each company. Personal accounts are not displayed in the debit account list. In case of business user, the application displays different companies followed by account of each company.
- Maximum Transfer Amount. Enter the maximum amount that you can transfer in this transaction.
- Effective Date. Select the Effective Date from the date picker. The transaction will be carried out on the selected date. The Effective date cannot be the current date.
- Click Proceed to go to the next screen.

- The application displays the details entered in the previous screen.
- Add the name of the recipients who will receive or pay the money when a transaction is made. Enter the details of the recipients based on the request type mentioned in the table. Note that the transaction cannot be initiated if the total amount across all the recipients exceeds the maximum transfer amount that is set for the transaction.
- If a default amount is required to all the added recipients, enter the required amount in Enter Default Amount for all Accounts field and click Apply. This field is optional.
- To add more recipients, click Add Additional Detail Row and enter the details. If there are more than one recipients and want to delete any recipient, click the Remove link on the required recipient row.
- Click Proceed to go to the next screen.
NOTE: If multi-factor authentication is enabled for the feature, the application sends a six-digit OTP to the selected channel. If you did not receive any OTP, use the resend cope option. Complete the authentication process and click Next
- The application displays an acknowledgment screen with a message that the transaction is submitted along with a reference number. The transaction is added to the list of transactions on the Transactions tab.

| Request Type | Account Details |
|---|---|
| PPD |
|
| CCD |
|
| CTX |
|
| Web Collection |
|
| Federal Tax |
|
ACH Transfers - Mobile Banking
Use the feature to view the ACH transactions and file list and approve the applicable pending transactions and files.
Menu path: Side menu > ACH
The application displays the ACH dashboard with the following information:
- Transactions. Tap to view the transactions list.
- ACH Files. Tap to view the list of ACH files.
ACH Transactions
The Transactions tab displays the list of all payment and collection ACH transactions. A user with access to the ACH feature, can do the following:
- View details of all the completed and pending approval transactions.
- Approve or reject the transactions that are pending approval if the user is one of the approvers.
- Withdraw the ACH transaction if it not approved yet.
The ACH Transactions tab displays the following information:
- Created Date: The transaction created date.
- Debit/Credit Account: The account from which the payment has to happen or to deposit the collection amount.
- Request Type: The type of the request made using any type (collection or payment) of template. Supported request types are:
- PPD (Prearranged Payments and Deposits) payment or collection
- CCD (Cash Concentration and Disbursement) payment or collection
- CTX (Corporate Trade Exchange) payment or collection
- Federal Tax
- Web Collection
- Amount: The transaction amount.
Filter: Filter the list based on the type of transactions to view. The options are:
- All Transactions: All ACH collection and payment transactions that are submitted for execution, rejected by the clearing house, and pending approval. This is the default selection.
- Collection Only: ACH collection transactions that are submitted for execution, rejected by the clearing house, and pending approval.
- Payment Only: ACH payment transactions that are submitted for execution, rejected by the clearing house, and pending approval.
- Pending: All ACH collection and payment transactions that are pending approval of the logged in user.
- Collections Pending: ACH Collection transactions that are pending approval of the logged in user.
- Payments Pending: ACH payment transactions that are pending approval of the logged in user.
Tap any transaction to view details of the transactions and take further appropriate action depending on the status of the transaction. Search the list of transactions to find a certain transaction. To search any transaction, enter the reference ID, account name, request type, or the template name.
Actions
- For submitted transactions. View the detailed information of the transaction.
- For transactions pending approval:
- Back to all transactions.
- Approve: Applicable only if the user is one of the approvers for the transaction. Click to approve the transaction.
- Reject: Applicable only if the user is one of the approvers for the transaction. Click to reject the transaction.
- Withdraw the payment or collection transaction before the transaction is approved.
ACH Files
The ACH Files tab displays the list of files (NACHA files with.ach format) that are submitted for bulk processing payments and collections through the application. A user with access to create a ACH transaction can upload an ACH file for processing the transaction. Only NACHA file format is accepted as a valid file format for processing.
The ACH Files tab displays the following information:
- File name: The NACHA file name in .ach format.
- User name
- Status: The status of the file - Pending, Executed, and Sent.
Filter: Filter the list based on the status of the files to view. The options are:
- All Files: All files that are executed, sent, and pending approval. This is the default selection.
- Sent: The list of uploaded files.
- Completed: The list of files with the status as Executed.
- Pending Approval: All ACH transactions that are pending approval of the logged in user.
Tap any file to view file details and take further appropriate action depending on the status of the file. Search the list of files to find a certain file to action further. To search any file, enter the file name or the request type.
Actions
- For executed and sent files. View the details of the file.
- For transactions pending approval:
- Back to the files list.
- Approve: Applicable only if the user is one of the approvers for the transaction. Click to approve the file.
- Reject: Applicable only if the user is one of the approvers for the transaction. Click to reject the file.
- Withdraw: Withdraw the file before it is approved.
Configuration
Permissions
- The visibility of each feature is controlled through the permissions defined for the user. See permissions for more information. The permissions at user levels are defined during user creation and while editing the user details after the user is created. In case the user does not have access to any of the features, that option will not be visible on the form and on the menus. The permissions at the company level and role level are defined in the Spotlight application.
- Only those users with permission to create ACH Payments / ACH Collections can create the respective templates and transactions.
- Only the users with permission to approve ACH transactions can approve or reject transactions.
- Authorized approver will see the payments and collections transactions only if the approver has Approval permission for ACH Payments and ACH Collections respectively.
Approve or reject transactions
- Applicable only to those users who have the required permissions to approve or reject transactions and the user is one of the approvers for the selected accounts as defined in the approval matrix.
Add Bookmark
save your best linksView Bookmarks
Visit your best links BACK
BACK


Are you sure you want to log-off?