

| Bookmark Name | Actions |
|---|
Business Enrollment
Use the feature to enroll your business into the banking application to view and manage your accounts online. The enrollment feature is for existing business customers of the bank who do not have any login credentials to access the accounts online. After you enroll into online banking and create a user name and password combination, you can sign in to the banking application from a computer, mobile device, or a tablet as applicable to access all your eligible accounts.
The business enrollment capability is provided to only authorized persons of a business and the application authenticates such users before allowing them to proceed with the enrollment. An authorized person (business owner) can enroll in business banking only after the authorized person has already connected with the bank and the bank has created and set up the business accounts. The bank captures the authorized person details in the core banking system (Infinity Transact), and then only the authorized person can self-enroll.
NOTE:
- The business enrollments can be auto-approved, where no manual intervention is required from the bank and the business customer can sign in and start using the online banking application right away. Alternatively, financial institutions may choose to evaluate the requests for enrollments and approve or reject them. This is based on the configuration set in the Spotlight application.
- The application has the capability to integrate with customer centric or account centric cores in Infinity Transact and allows for virtual business entities to be created by either aggregating a set of customer IDs or a set of account numbers. The corresponding enrolment flow, whether customer centric or account centric is to be decided at the implementation stage itself and there is no provision to switch between the enrollment flows later.
The core banking system may either be Account Centric or Customer Centric. In case of Account Centric core, there may not be a relation between the various accounts held by a customer/business. Customer Centric core relates all the accounts associated with a customer/business in a single entity like Membership ID or customer identification file (CIF).
While enrolling a new business, the application user will be required to look up the accounts and details from the core. The information to be captured and verified for this purpose depends on the core.
Any financial institution (FI) using the Infinity solution will have one of the cores based on which an enrollment flow can be chosen. A system configuration is available for this purpose at the time of implementation. Based on the type of enrollment flow selected in the configuration, the UI and services are enabled accordingly. This configuration needs to be set at the deployment time in the Application table of DBX DB. See Configuration for more information.
This section explains the customer-centric and account-centric business enrollment flows.
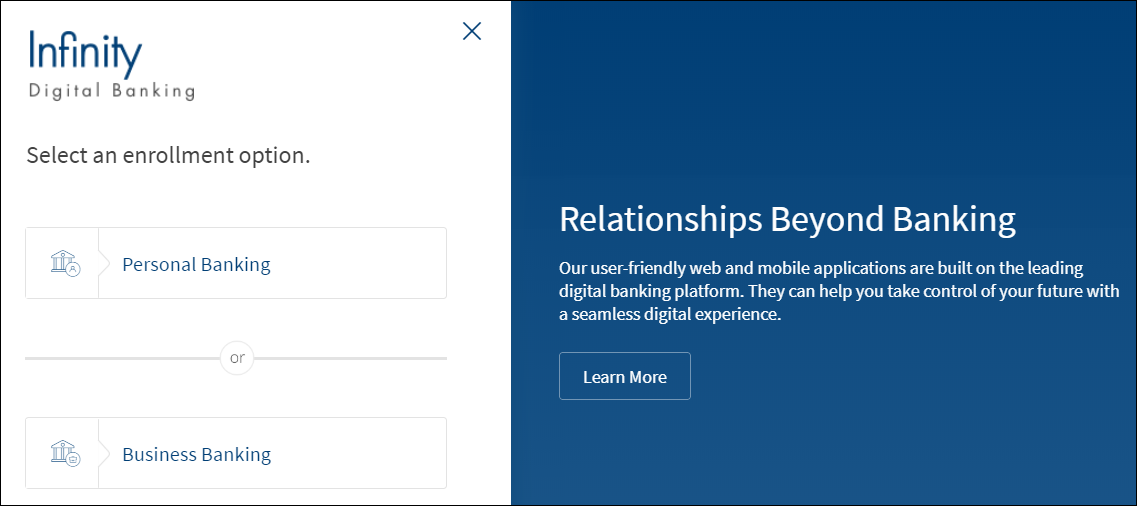
Menu path: On the sign in screen, click Enroll.
The application displays the screen to select the enrollment option.
NOTE:
- After enrollment, the default role to be assigned to the new user enrolling can be set up by the Financial Institution through the Spotlight application. The authorized person will have access to all the company accounts. The transaction limits on all the services (for the business) is set to the maximum allowable by the bank. The permissions and transaction limits for the business authorized person is set to the maximum allowable by the bank (based on the default role). The authorized person can add business users who can access or transact over the company accounts.
- An authorized person cannot attempt to enroll a business more than once. Other business users cannot enroll for business banking.
Customer Centric Enrollment
The application has the capability to integrate with customer-centric core in Infinity Transact and allows for virtual business entities to be created by aggregating a set of customer IDs. Before enrolling, the authorized person must make sure that the company related details are already available in the core banking system to enable smooth verification of details during the enrollment process.
To enroll for business banking, follow these steps:
- On the sign in screen, click Enroll.
- On the Select an enrollment option screen, click Business Banking.

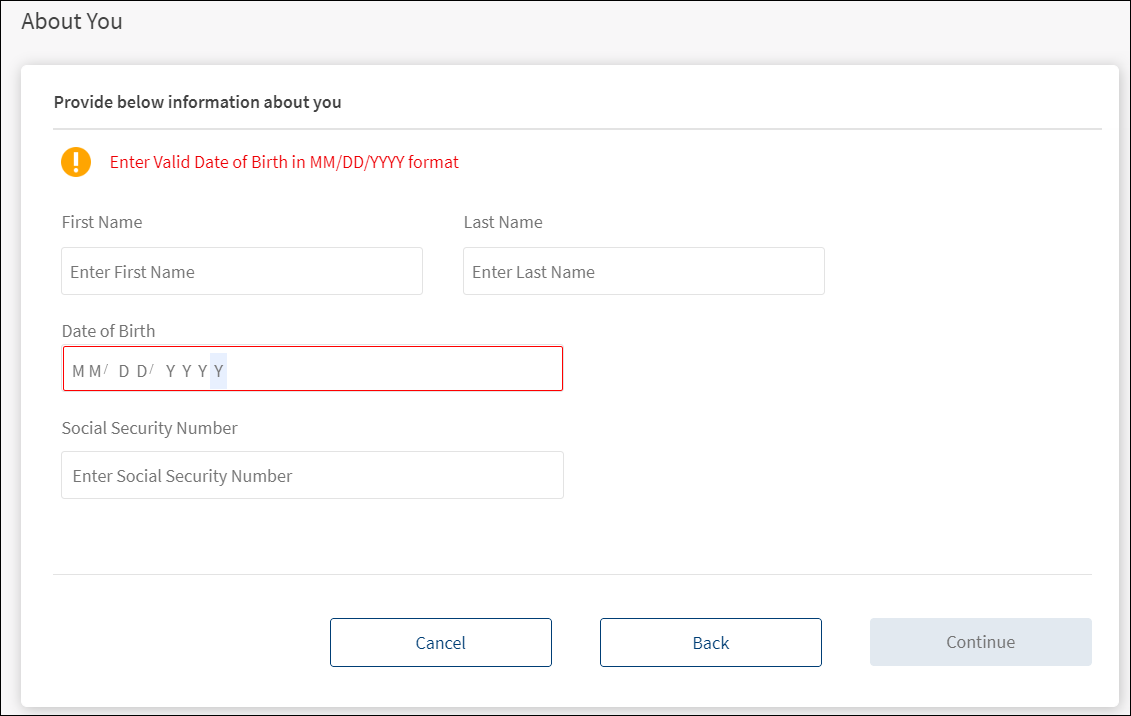
- Enter the following details as a proof of identification. Make sure that you enter valid data. All fields are mandatory.
- Enter the first name.
- Enter the last name.
- Enter your date of birth in MM/DD/YYYY format.
- Enter your nine-digit Social Security Number (SSN)/National Identification Number.
- Click Continue. The Continue button is enabled only if all valid details are entered.

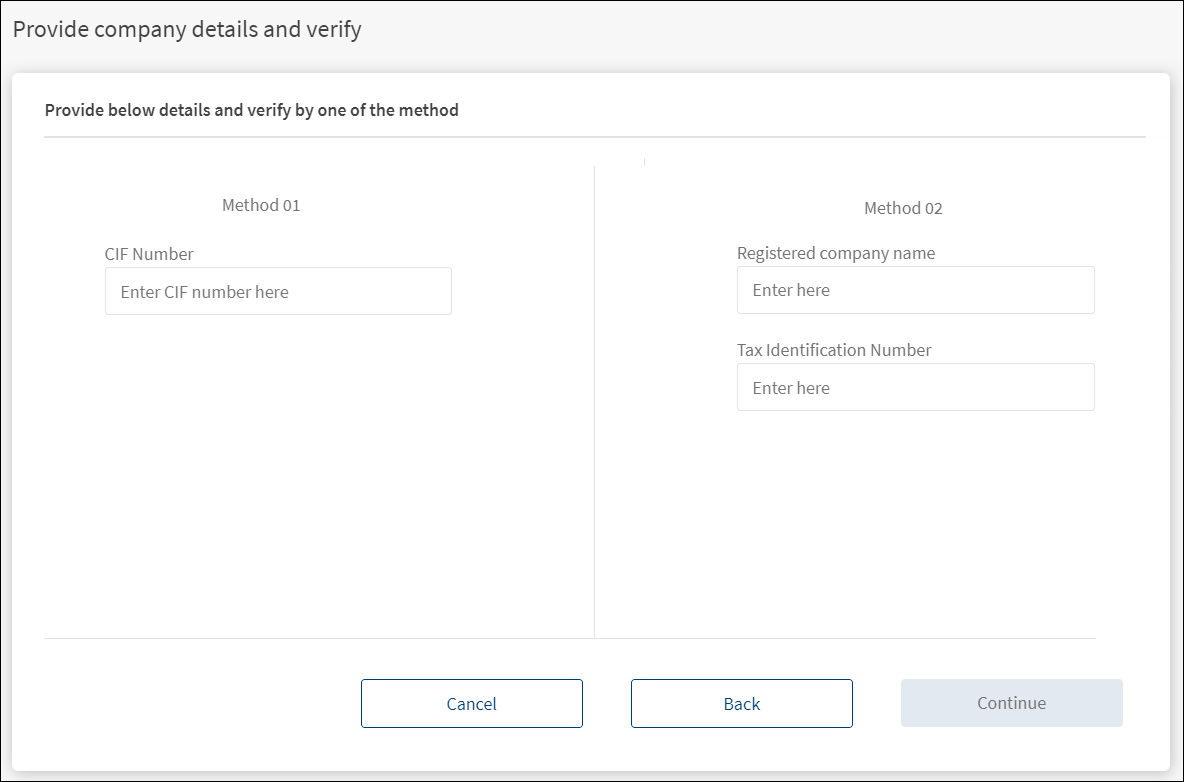
- The application displays the screen to enter the company details and verify. All fields are mandatory.
- Follow any one of the following methods:
- Method 01: Enter the customer information file (CIF) number.
- Method 02: Enter the registered company name and tax identification number.
- Click Continue. The Continue button is enabled only if the required values are entered.
- Follow any one of the following methods:
- The application verifies the information with the information stored in the core banking system (Infinity Transact) to ensure the following:
- A business customer is already created and set up.
- The person who is trying to enroll is an authorized person associated with the business.
- If the details do not match with the records available with the bank, the application displays an appropriate message to contact the bank for assistance in enrolling the business.

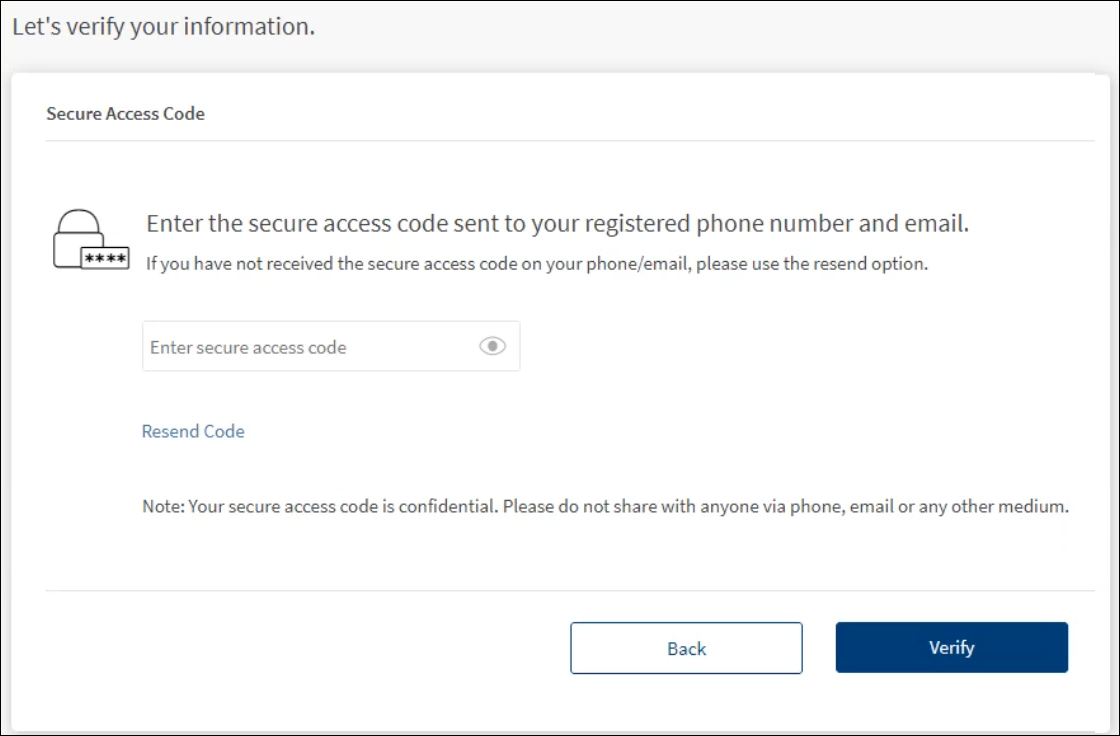
- If the verification is successful, complete the second factor of authentication for security reasons. Do the following:
- The secure access code is sent to your registered phone number and email ID. Enter the secure access code. In case you have not received the OTP, use the Resend Code option to receive the OTP again.
- Click Verify. If the entered code is correct, the application displays the screen to verify the company and business accounts details.

NOTE: If you enter an incorrect OTP or do not provide any OTP response, the application requests you to enter the correct OTP. If you enter an incorrect response more than five times (configurable), the application displays an error message and navigates you back to the Sign In screen. Click Next. The app displays an alert if any information is incorrect and prompts you to enter the correct information.
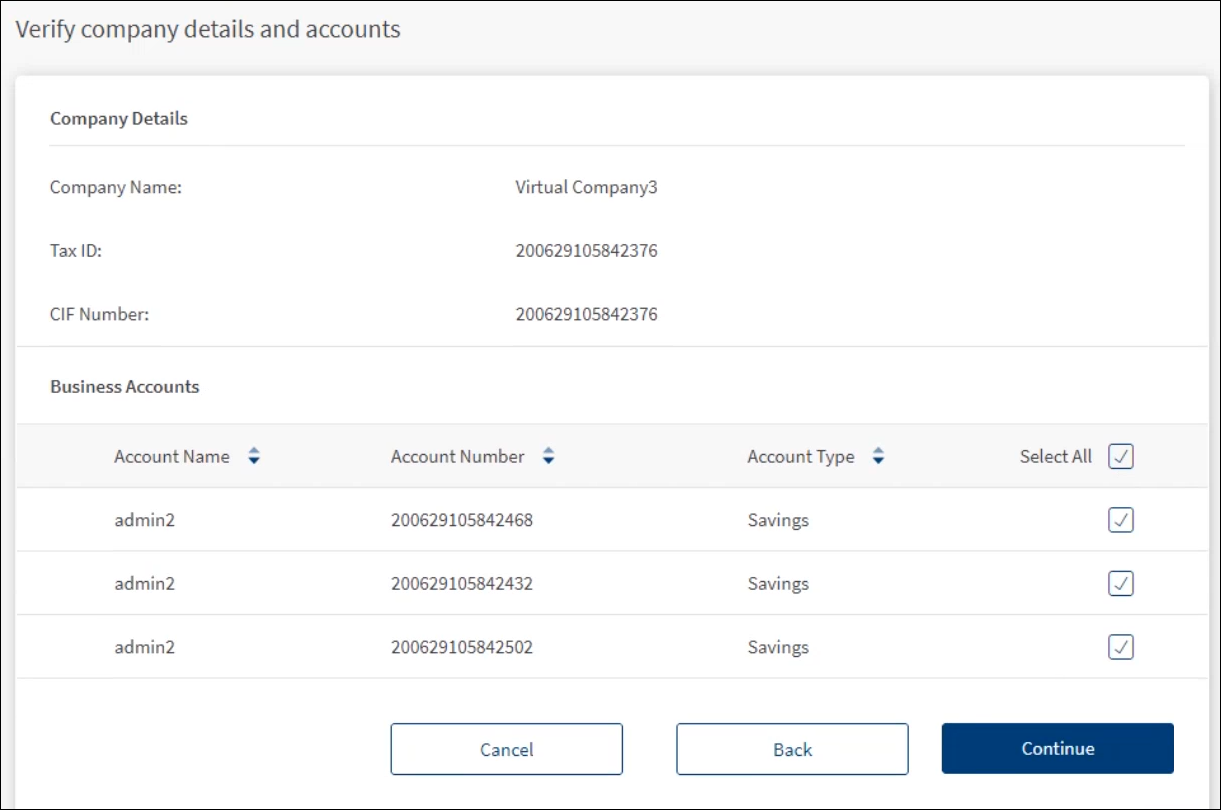
- After the code is successfully verified, the application displays the screen to verify the company and business accounts details.
- Company Details: Company name, Tax ID, and CIF number.
- Business Accounts: The list of applicable business accounts with the company with details such as account name, account number, and account type. Select the required accounts for which you want the online banking facility.
- Click Continue.
- The application provides an option to add another company in the enrollment flow and displays a screen asking if you want to add another company. Adding another company in the enrollment flow allows for an aggregation of multiple companies by which business users can have a combined view of the accounts associated with multiple companies and be able to centrally manage the users, authorizations, and beneficiaries for the two companies.
- Click Yes, if you want to add another company. The application navigates to the company details screen where you will enter the details of the aggregated business entity.
- Click No to continue the enrollment flow.

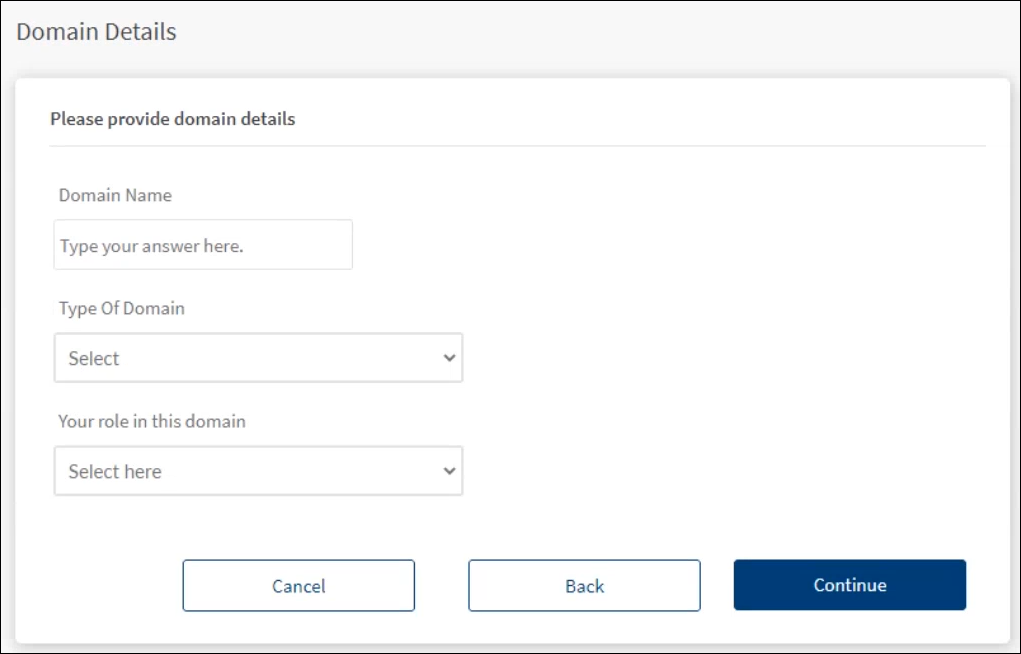
- The application displays the Domain Details screen. Do the following:
- Domain Name: The domain name or the company name is pre-populated in the field, if you have not aggregated multiple companies. If you are enrolling for multiple businesses, then you must enter the domain name.
- Select the Type of Domain from the list (for example, Sole Proprietor, Trust, Corporation). The domain types are configurable.
- Select your role in the company from the list. The roles are configurable through Spotlight application.
- Click Continue.

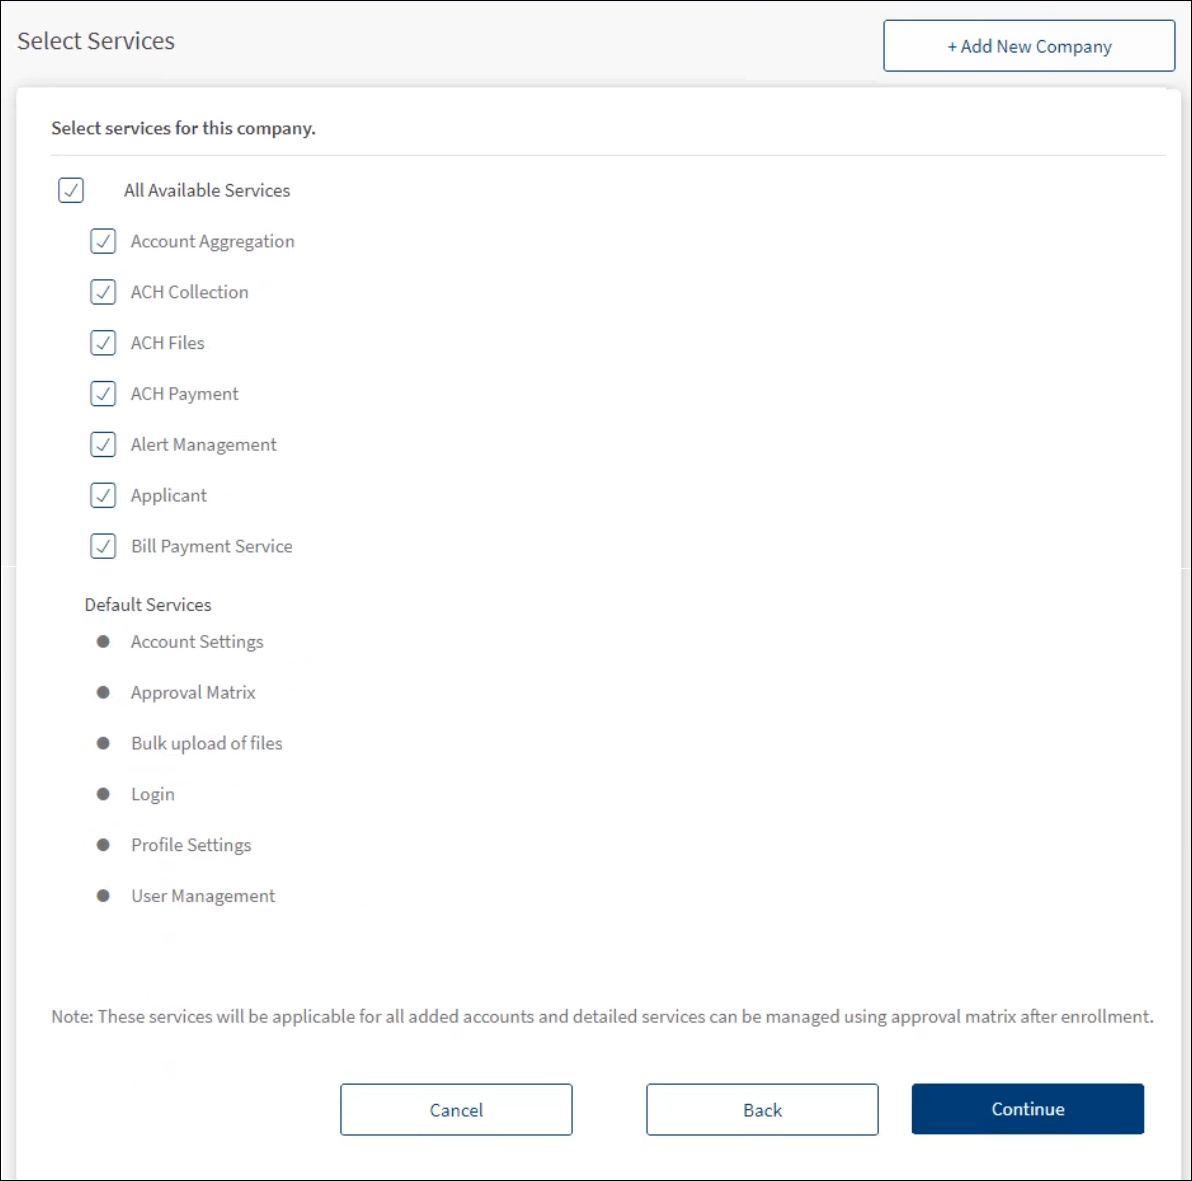
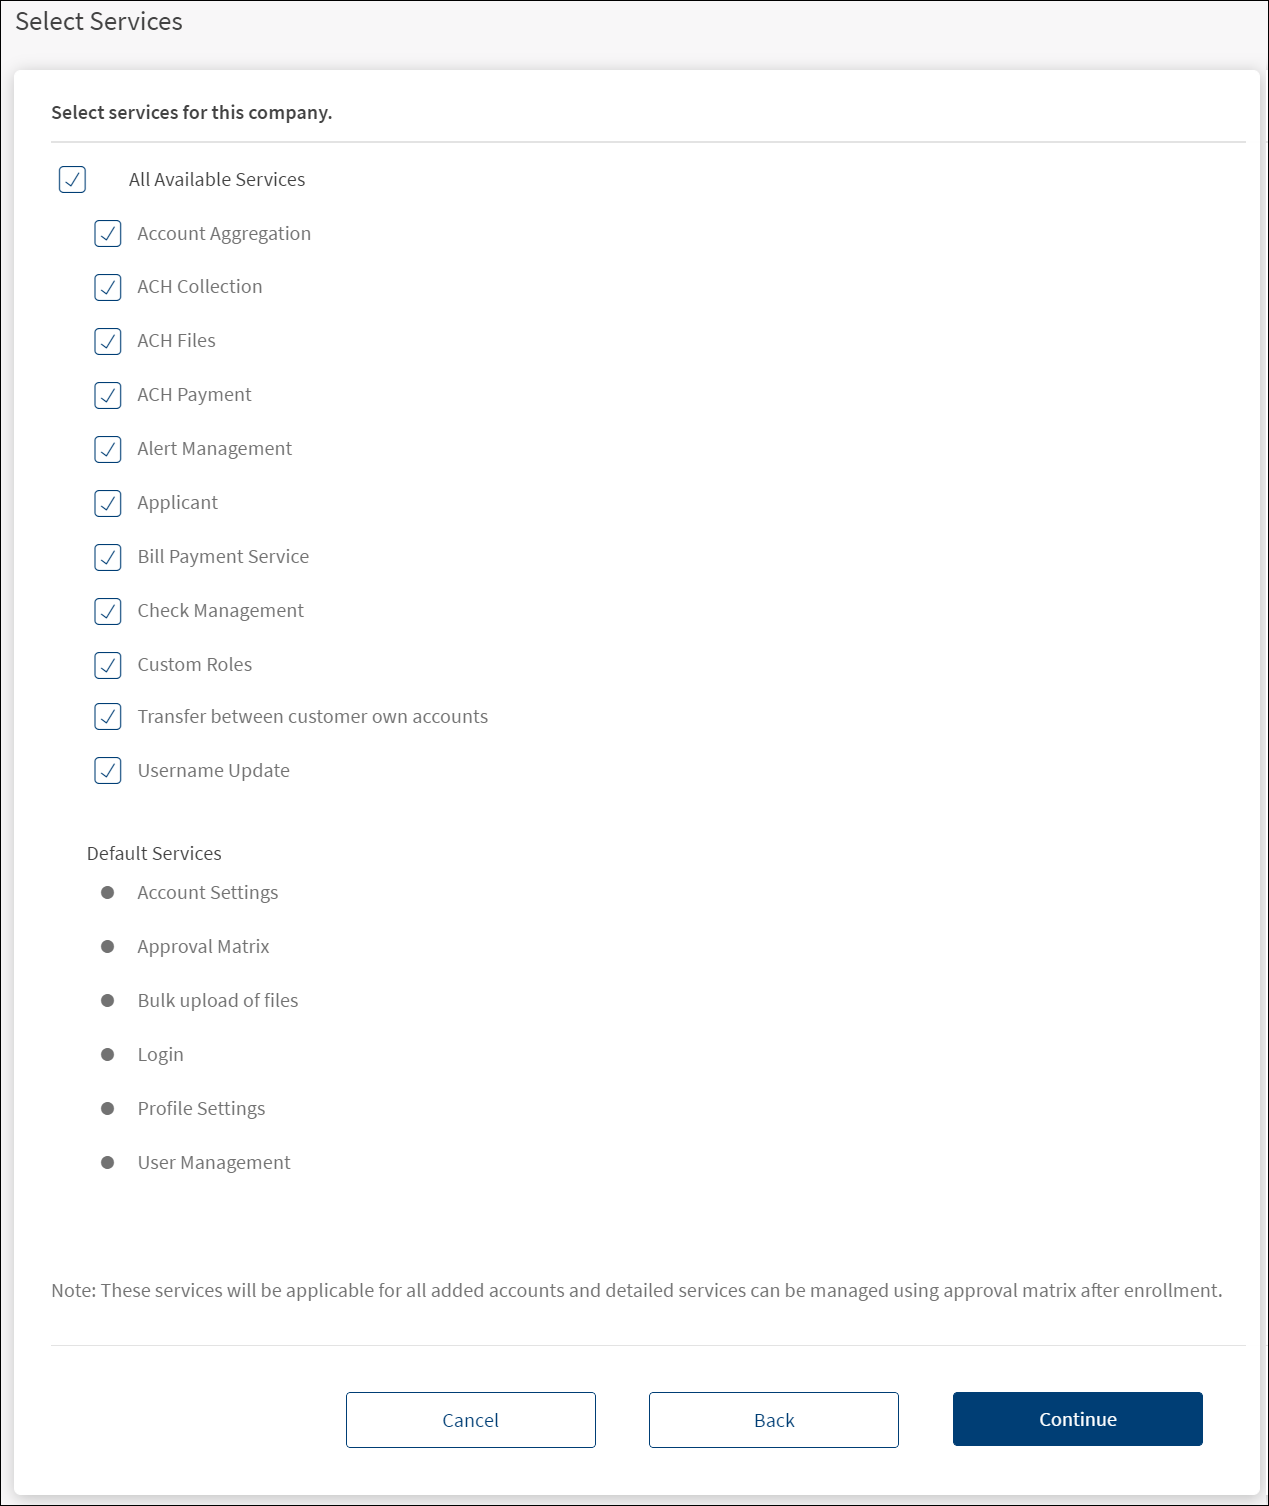
- The application displays the Select Services screen. The services are applicable to all the added accounts.
- All Available Services: Clear or select the required services from the list of available services as required. By default, all the services are selected.
- Default Services: The list of default or mandatory services that are available to all businesses enrolling for online banking access and are applicable to all selected accounts.
- Add New Company: Click to add a new company.
- Click Continue.

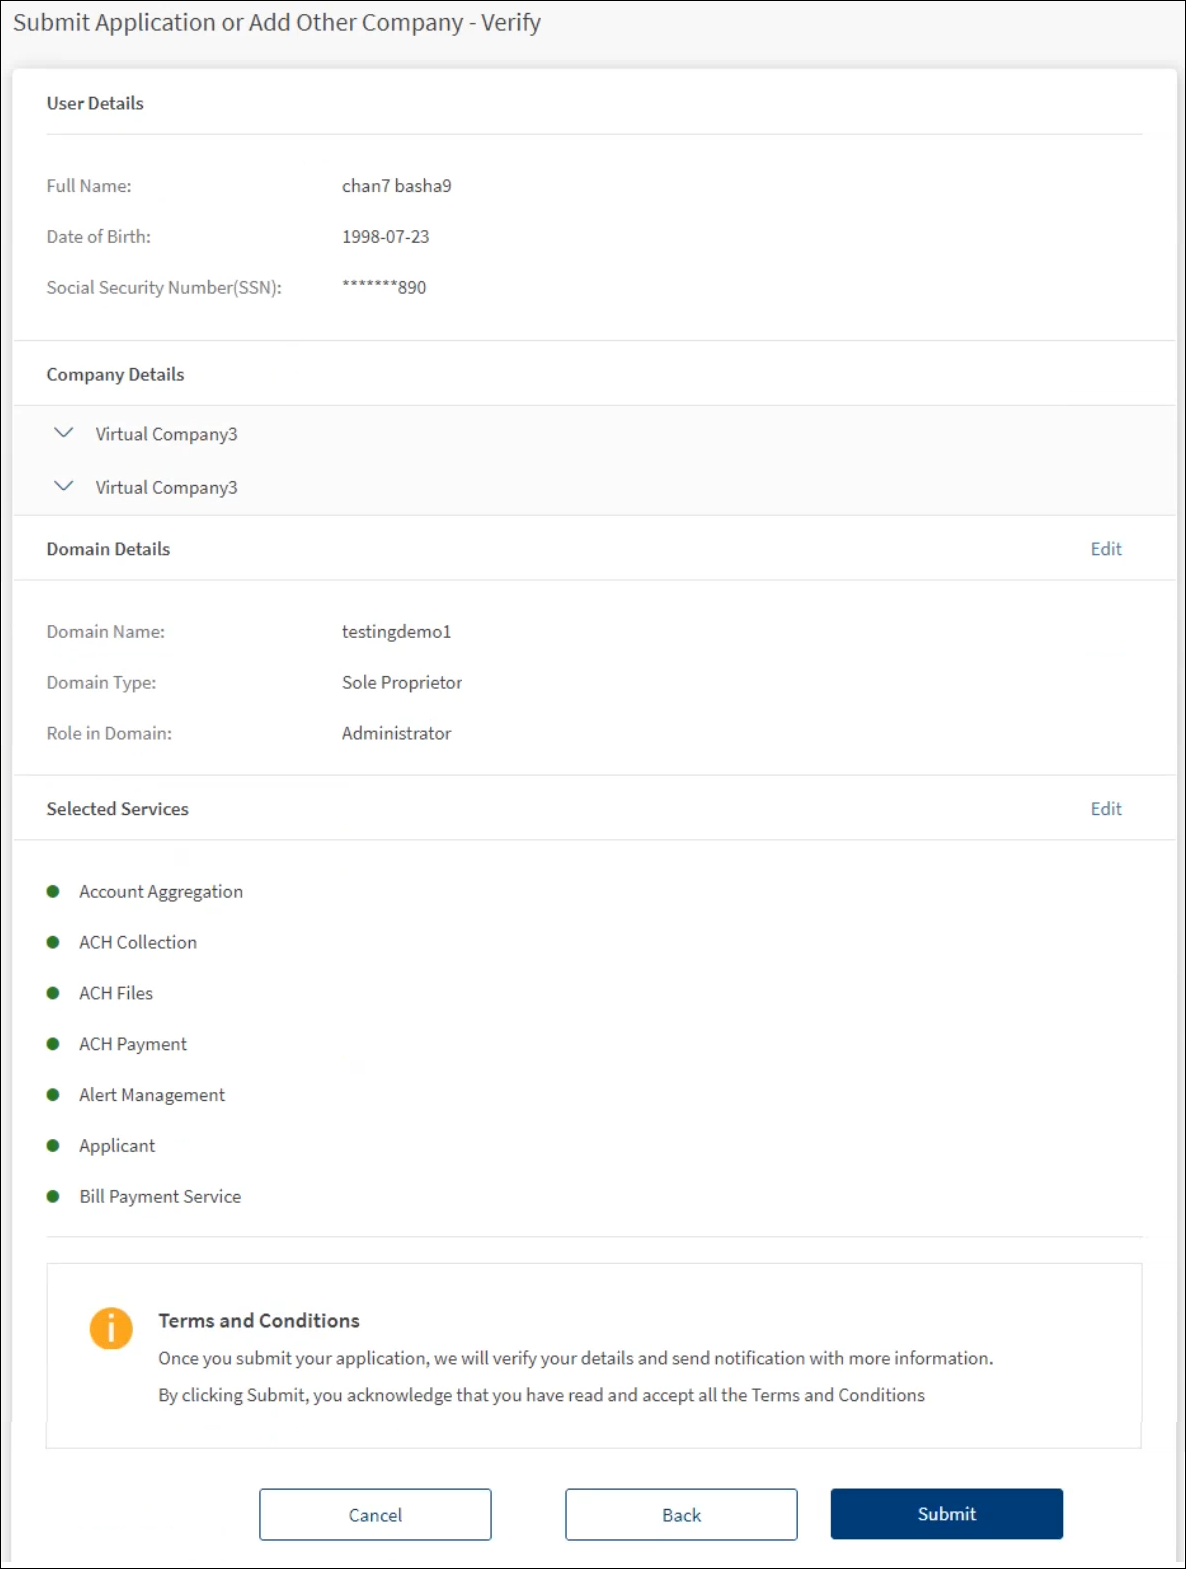
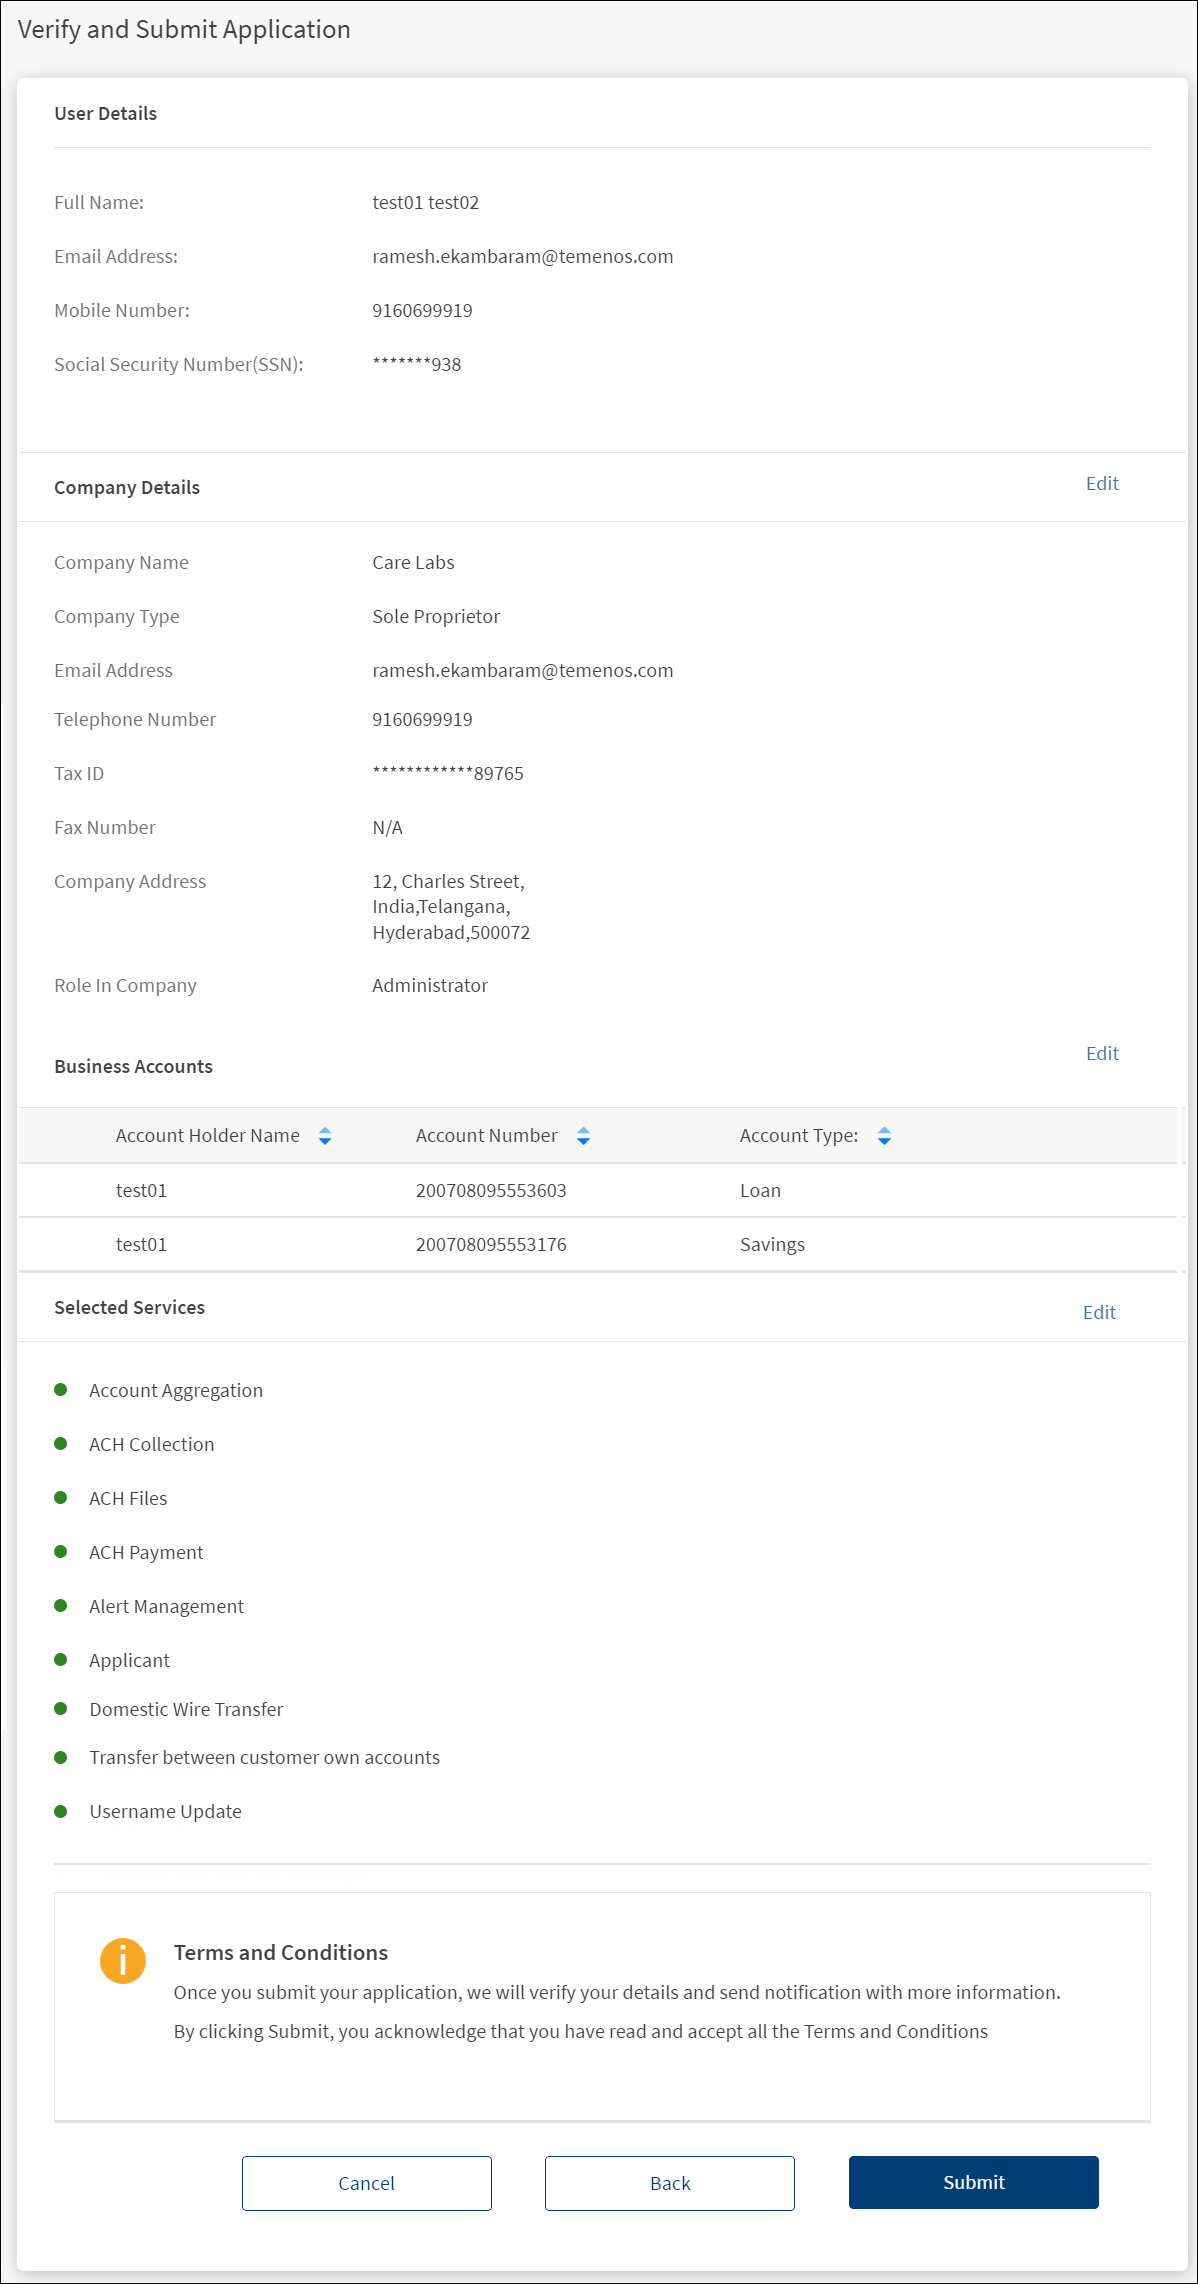
- The application displays the submit application screen where you can review the details that you have entered so far.
- User Details: Displays the full name, date of birth, and the social security number.
- Company Details: Click the down arrow to view the company details.
- Domain Details: Click Edit to modify the details as required.
- Selected Services: Click Edit to modify the details as required.
- Click Submit. By submitting the application, it is understood that the user has read and accepts all the terms and condition.
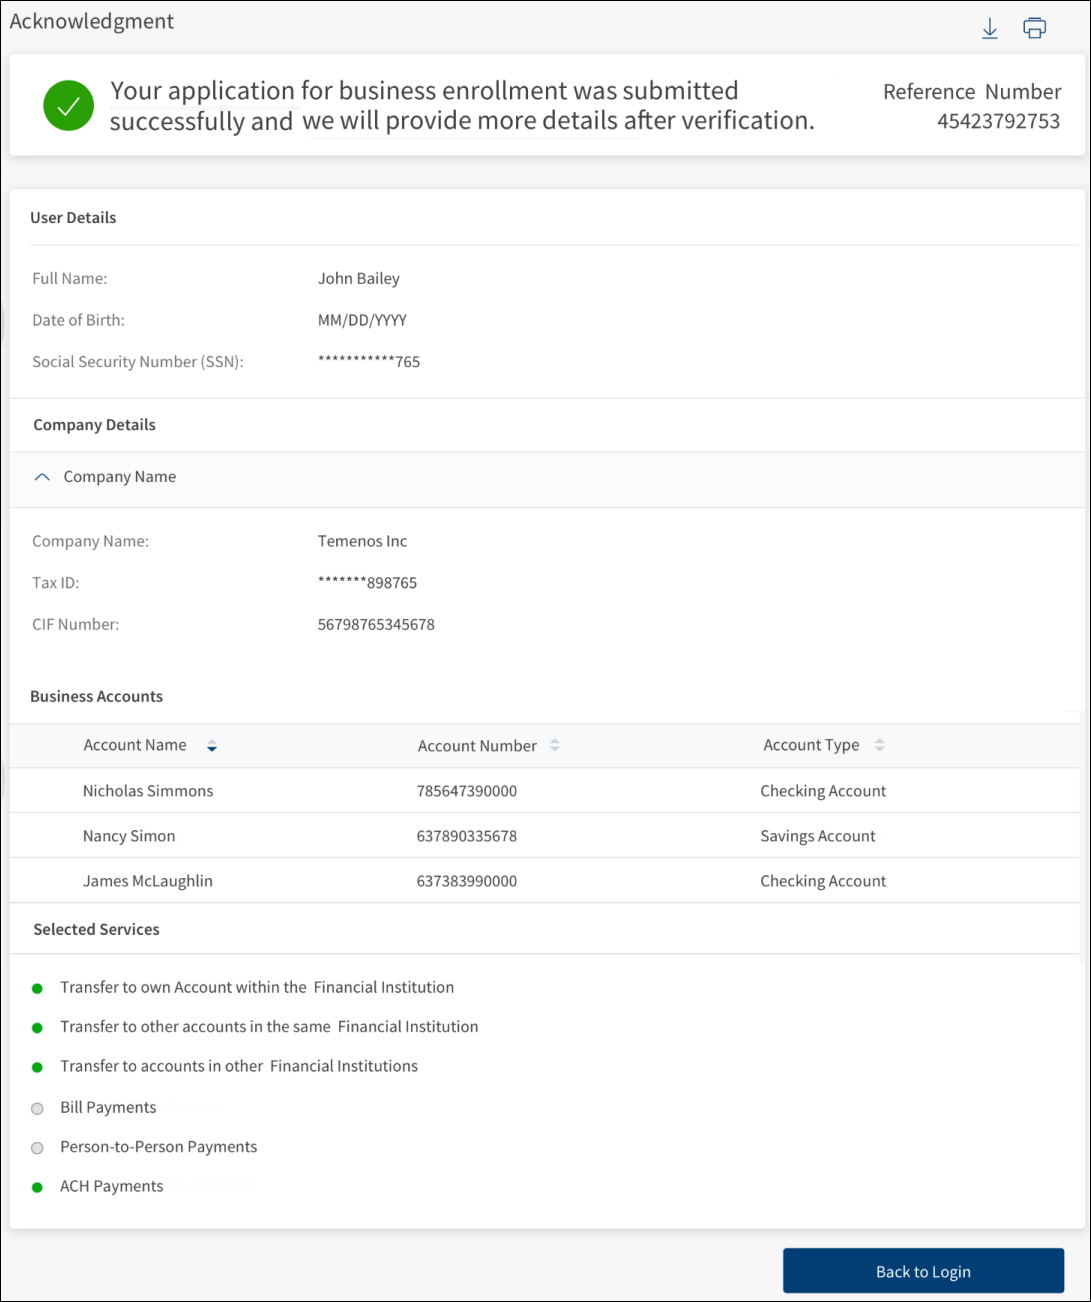
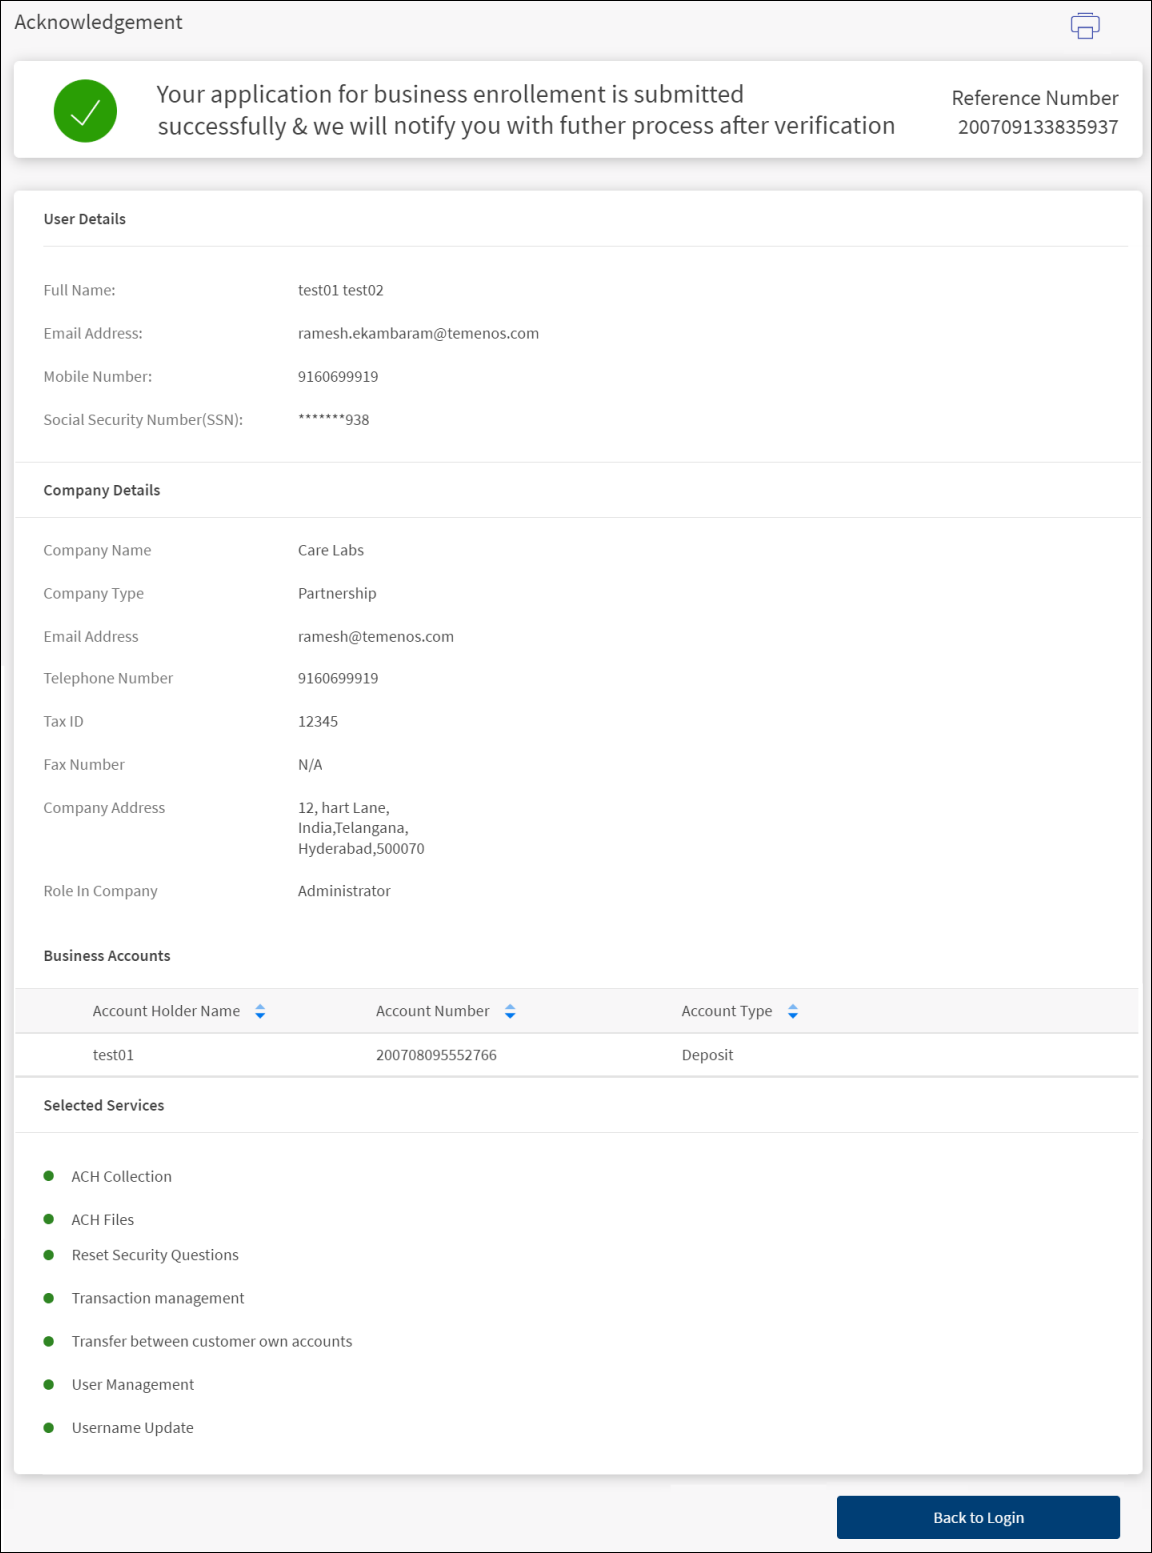
- The application displays an acknowledgment screen with a unique reference number depending on the auto approval option for business enrollment (approval configuration set up in the Spotlight application). Accordingly, an email is triggered to your email address with instructions.
- Acknowledgment message:
- Auto approval: If this method is enabled, the acknowledgment screen shows the message, "Your application for enrollment is submitted successfully. You will receive an email with instructions to set up your credentials".
- FI/Bank approved: If this method is enabled, the acknowledgment screen shows the message, "Your application for enrollment is submitted successfully. You will receive an email with further instructions after the verification is complete".
- The following details are displayed on the acknowledgment screen:
- User details
- Company details
- Business accounts
- Selected services
- Click Back to Login to go to the sign in screen.
- Click the download icon to download the acknowledgment screen details.
- Click the print icon to print the acknowledgment screen details.

- Acknowledgment message:
NOTE:
- Enrollments initiated through the online banking application can be self-approved and the user can sign in into the application and use it right after the application process after following the instructions in the email.
- Enrollments initiated through the online banking application can require approval by the FI (maintained in Spotlight) before the user can sign in to the application and start to use it for online transactions.
- In the Spotlight application, if the auto approval option for business enrollment approval is turned on, then the enrollment request is automatically approved, and the user can use the banking application right away. Otherwise, on submitting, the request is sent to the bank and approved by the bank employee in the Spotlight application. After approval, an email is triggered to the user's email address with login information using which, the user can set the password and sign in to the banking application.
Method 1 - Auto-approval
Enrollments initiated through the online banking application are self-approved and the user can sign in to the application and use it right after the enrollment application process.
The following are done after the request is submitted:
- A virtual company is created automatically with the given domain details.
- the CIFs and accounts provided are associated with the virtual company.
- The features selected are enabled and the rest disabled for the virtual company.
- The limits set for each feature for the company are left as the default.
- A default approval matrix is created.
- A user profile for the type - Business User (Authorized Signatory) - is created for the user.
- The details of the user are populated from the authorized signatory details (fetched from the core).
- The user will be assigned the role which is Default for the "Business type" that was set for the company.
- The permissions and limits will be same as what is applied by default for new users.
- The user is given access to all the accounts that are associated with the virtual company.
- There will be no user name and password set for the profile yet.
- The profile status will be "New".
- The application displays an acknowledgment page informing the user that the process is completed.
- The user is sent an email with a link to the application that allows the user to complete the process by setting up the user name and password (see mail responses).
- This page is same as that which exists for the Retail User enrollment.
- The user can select a user name and if the user name is available it is indicated to the user.
- The password needs to be entered twice and must match.
- The password rules apply.
- After the user name and password has been set, the user can sign in to the application and start transacting online.
- Apart from the user who enrolled, the application sends an email to all the authorized persons on the CIFs (customer centric) or Joint account holders (user centric) that have been enrolled. This is to inform them that their accounts have been set up for online banking (see mail responses).
Method 2 - FI approved
Enrollments initiated through the online banking application require approval by the financial institution (FI) before the user can sign in to the application and start to use it for online transactions.
The following are done after the request is submitted:
- A request is created and submitted to the FI. The request contains the following details:
- User who enrolled
- Domain
- Associated CIFs and accounts
- Services selected
- The request is shown in the Spotlight application as pending approval/rejection.
- The application sends an email to all the authorized persons on the CIFs (customer centric) or Joint account holders (user centric) that have been enrolled including the person who has done the enrollment. This is to inform them that a request has been raised for enrolling into the online banking services (see mail responses).
- The application displays an acknowledgment page informing the user that a request has been raised for enrolling into the online banking services.
- For auto approval: Enrollments initiated through the online banking application are self-approved and the user can sign in to the application and use it right after the application process. The application sends an account activation email with a link to the application that allows the user to complete the process by setting up the user name and password. The application follows up with a confirmation email to all the authorized persons on the CIFs that have been enrolled including the user who enrolled. This is to inform them that their accounts have been set up for online banking.
- For FI/Bank approved: Enrollments initiated through the online banking application require approval by the FI/bank before the user can sign in to the application and start using for online transactions. The application sends an email to all the authorized persons on the CIFs that have been enrolled including the user who enrolled. This is to inform them that a request has been raised for enrolling into the online banking services. After approval, the application sends an email to all the authorized persons on the CIFs that have been enrolled. This is to inform them that their accounts have been set up for online banking.
- For enrollment rejection: The application sends an email to all the authorized persons on the CIFs that have been enrolled including the user who enrolled. This is to inform them that the request that has been raised for enrolling into the online banking services has been rejected.
Accounts Centric Enrollment
The application has the capability to allow for virtual business entities to be created by aggregating a set of account numbers. Before enrolling, the authorized person must make sure that the accounts numbers and account owner details are already available in the core banking system to enable smooth verification of details during the enrollment process.
To enroll for online business banking, follow these steps:
- On the sign in screen, click Enroll.
- On the Select an enrollment option screen, click Business Banking.

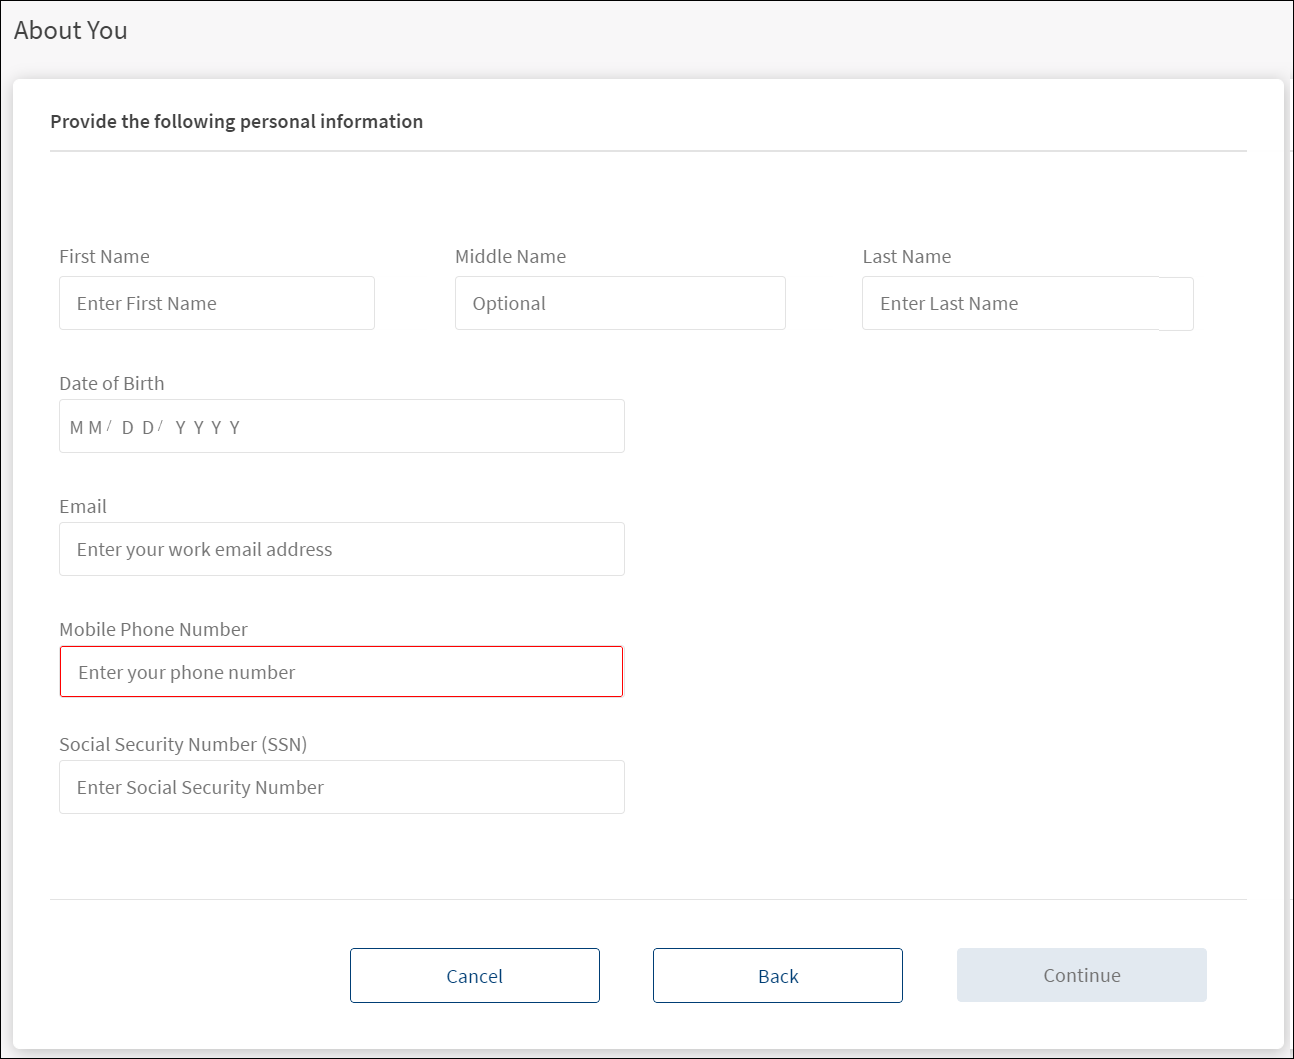
- Enter the following details as a proof of identification. Make sure that you enter valid data because the application will verify the details that you enter here with the details available in the core banking system. All fields are mandatory.
- First Name
- Middle Name. It is optional.
- Last Name.
- Enter your date of birth in MM/DD/YYYY format.
- Email address.
- Mobile Phone Number.
- Enter your nine-digit Social Security Number (SSN)/National Identification Number.
- Click Continue. The Continue button is enabled only if all valid details are entered.

- The application displays the screen to enter the company details. All fields are mandatory.
- Company Name
- Type of Organization. Select the type of organization you are enrolling from the list. The list items are fetched from the Spotlight application. The options are:
- Your Role in the Company. Select from the list. The list items are fetched from the Spotlight application.
- Email Address of the company.
- Telephone Number
- Tax ID
- FAX number. It is optional.
- Company Address with Country, State, City name, and Zip code.
- Click Continue. The Continue button is enabled only if the required values are entered.
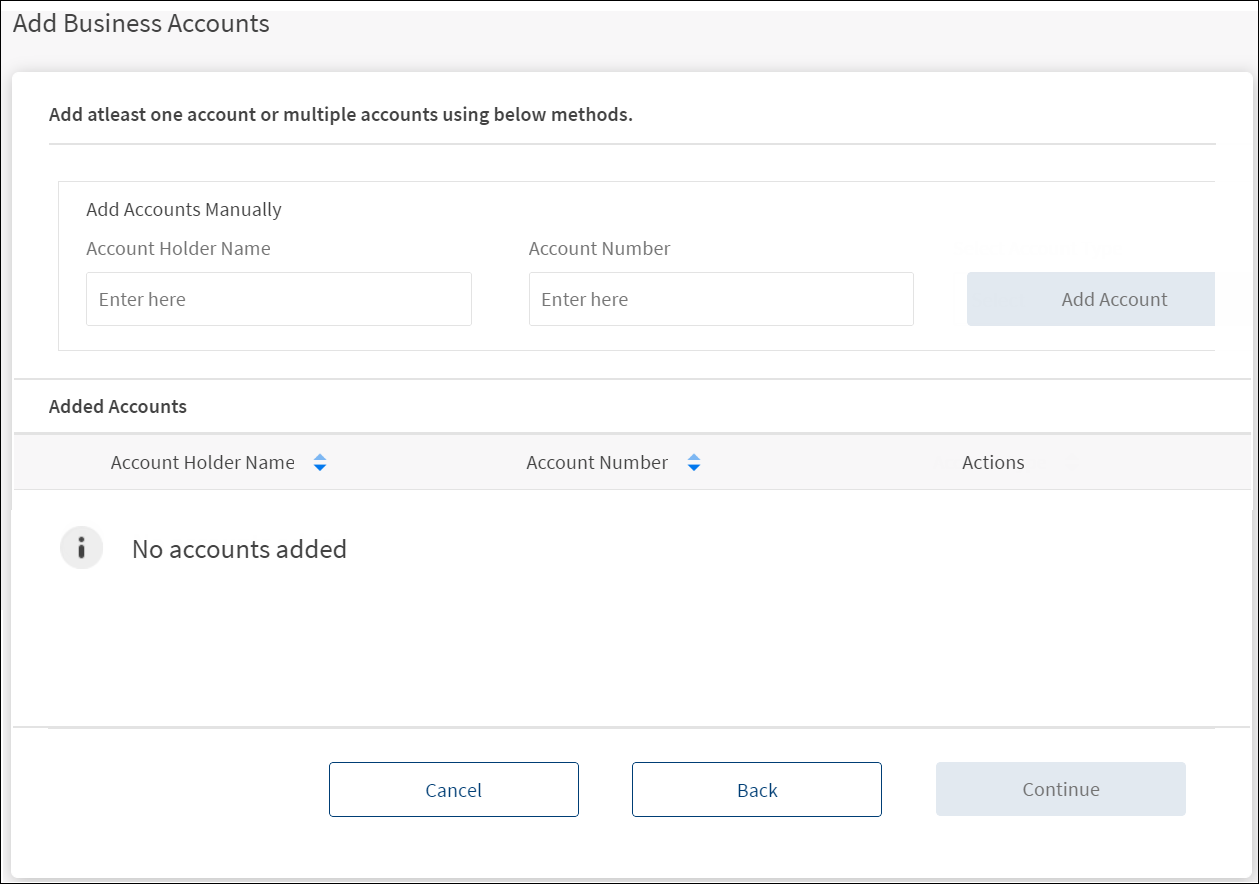
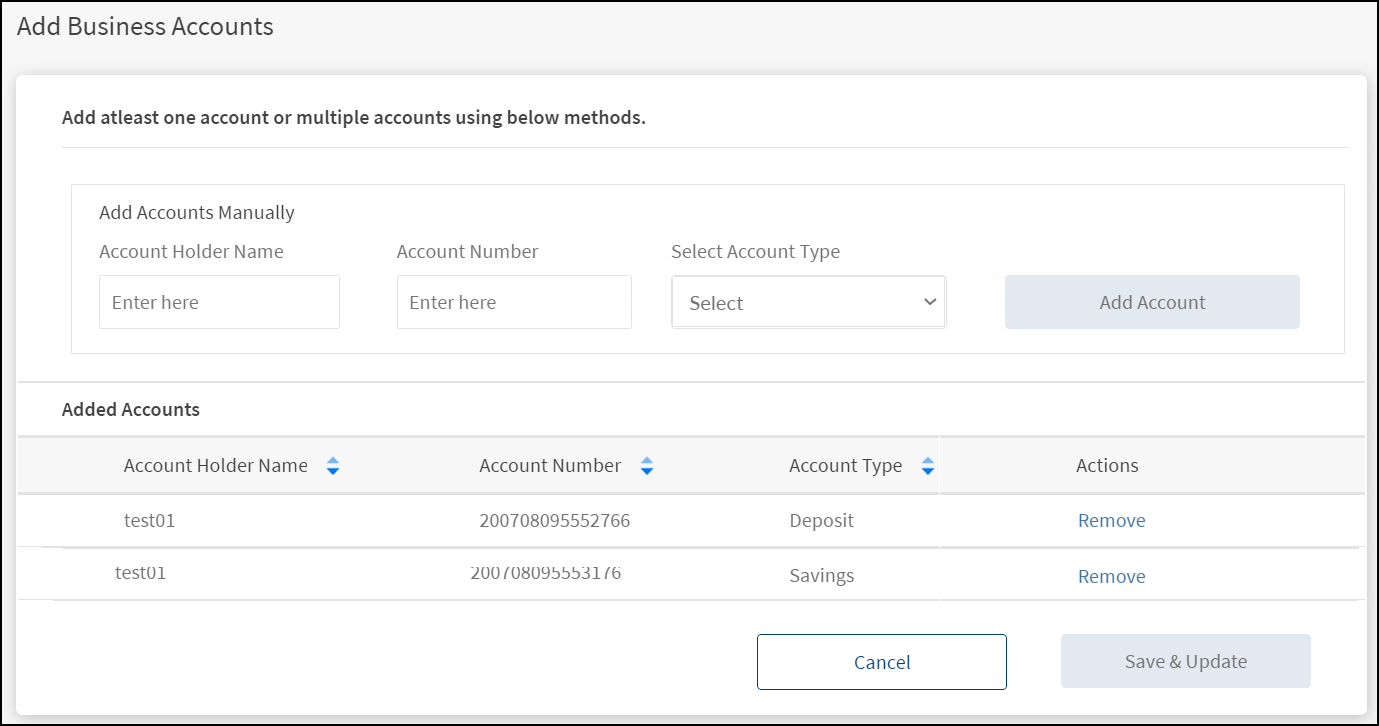
- The application displays the Add Business Accounts screen where you must enter the accounts that are associated with the company.

- Enter the Account Holder name.
- Enter a valid Account Number.
- Click Add Account. The button is enabled only when all the details are entered.
- The application verifies the information with the information stored in the core banking system to ensure the following:
- The account details provided are valid.
- The account holder/joint account holder details (Last Name, Date of Birth, and SSN) are the same as that provided by the user while enrolling.
- If the details do not match with the records available with the bank, the application displays an appropriate message to contact the bank for assistance in enrolling the business.
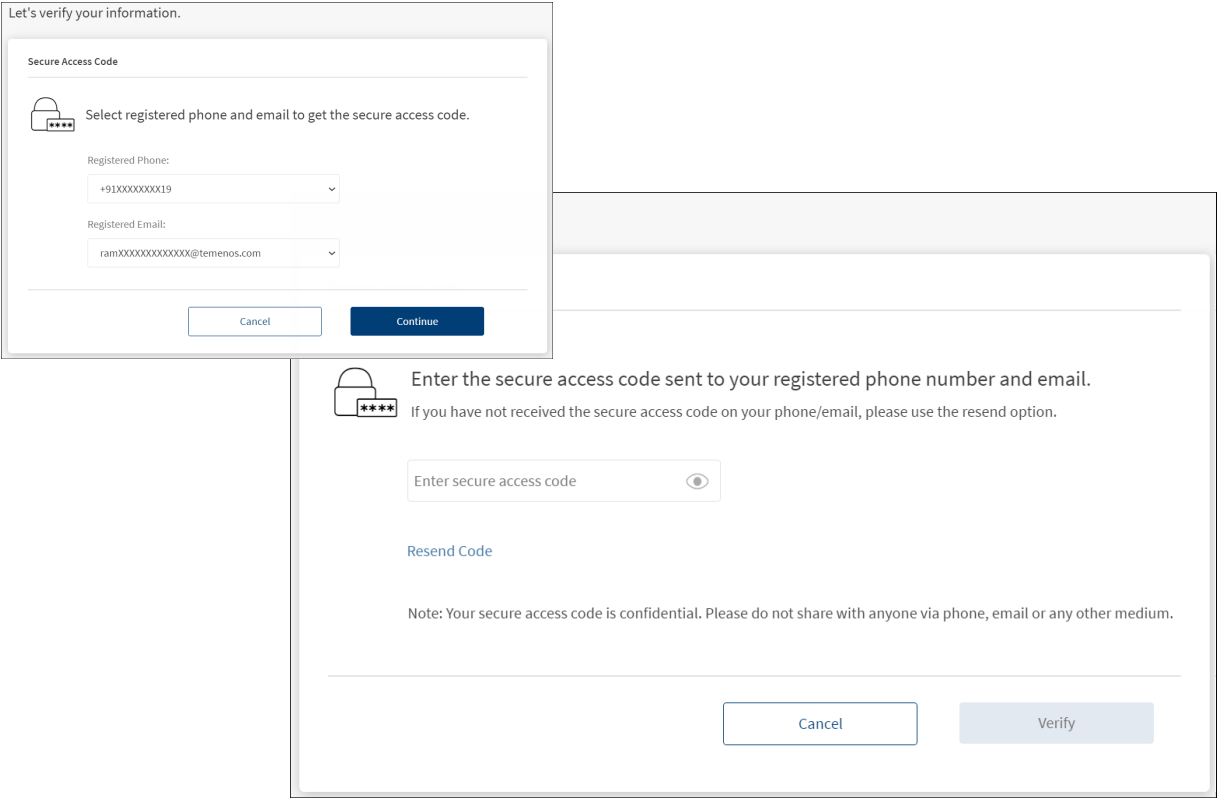
- If the verification is successful, complete the second factor of authentication for security reasons. Do the following:
- The application displays the registered phone and email to send the secure access code for further verification. Click Continue.

- The secure access code is sent to your registered phone number and email ID. Enter the secure access code. In case you have not received the OTP, use the Resend Code option to receive the OTP again.
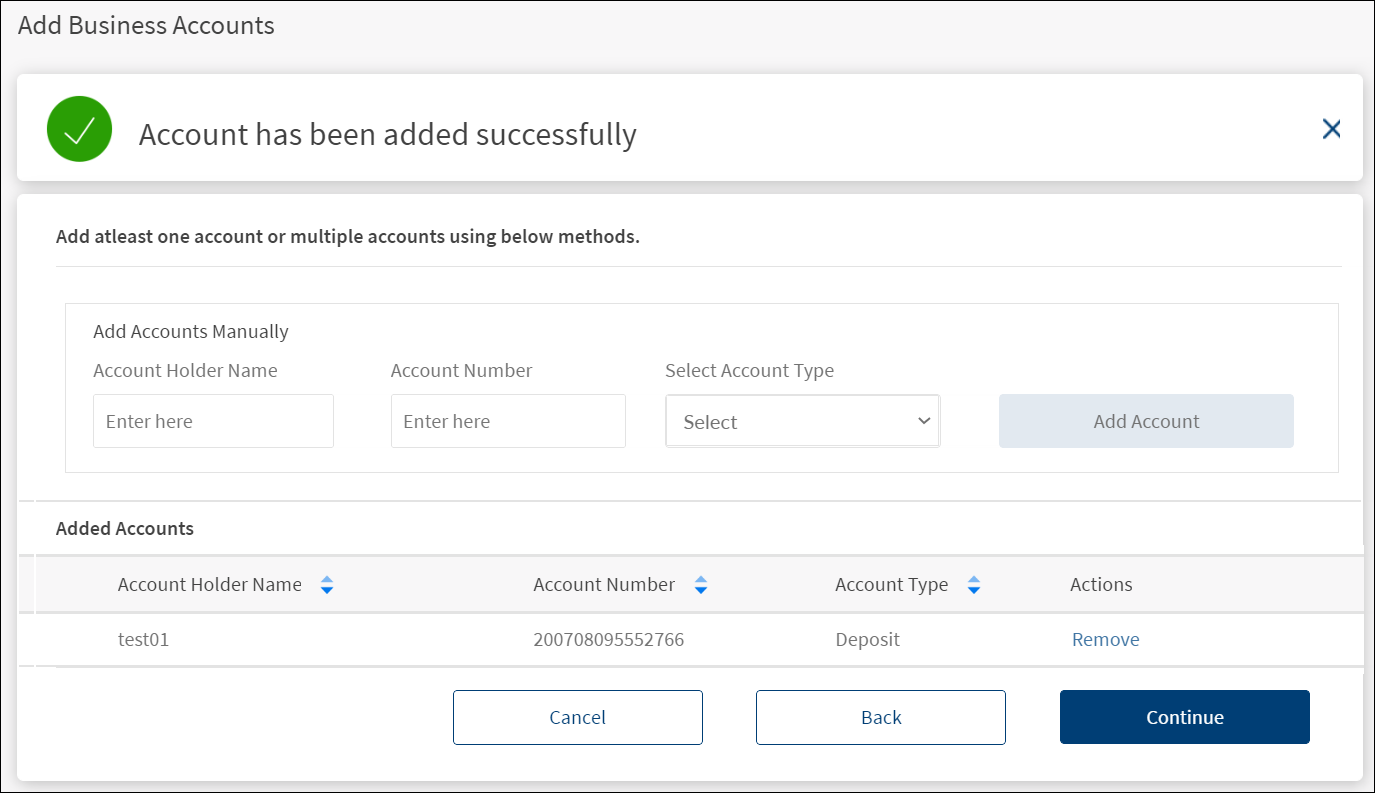
- Click Verify. If the entered code is correct, the application displays a screen that the account has been added successfully.

- The application displays the registered phone and email to send the secure access code for further verification. Click Continue.
- The account is added to the Added Accounts section.
- Repeat the procedure to add as many valid accounts that are associated with the company. For each of the account that is added, follow the verification procedure.
- Use the sort option if required. Click Remove to remove any account from the list.
- After all the accounts have been added, Click Continue.
- The application displays the Select Services screen. The services are applicable to all the added accounts.

- All Available Services: Clear or select the required services from the list of available services as required. By default, all the services are selected.
- Default Services: The list of default or mandatory services that are made available to all businesses enrolling for online banking access and are applicable to all selected accounts.
- Click Continue.
- The application displays the submit application screen where you can review the details that you have entered so far.

- Click the Edit link to modify the following details:
- Company Details
- Business Accounts
- Selected Services

- After modifying the details, click Save & Update.
- Click the Edit link to modify the following details:
- After modifying and verifying the details, click Submit. By submitting the application, it is understood that the user has read and accepts all the terms and condition.
- The application displays an acknowledgment screen with a unique reference number depending on the auto approval option for business enrollment (approval configuration set up in the Spotlight application). Accordingly, an email is triggered to your email address with instructions.
- Acknowledgment message:
- Auto approval: If this method is enabled, the acknowledgment screen shows the message, "Your application for enrollment is submitted successfully. You will receive an email with instructions to set up your credentials".
- FI/Bank approved: If this method is enabled, the acknowledgment screen shows the message, "Your application for enrollment is submitted successfully. You will receive an email with further instructions after the verification is complete".
- The following details are displayed on the acknowledgment screen:
- User details
- Company details
- Business accounts that were added for online banking.
- Selected services
- Click Back to Login to navigate to the sign in screen.
- Click the print icon to print the acknowledgment screen details.

- Acknowledgment message:
NOTE:
- Enrollments initiated through the online banking application can be self-approved and the user can sign in into the application and use it right after the application process after following the instructions in the email.
- Enrollments initiated through the online banking application can require approval by the FI (maintained in Spotlight) before the user can sign in to the application and start to use it for online transactions.
- In the Spotlight application, if the auto approval option for business enrollment approval is turned on, then the enrollment request is automatically approved, and the user can use the banking application right away. Otherwise, on submitting, the request is sent to the bank and approved by the bank employee in the Spotlight application. After approval, an email is triggered to the user's email address with login information using which, the user can set the password and sign in to the banking application.
Method 1 - Auto-approval
Enrollments initiated through the online banking application are self-approved and the user can sign in to the application and use it right after the enrollment application process.
The following are done after the request is submitted:
- A virtual company is created automatically with the given domain details.
- the CIFs and accounts provided are associated with the virtual company.
- The features selected are enabled and the rest disabled for the virtual company.
- The limits set for each feature for the company are left as the default.
- A default approval matrix is created.
- A user profile for the type - Business User (Authorized Signatory) - is created for the user.
- The details of the user are populated from the authorized signatory details (fetched from the core).
- The user will be assigned the role which is Default for the "Business type" that was set for the company.
- The permissions and limits will be same as what is applied by default for new users.
- The user is given access to all the accounts that are associated with the virtual company.
- There will be no user name and password set for the profile yet.
- The profile status will be "New".
- The application displays an acknowledgment page informing the user that the process is completed.
- The user is sent an email with a link to the application that allows the user to complete the process by setting up the user name and password (see mail responses).
- This page is same as that which exists for the Retail User enrollment.
- The user can select a user name and if the user name is available it is indicated to the user.
- The password needs to be entered twice and must match.
- The password rules apply.
- After the user name and password has been set, the user can sign in to the application and start transacting online.
- Apart from the user who enrolled, the application sends an email to all the authorized persons on the CIFs (customer centric) or Joint account holders (user centric) that have been enrolled. This is to inform them that their accounts have been set up for online banking (see mail responses).
Method 2 - FI approved
Enrollments initiated through the online banking application require approval by the financial institution (FI) before the user can sign in to the application and start to use it for online transactions.
The following are done after the request is submitted:
- A request is created and submitted to the FI. The request contains the following details:
- User who enrolled
- Domain
- Associated CIFs and accounts
- Services selected
- The request is shown in the Spotlight application as pending approval/rejection.
- The application sends an email to all the authorized persons on the CIFs (customer centric) or Joint account holders (user centric) that have been enrolled including the person who has done the enrollment. This is to inform them that a request has been raised for enrolling into the online banking services (see mail responses).
- The application displays an acknowledgment page informing the user that a request has been raised for enrolling into the online banking services.
- For auto approval: Enrollments initiated through the online banking application are self-approved and the user can sign in to the application and use it right after the application process. The application sends an account activation email with a link to the application that allows the user to complete the process by setting up the user name and password. The application follows up with a confirmation email to all the authorized persons on the CIFs that have been enrolled including the user who enrolled. This is to inform them that their accounts have been set up for online banking.
- For FI/Bank approved: Enrollments initiated through the online banking application require approval by the FI/bank before the user can sign in to the application and start using for online transactions. The application sends an email to all the authorized persons on the CIFs that have been enrolled including the user who enrolled. This is to inform them that a request has been raised for enrolling into the online banking services. After approval, the application sends an email to all the authorized persons on the CIFs that have been enrolled. This is to inform them that their accounts have been set up for online banking. The application sends an account activation email with a link to the application that allows the user to complete the process by setting up the user name and password.
- For enrollment rejection: The application sends an email to all the authorized persons on the CIFs that have been enrolled including the user who enrolled. This is to inform them that the request that has been raised for enrolling into the online banking services has been rejected.
Configuration
Enrolling capability
Providing the enrollment capability to retail and business banking is managed the Spotlight application.
Enrollment status
A user's enrollment status is visible in the Spotlight application. In case the user has not enrolled yet, the bank employee has an option to send an enrollment link to the business user.
Auto approval option
The auto approval option for business enrollment approval is configured in the Spotlight application - Configurations > Business Configurations > Business Banking Configurations.
- Configuration name: Business Enrollment Approvals
- This configuration allows the FI to choose whether they want to auto-approve all business enrollment requests from the business banking application or want to review them before approving them and creating a company.
- The application indicates the current configuration that is enabled.
- The user has only one action, choose whether to enable or disable the approval flow. On selecting the action, the application asks for confirmation to change the approval flow.
- For the out-of-the-box application, the default setting is auto-approval.
Type of Organization
The list items (Sole Proprietor, Partnership, Trust and more) are configurable in the Spotlight application.
Role in Company
The list items (Administrator, Authorizer, and more) are configurable in the Spotlight application.
Configuration to support core type
This is a deployment time configuration maintained in the application table of DBX DB. This configuration allows to switch the core type between Account Centric and Customer Centric flows for business enrollment. Based on the configuration defined, the appropriate fields are available in the Business Enrollment form in the business banking application.
- Database: DBXDB
- Table: application
- Field: isAccountCentricCore
- Value: 1 (default value)
- 1 - Account centric flow
- 0 - Customer centric flow
For the out-of-the-box application, the application maintains both types of sample core data for user experience.

APIs
The following APIs are shipped as part of this feature:
| API | Description |
|---|---|
| AccountType | Fetches the list of account types. |
| checkIfCompanyExists | Checks for authorized signatory and company availability in DBX. |
| createOrganization | Creates an organization in DBX. Additionally, the address, owner, accounts and membership data can also be created. |
| CreateSmallOrganizationEmployeeForAdmin | |
| EditOrganizationEmployeeForAdmin | |
| enrollOrganization | If the business enrollment is auto-approved and virtual company creation is successful, email is triggered to all the authorized signatories associated with the CIF (Customer-centric scenario) and Accounts (Account-centric scenario). |
| fetchAuthorizedSignatories | Fetches authorized signatories of a company. |
| getAccountCentricDetails | |
| getAllAccounts | Fetches all matching accounts based on the search criteria. |
| getAllFeatures | Fetches the list of services/features at the FI Level. |
| getBusinessTypeRoles | |
| getBusinessTypes | Fetches the list of business types. |
| getCompanyAccounts | Fetches the company details and accounts after OTP verification. |
| getCompanyDetails | Fetches the company details for business enrollment from Spotlight. |
| getCustomerTermsAndConditionsPreLogin | |
| getDbxOrganizationDetails | Fetches the Organization details based on ID, email, and name. |
| getDbxOrganizationUsers | Retrieves the details of all the corporate users registered for a DBX organization. |
| getListOfOrganizationsByStatus | Fetches the list of organizations which are pending for approval. |
| getOrganizationAccounts | Retrieves the list of accounts assigned to an organization. |
| getOrganizationAccountsHolderDetails | |
| getOrganizationBusinessTypeSignatories | |
| IsEmailLinkActive | |
| requestEnrollOTP | Initiates the MFA process or fetches additional parameters required to initiate the MFA process. This service is invoked in pre-login flows like password reset and user enrollment. |
| SetOrgEmployeePassword | |
| updateOrganization | Updates the details of an organization. |
| updateOrganizationStatus | Rejects the organizations which are pending for approval. |
| verifyOTPPreLogin | Validates and verifies the OTP passed in from the application for the given pre-login scenario like reset password or user enrollment. |
Add Bookmark
save your best linksView Bookmarks
Visit your best links BACK
BACK


Are you sure you want to log-off?